
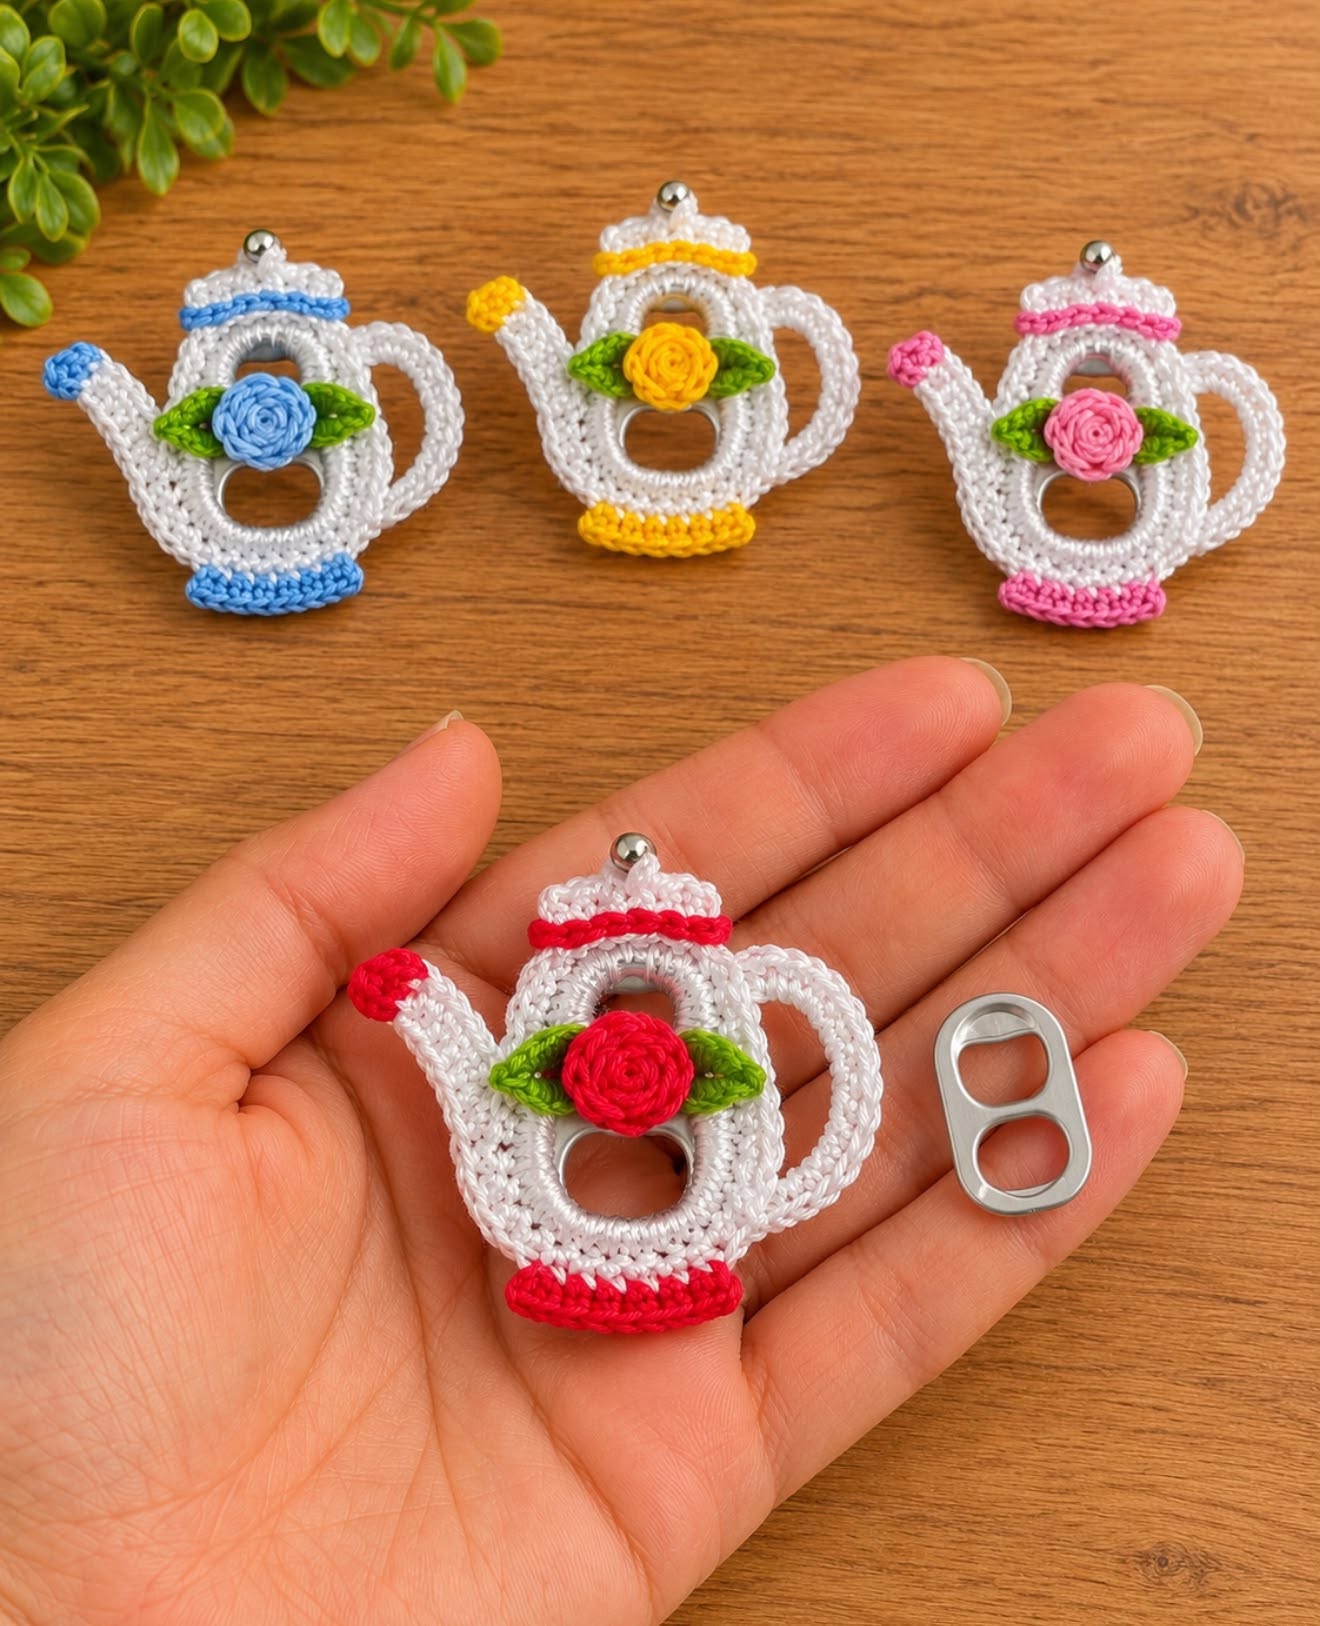
What makes these mini crochet teapots so special is their intricate appearance and surprisingly simple construction. Each tiny teapot features a white crocheted body, a curved spout, an elegant handle, and a beautiful rose surrounded by green leaves. Colorful accents in pink, blue, yellow, or red give every ornament its own personality, making them ideal for handmade gifts, keychains, and decorative collections.
This project is especially appealing to anyone who enjoys miniature crochet patterns, recycled crafts, and vintage-inspired decorations. The combination of delicate cotton thread and floral embellishments creates a timeless aesthetic reminiscent of traditional porcelain teapots.
Whether you are making a single ornament or an entire colorful collection, these tiny creations are a delightful way to practice fine crochet techniques while exploring sustainable crafting.
Materials and Preparation for Mini Crochet Teapot Ornaments
Before beginning your crochet teapot ornament, gather the supplies needed to create a sturdy structure and delicate decorative details. Since this project uses fine thread and small components, choosing appropriate materials will help you achieve a polished result.
The teapots shown in the inspiration image feature a central aluminum pull tab covered with crochet stitches. The two openings remain visible, while the surrounding crochet creates the rounded silhouette of a traditional teapot. Additional crocheted pieces form the spout, handle, lid, base, and decorative rose.
Materials needed:
- 1 clean aluminum soda can tab per ornament, preferably with two intact openings
- Size 10 crochet cotton thread in white
- Small amounts of cotton thread in blue, pink, yellow, red, and green
- 1.25 mm to 1.75 mm steel crochet hook, or a size suitable for your thread
- Fine tapestry needle
- Small sharp scissors
- Stitch markers, optional
- Small silver beads for the lid decorations
- Jewelry jump rings or keychain attachments, optional
- Needle-nose pliers for jewelry assembly
For the best results, choose tightly twisted cotton thread. Cotton holds its shape beautifully and produces defined stitches, which is particularly important when crocheting miniature decorations.
The finished size will depend on your soda tab, yarn thickness, and crochet tension. Using an average pull tab measuring approximately 3 cm, a completed ornament may measure about 5–6 cm tall and 5–6 cm wide, including the handle and spout.
The pattern below is an original, adaptable interpretation of the pictured design rather than an exact stitch-by-stitch reproduction. Small adjustments may be needed to fit your particular pull tabs.
Crochet Abbreviations (US Terms)
- ch: Chain
- sc: Single crochet
- hdc: Half double crochet
- dc: Double crochet
- sl st: Slip stitch
- st(s): Stitch(es)
- inc: Increase, working two stitches into one stitch
- FO: Fasten off
- MR: Magic ring
Use a consistent tension throughout the project. Small stitches will help the crochet cover the metal edges completely and make your ornament more durable.
Step-by-Step Crochet Mini Teapot Body and Structure
Creating the main teapot structure is the most important part of this project. The aluminum tab acts as the foundation, while rows of white crochet build the decorative body around its openings.
Step 1: Prepare the aluminum soda tab
Wash the soda tab thoroughly with warm water and soap. Allow it to dry completely before beginning.
Inspect the tab carefully for sharp edges or damaged sections. Use only smooth, undamaged tabs, and handle the metal carefully during construction.
Position the tab vertically with one opening above the other. This orientation creates the distinctive silhouette of the miniature teapot.
Step 2: Crochet around the tab
Attach the white cotton thread to the outer edge of the aluminum tab using a slip knot and a securing single crochet.
Work closely spaced single crochet stitches around the outer perimeter, covering the exposed metal wherever the hook can pass safely.
Add enough stitches to conceal the edge without creating excessive ruffling. Depending on the size of your tab and thread, you may need approximately 35–50 stitches.
Join with a slip stitch to complete the first round.
Step 3: Shape the decorative teapot body
Continue working around the covered tab with white thread.
On the lower half, use a combination of single crochet and half double crochet stitches to create a fuller, gently rounded shape.
Where needed, work increases along the lower sides to produce a slightly wider teapot body. Keep the upper section narrower to suggest the shoulders of the teapot.
Try to preserve the two visible openings, since these give the finished ornament its delicate, openwork appearance.
Step 4: Create the curved spout
Attach the white thread to the upper-left side of the teapot.
Chain 10–13 stitches, depending on the size of your ornament. Work back along the chain with single crochet stitches, gradually shaping the strip into a narrow spout.
For a thicker spout, crochet a second row of single crochet stitches. Shape the final stitches upward to create the recognizable pouring tip.
Sew the lower portion securely to the left side of the teapot. If necessary, add small invisible stitches to keep the spout curved.
Step 5: Crochet the rounded handle
Attach white thread to the upper-right side of the teapot.
Chain approximately 15–19 stitches, forming a curved loop that extends outward from the main body.
Attach the final chain to the lower-right edge with a slip stitch.
Work single crochet stitches back along the chain to strengthen the handle. For a fuller appearance, add another row of tightly worked stitches.
The handle should form a smooth, rounded arch similar to the handle of a miniature porcelain teapot.
Step 6: Make the decorative lid
Using white thread, chain 11 stitches.
Beginning in the second chain from the hook, work one single crochet in each chain across.
Turn, chain one, and work another row, adding a small increase near the center if you want a gently curved top.
Fasten off and sew the piece along the top edge of the teapot.
Attach a small silver bead at the center of the lid, ensuring it is firmly secured. If you prefer an entirely crocheted ornament, substitute a tiny yarn bobble.
How to Crochet the Miniature Rose, Leaves, and Colorful Details
The beautiful floral embellishment is what gives these crochet teapot ornaments their distinctive vintage charm. A tightly rolled rose, surrounded by two pointed green leaves, creates an elegant centerpiece that can be customized in many colors.
Step 1: Crochet the small rose
Choose your favorite accent color, such as soft pink, bright red, golden yellow, or sky blue.
Chain 21 stitches.
Beginning in the second chain from the hook, work one single crochet. In the next stitch, work three double crochet stitches to form a small petal.
Continue along the foundation chain, alternating slip stitches and groups of three double crochet stitches to create a gently scalloped strip.
The strip will naturally begin to curl as the petals form. Fasten off, leaving a long tail for sewing.
Step 2: Roll the rose into shape
Starting at one end of the crocheted strip, roll it tightly to create the center of the rose.
Gradually wrap the remaining petals around the center, allowing the outer petals to sit slightly looser.
Use the long yarn tail to sew through the base of the flower several times.
Keep the front of the rose rounded and full, with the spiral of petals clearly visible.
Step 3: Crochet the pointed leaves
With green cotton thread, chain seven stitches.
Beginning in the second chain from the hook, work one slip stitch, one single crochet, one half double crochet, one double crochet, one half double crochet, and one single crochet.
Continue around the opposite side of the foundation chain, mirroring the stitches to form a pointed oval leaf.
Join with a slip stitch and fasten off, leaving a tail for sewing.
Repeat to create a second leaf.
Step 4: Assemble the floral decoration
Position one green leaf on each side of the center of the teapot.
Sew the leaves securely over the white crocheted body, keeping their pointed ends facing outward.
Place the rolled rose between the two leaves, slightly overlapping their inner edges.
Secure the rose with several stitches through its base. This creates the delicate floral arrangement seen on the miniature teapots.
Step 5: Add colorful details
Choose an accent color matching the rose.
Crochet a short strip of single crochet stitches to fit along the lower edge of the teapot, creating a decorative pedestal or base.
Sew the strip into position, allowing it to extend slightly beyond the white body.
For the lid trim, work a chain long enough to cross the upper front edge. Attach it just below the white crocheted lid.
Finally, add a tiny accent to the end of the spout using several closely worked stitches in the matching color.
Step 6: Finish the ornament
Weave in all remaining thread ends with a fine tapestry needle.
Check that the rose, leaves, handle, spout, and decorative pieces are firmly attached.
Gently shape the teapot with your fingers, adjusting the curves until the silhouette looks balanced.
If desired, sew a small thread loop behind the lid for hanging the ornament. You can also attach a keychain ring to a reinforced crochet loop.
Creative Ideas, Finishing Tips, and Uses for Crochet Teapot Ornaments
One of the loveliest aspects of this mini teapot crochet pattern is the opportunity to explore different color combinations. A collection of miniature teapots can be coordinated to match seasonal decorations, personal preferences, or a particular handmade gift theme.
For a classic vintage look, combine a white teapot body with powder blue trim and a blue rose. This palette evokes the appearance of traditional blue-and-white porcelain and works beautifully with cottage-style decorations.
A pink-and-white version offers a softer, romantic appearance. Choose dusty rose, blush pink, or antique pink for an elegant handmade accessory that complements feminine and shabby-chic interiors.
Yellow accents create a cheerful spring-inspired teapot. Pair a golden-yellow rose with fresh green leaves and a clean white body to produce a warm, inviting decoration.
For a more dramatic design, use bright red trim and a deep red rose. This combination is particularly lovely for holiday ornaments, decorative gift packaging, and small handmade collections.
These tiny creations can also become crochet keychains, handbag charms, miniature wall decorations, or embellishments for handcrafted greeting cards. If you plan to use them as keychains, reinforce the attachment point and check that all parts are securely fastened.
Because the project incorporates a recycled aluminum tab, it is also an enjoyable way to experiment with upcycled crochet crafts. Instead of relying entirely on new materials, you can give an everyday object a decorative second life.
Tips for a Professional Finish
Working with fine crochet thread requires patience, especially when creating curved details and miniature roses. A few simple techniques can greatly improve the final appearance of your ornaments.
Keep the stitches around the aluminum tab close together. Visible gaps can interrupt the smooth white outline, while loose stitches may shift with handling.
Avoid pulling the thread too tightly when creating the handle or spout. These pieces need enough flexibility to maintain their gentle curves without distorting the main body.
Make the rose separately before attaching it. This gives you more control over the shape of the petals and makes it easier to center the flower between the green leaves.
Use discreet sewing stitches and weave thread ends behind the ornament. Since the crochet is so small, even a few loose strands can affect the overall appearance.
For a slightly firmer ornament, you may lightly block the crochet portions before final assembly. Avoid soaking or applying moisture treatments directly to the metal, especially if the finish is damaged or prone to corrosion.
Frequently Asked Questions
Is this crochet teapot pattern suitable for beginners?
This project is best suited to confident beginners or intermediate crocheters. Basic stitches are simple, but working with fine cotton thread and assembling miniature pieces requires precision.
Can I use regular yarn instead of crochet cotton thread?
Yes, although thicker yarn will produce a larger ornament and may hide the delicate features. Fine cotton thread is recommended for a miniature appearance.
Do I need to use a soda can tab?
The soda tab provides the characteristic double-opening structure. You can create an entirely crocheted alternative using reinforced rings, but the construction and appearance will differ.
How long does it take to crochet one mini teapot?
Depending on experience and the amount of detail, one ornament may take approximately one to three hours to complete.
Can I turn these mini teapots into Christmas ornaments?
Absolutely. Choose festive colors such as red, green, white, and gold. Add a hanging loop at the top and use them as decorations for a small Christmas tree.
Are these ornaments washable?
Gentle surface cleaning is preferable because the ornament includes metal and possibly a decorative bead. Avoid machine washing, extended soaking, and excessive twisting.
Can these ornaments be sold at craft fairs?
You can sell ornaments made from your own work and original adaptations. Their miniature size, recycled-material construction, and floral appearance may appeal to customers looking for handmade gifts.
Are they safe for children?
These are decorative objects rather than toys. The small bead, metal tab, and attachments may present hazards, so they should be kept away from young children and pets.
Conclusion
The Crochet Mini Teapot Ornament Pattern is a delightful celebration of creativity, traditional needlework, and resourceful crafting. With a recycled soda tab, delicate cotton thread, and a handful of colorful stitches, you can create an ornament that resembles a miniature floral teapot.
From the graceful curved handle to the cheerful rose and green leaves, every detail contributes to the charm of this handmade design. Each ornament can be personalized with different colors, making the project especially enjoyable for crafters who love creating coordinated sets.
Whether displayed as a decorative miniature, attached to a handbag, or given as a thoughtful handmade gift, these crochet teapot ornaments are beautiful examples of how small materials and careful craftsmanship can produce something truly memorable.