
The magic of Christmas often lives in the smallest handmade details, and these beautiful Crochet Spiral Christmas Angel Ornaments are a perfect example of how simple yarn can become an extraordinary holiday decoration. Featuring elegant spiral bodies, delicate wings, rounded heads, and shimmering golden accents, these angels bring warmth and sophistication to any Christmas tree. Their graceful shapes create a floating effect that makes them especially charming when surrounded by twinkling holiday lights.
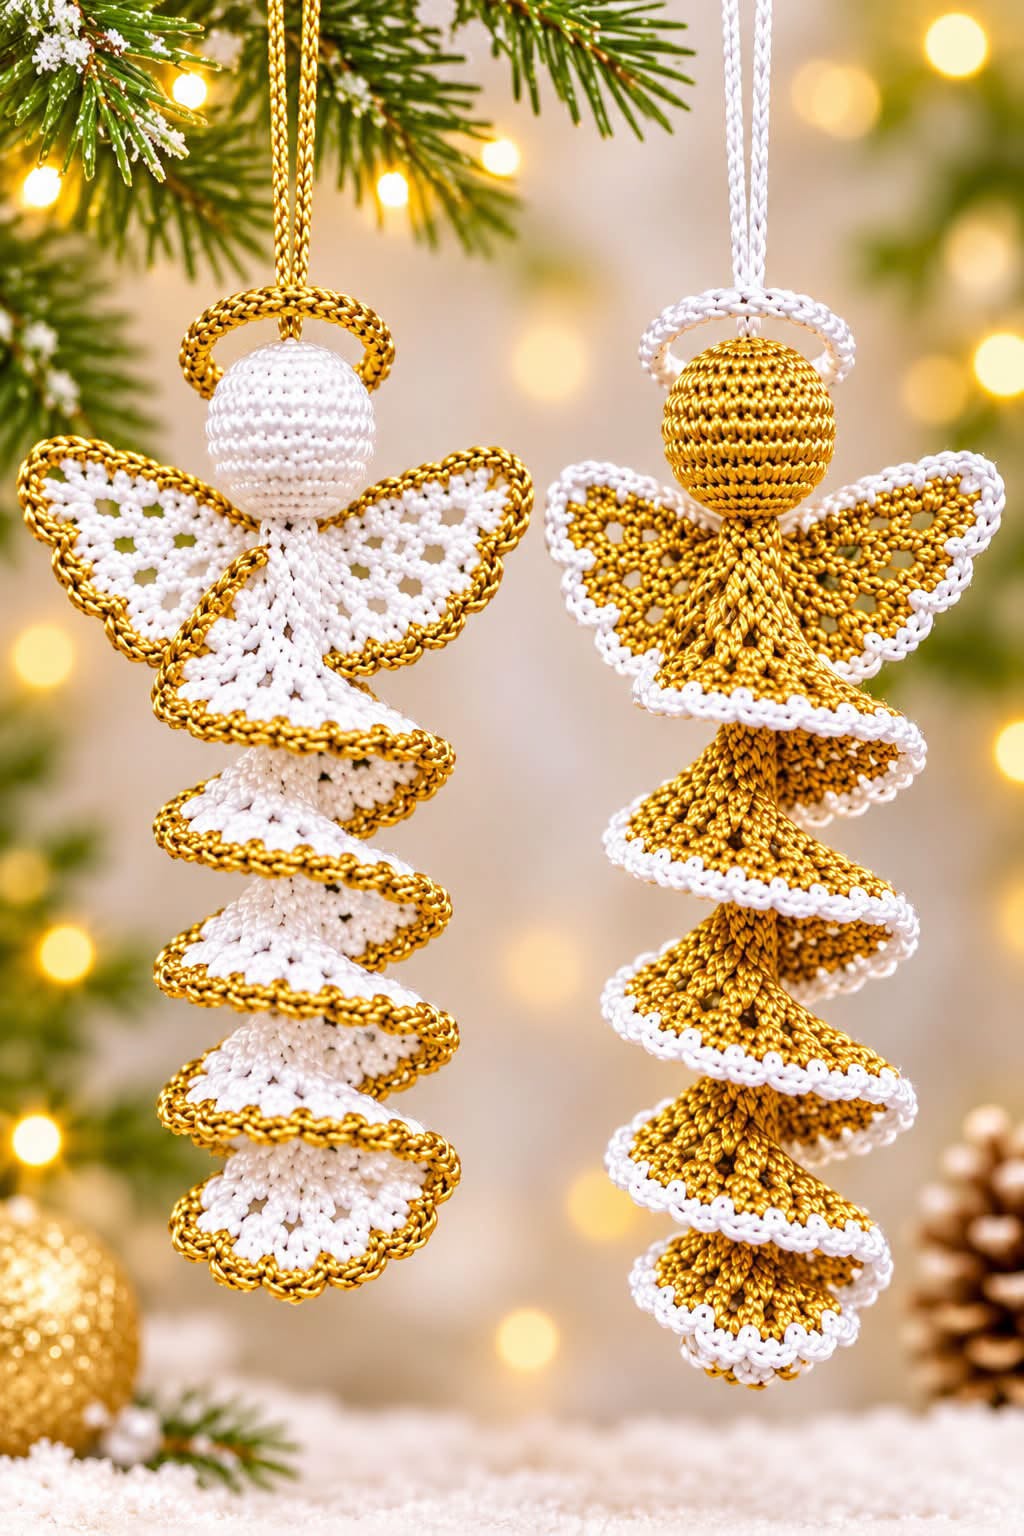
One of the most attractive features of this crochet Christmas angel pattern is the combination of traditional crochet techniques with a modern spiral design. The ornaments shown in the photograph feature two beautiful color combinations: a white angel decorated with metallic gold edging and a golden angel finished with delicate white borders. Both versions have an elegant, festive appearance that complements classic, rustic, and contemporary Christmas decorations.
Creating your own handmade crochet angel ornaments is also a wonderful way to celebrate the holiday season through creativity. Whether you enjoy making decorations for your home, preparing thoughtful gifts, or exploring new crochet projects, these spiral angels offer an enjoyable experience.
Their lightweight construction, decorative wings, and flowing spiral bodies make them excellent ornaments for Christmas trees, holiday garlands, decorative wreaths, and festive gift packages.
1. Materials and Supplies for Crochet Spiral Christmas Angels
Before beginning your crochet spiral angel ornament, gathering the appropriate materials will help you achieve neat stitches, balanced proportions, and an attractive finished decoration. The design combines a firm crocheted head with a flexible spiral body, so choosing a yarn or cord that holds its shape is especially important.
For a decoration similar to the photograph, consider using white cotton crochet thread alongside metallic gold cord or metallic crochet yarn. Cotton provides excellent stitch definition, while metallic yarn adds the festive shine that makes these ornaments stand out. You can create the white version with gold borders or reverse the colors for a completely different appearance.
Recommended Materials
-
White cotton crochet thread, size 3 or a similar firm lightweight yarn
-
Metallic gold crochet yarn or flexible decorative cord of comparable thickness
-
2.0–2.5 mm crochet hook, adjusted to your yarn
-
Polyester fiberfill for the angel’s head
-
Yarn needle for sewing the pieces together
-
Small scissors
-
Stitch markers
-
Measuring tape
-
Fabric stiffener, optional
-
White or gold cord for the hanging loop
The suggested finished height is approximately 18–22 cm (7–8.7 inches), including the angel’s head and spiral body but excluding the hanging cord. The width across the wings may measure approximately 12–15 cm (4.7–5.9 inches), depending on your tension and the desired shape.
These measurements are suggested for a homemade version inspired by the photograph, rather than dimensions verified from an original pattern. You can easily create smaller angels by using thinner crochet thread and a smaller hook, or larger ornaments by choosing thicker yarn.
Another important consideration is the weight of the finished angel. Christmas tree branches support lightweight decorations more comfortably, so avoid using excessive stuffing or heavy embellishments. A tightly crocheted head, openwork wings, and airy spiral body will give your ornament an attractive shape without unnecessary weight.
For beginners, it may be easier to work with ordinary cotton yarn before introducing metallic thread. Some metallic yarns can be slightly slippery or less flexible than cotton, so maintaining consistent tension is essential for achieving beautiful and even stitches throughout the project.
Crochet Abbreviations – US Terms
| Abbreviation | Meaning |
|---|---|
| MR | Magic ring |
| ch | Chain |
| sl st | Slip stitch |
| sc | Single crochet |
| hdc | Half double crochet |
| dc | Double crochet |
| tr | Treble crochet |
| inc | Increase |
| dec | Decrease |
| st(s) | Stitch(es) |
| BLO | Back loop only |
| FO | Fasten off |
2. How to Crochet the Angel’s Head and Beautiful Spiral Body
The most recognizable feature of this Christmas crochet angel ornament is the long, flowing spiral that forms its body. Unlike a traditional angel dress, this decorative design uses a twisting ribbon of crochet fabric that creates beautiful layers as it hangs vertically. The spiral provides movement, dimension, and an elegant silhouette.
Begin by making the angel’s head using the amigurumi technique. A simple spherical shape works beautifully because it contrasts with the intricate texture of the spiral body. Work in continuous rounds with single crochet stitches, using a stitch marker to identify the beginning of each round.
Step 1: Crochet the Angel’s Head
Using your main yarn color, create a magic ring and work six single crochet stitches into the ring.
Follow these rounds:
-
Round 1: 6 sc into MR. (6)
-
Round 2: Inc in every stitch. (12)
-
Round 3: 1 sc, inc repeat 6 times. (18)
-
Round 4: 2 sc, inc repeat 6 times. (24)
-
Round 5: 3 sc, inc repeat 6 times. (30)
-
Rounds 6–10: 1 sc in each stitch. (30)
-
Round 11: 3 sc, dec repeat 6 times. (24)
-
Round 12: 2 sc, dec repeat 6 times. (18)
-
Round 13: 1 sc, dec repeat 6 times. (12)
-
Round 14: Dec around. (6)
Before completely closing the head, gently fill it with polyester fiberfill. Avoid overstuffing, as the finished sphere should remain smooth and rounded.
Close the opening securely using a yarn needle, then weave in the loose end. If you are making a matching set, crochet both heads before continuing with the decorative body sections.
Step 2: Create the Spiral Foundation
The crochet spiral angel body can be created using an increased ribbon construction. The following instructions provide a practical method for making a decorative corkscrew similar in overall appearance to the photograph.
Begin by chaining 71 stitches. Work two double crochet stitches into the fourth chain from the hook and then two double crochet stitches into each remaining chain. The increases will cause the crocheted strip to begin curling naturally.
For a more pronounced spiral, turn your work, chain three, and work two double crochet stitches into each stitch along the previous row. As the strip grows, it will twist into a dramatic corkscrew shape.
The amount of curling depends on your yarn thickness, hook size, and stitch tension. If the spiral becomes excessively thick, use fewer increases. If it remains too flat, add an additional increase row to encourage a stronger twisting effect.
Step 3: Add Decorative Borders
Once the spiral has reached your desired fullness, add a contrasting border along the outside edge. For the white angel, use metallic gold yarn, while the golden version looks beautiful with a crisp white border.
Attach the contrasting yarn at one end of the ribbon and work single crochet stitches evenly along the outer edge. For a decorative scalloped finish, work sl st, skip 1 st, 5 hdc in the next st, skip 1 st and repeat where the stitch spacing allows.
Take care not to pull the border too tightly. A flexible edging will allow the spiral to maintain its naturally flowing appearance. If necessary, lightly shape the ribbon with your fingers as you crochet.
Step 4: Shape the Flowing Angel Dress
Hold the spiral vertically and allow it to hang freely. You should notice that the crocheted fabric forms several descending circular layers, creating the appearance of a delicate angel dress.
Adjust the fabric so that the largest curves are evenly distributed along the body. The bottom of the spiral should finish with a rounded decorative edge, while the upper portion should connect neatly beneath the angel’s head.
Secure the upper section of the spiral with several strong stitches. Use matching yarn and a yarn needle to attach it directly to the underside of the crocheted head, checking that the ornament hangs straight.
Step 5: Prepare the Angel for Assembly
Before attaching the wings, place the ornament on a flat surface and examine the overall proportions. The head should be centered above the spiral, and the body should twist gracefully downward.
If necessary, use a small amount of fabric stiffener to help the spiral retain its sculptural shape. Apply it sparingly, following the manufacturer’s instructions, and allow the ornament to dry completely before continuing.
This stage is particularly important for delicate metallic yarns. Carefully arranging the spiral ensures that the finished ornament looks elegant from different viewing angles rather than appearing uneven or twisted in an unwanted direction.
3. Making the Crochet Angel Wings, Halo, and Hanging Loop
The wings are among the most beautiful elements of this crochet Christmas angel decoration. Their openwork construction adds a delicate lace effect that complements the fuller spiral body. In the photograph, both ornaments feature wide, symmetrical wings with contrasting borders that highlight their graceful outlines.
To create a similar appearance, crochet two matching wings separately and attach them behind the angel’s head. A combination of chain spaces, double crochet stitches, and decorative edging creates a lightweight fabric that spreads naturally outward.
Step 6: Crochet the Angel Wings
Using the main color, chain 7 and work a double crochet into the fourth chain from the hook. Continue working double crochets across the remaining chains to establish a small foundation.
For the next row, chain three, turn, and increase at both ends by working two double crochets into the first and last stitches. Continue increasing in subsequent rows until the wing reaches approximately 6–7 cm (2.4–2.8 inches) in width.
To add an openwork appearance, alternate groups of three double crochets with chain-two spaces. This produces small decorative openings that allow Christmas tree lights to shine through the wings.
Finish with a slightly curved outer edge by working groups of double crochets or half double crochets along the top and outer sides. Repeat the process for the second wing, mirroring the shaping so both pieces appear balanced.
Step 7: Add the Contrasting Wing Border
With the contrasting yarn, work a row of single crochet stitches evenly around the outer edge of each wing.
For a more decorative appearance, add occasional groups of three single crochets into the corners or curved sections. This helps define the wings and creates a slightly raised border.
The white wings with golden borders look particularly elegant because the metallic thread emphasizes the lace details. Reversing the colors produces a bold golden wing with a clean white outline, creating a coordinated pair of Christmas angels.
Step 8: Crochet the Angel’s Halo
The halo is a small but essential feature that completes the angel’s recognizable silhouette. A simple crocheted ring works well and can be created using either the main yarn or the contrasting metallic thread.
Chain approximately 24 stitches and join with a slip stitch to form a ring, being careful not to twist the chain. Work one round of single crochet stitches around the ring, then fasten off and weave in the ends.
The halo should measure approximately 4–5 cm (1.6–2 inches) across when shaped. Adjust the starting chain count if necessary to suit the proportions of your crocheted head.
To keep the ring slightly rigid, crochet firmly or use a small amount of fabric stiffener. Position it behind and slightly above the angel’s head, then sew it securely into place.
Step 9: Attach the Wings
Place both wings behind the head with their inner corners meeting at the upper portion of the spiral body. Angle them slightly upward to create the appearance of an angel spreading its wings.
Using a yarn needle and matching yarn, sew each wing securely to the back of the ornament. Make several small stitches through the base of each wing and the body to prevent the pieces from shifting.
Examine the angel from the front and adjust the wings before tightening the final stitches. Ideally, both wings should extend outward at a similar angle, creating a symmetrical and balanced appearance.
Step 10: Make the Hanging Loop
Cut approximately 20–25 cm (8–10 inches) of white or gold cord. Fold it in half and attach the ends securely to the back of the head, positioning the loop behind the halo.
If you prefer a fully crocheted hanger, chain approximately 35 stitches and fasten off, leaving enough yarn for sewing.
Always test the hanging loop before placing the ornament on your Christmas tree. Hold the angel by the loop and ensure that the head, halo, wings, and spiral body remain properly aligned.
4. Creative Christmas Decorating Ideas and Finishing Tips
One of the greatest advantages of making handmade crochet Christmas ornaments is the freedom to experiment with different colors, textures, and finishing details. Although white and gold create a timeless holiday combination, this angel design can also be adapted to suit many other Christmas decorating styles.
For a traditional Christmas tree, consider creating angels in white, cream, champagne, and metallic gold. These warm and neutral shades blend beautifully with golden lights, pine greenery, and natural wooden ornaments, creating a peaceful and sophisticated holiday atmosphere.
If you prefer a more colorful Christmas display, try working the spiral bodies in deep burgundy, emerald green, or midnight blue. Pair these colors with ivory or metallic borders to maintain the elegant contrast that makes the angel’s spiral shape so distinctive.
These crochet spiral angel ornaments also make meaningful handmade gifts. A set of two angels can be placed inside a decorative gift box, accompanied by a handwritten holiday message. They are particularly lovely as Christmas keepsakes for family members, friends, teachers, and fellow crochet enthusiasts.
For a coordinated holiday collection, create angels in three different sizes. Smaller ornaments can decorate miniature Christmas trees or gift packages, while larger versions can become beautiful accents on wreaths, mantel displays, or festive wall hangings.
Before displaying your finished ornaments, check all sewn connections and weave in any remaining yarn ends. If the wings need additional shaping, lightly block them according to the yarn manufacturer’s care guidance. Avoid excessive heat on metallic fibers, which may be sensitive to ironing or steaming.
Frequently Asked Questions About Crochet Spiral Christmas Angels
Is this crochet Christmas angel suitable for beginners?
This project is best suited to confident beginners or intermediate crocheters. The head uses basic amigurumi stitches, while the spiral body and decorative wings require more attention to shaping, increases, and assembly.
What is the best yarn for crochet angel ornaments?
Firm cotton yarn or cotton crochet thread is an excellent choice because it provides defined stitches and helps maintain the ornament’s shape. Metallic yarn can be used for decorative details or the entire angel, provided it is flexible enough for crochet.
How can I make the spiral more pronounced?
A strong spiral is created by working multiple stitches into each stitch of the previous row. Increasing the number of stitches encourages the fabric to curl, although excessive increases may produce a bulky result.
Can I make these angel ornaments without metallic yarn?
Absolutely. White, cream, pastel pink, silver-gray, or soft yellow cotton yarn can produce beautiful angels. You can also use two complementary matte colors for a more rustic or traditional appearance.
How do I keep the crochet wings from folding?
Use firm stitches, block the wings gently, and apply a suitable fabric stiffener when necessary. Make sure the wings are fully dry before attaching them to the angel’s body.
Can these crochet Christmas angels be washed?
Washing depends on the yarn and embellishments used. Cotton ornaments without delicate metallic decorations may tolerate gentle handwashing, but pieces with stiffener or metallic fibers should be cleaned carefully according to the materials’ care instructions.
Can I use this pattern to create Christmas gifts?
Yes. Handmade crochet angels make thoughtful Christmas presents, keepsakes, and seasonal decorations. Their delicate appearance and customizable colors make them especially suitable for personalized gift sets.
Conclusion
The Crochet Spiral Christmas Angel Ornament Pattern brings together beautiful crochet textures, graceful movement, and traditional Christmas symbolism in one charming handmade decoration. Its rounded head, delicate wings, elegant halo, and cascading spiral body create a distinctive ornament that looks wonderful against the greenery of a Christmas tree.
The contrasting white and metallic gold colors make these angels particularly beautiful for elegant holiday decorating. Whether you create a matching pair or an entire collection, each angel offers an opportunity to experiment with color combinations, crochet techniques, and decorative finishing touches.
Most importantly, these handmade crochet Christmas angels celebrate the joy of creating something meaningful with your own hands. With patience, creativity, and attention to detail, a few simple materials can become treasured Christmas ornaments that bring warmth and beauty to your holiday celebrations for years to come.