
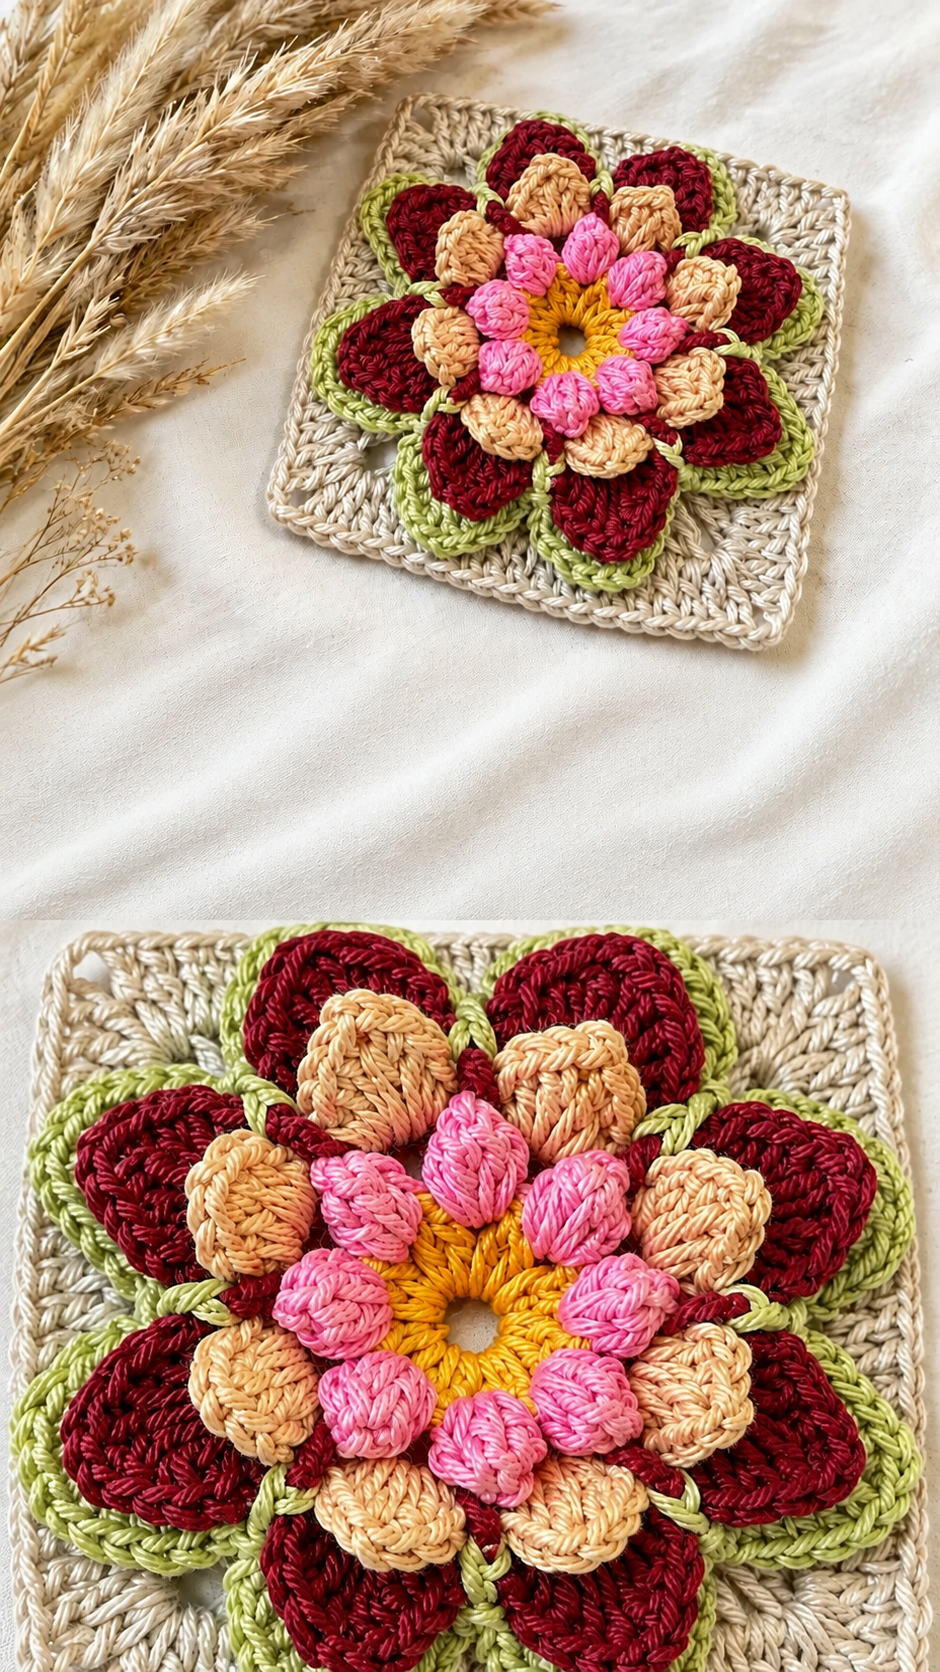
One of the most attractive features of this layered crochet flower pattern is the contrast between its colorful petals and its neutral cream-colored square background. The central flower begins with a sunny yellow ring, surrounded by small pink raised petals, soft peach petals, and larger burgundy petals with green edging. Each layer adds dimension and visual interest, transforming a simple crochet motif into an elegant decorative piece.
This beautiful crochet floral granny square is perfect for anyone who enjoys creating textured blankets, decorative cushions, table runners, and handmade gifts. Although the finished flower looks intricate, the project can be divided into manageable steps.
With patience, basic crochet skills, and careful attention to the petal layers, crocheters can create a charming square that looks lovely on its own or combined with other motifs.
1. Materials and Preparation for the 3D Crochet Flower Granny Square
Before beginning this 3D crochet granny square tutorial, it is important to prepare the yarn, crochet hook, and accessories. Choosing smooth cotton yarn will help the individual stitches remain visible while allowing the flower petals to maintain their shape.
The design shown in the image features six coordinated colors. Each color plays an important role in creating the layered floral effect, from the golden center to the delicate green outlines surrounding the outer petals.
Materials Needed
- Worsted-weight cotton yarn in golden yellow, bright pink, peach, burgundy, light green, and cream.
- Crochet hook size 4.0 mm (G/6), or a size appropriate for your yarn.
- Yarn needle for weaving in loose ends.
- Sharp scissors.
- Stitch markers.
- Measuring tape.
- Blocking mat and rustproof pins, if available.
For a softer and more delicate appearance, DK-weight cotton yarn with a 3.5 mm (E/4) crochet hook is another option. The important consideration is maintaining consistent tension throughout the project.
Recommended Measurements
The following dimensions are approximate for a sample made with worsted-weight cotton yarn and a 4.0 mm hook.
| Component | Approximate measurement |
|---|---|
| Finished granny square | 15 × 15 cm (6 × 6 inches) |
| Central yellow ring | 3 cm (1.2 inches) |
| Raised flower diameter | 11–12 cm (4.3–4.7 inches) |
| Pink inner petals | 2–2.5 cm (0.8–1 inch) |
| Peach middle petals | 3–3.5 cm (1.2–1.4 inches) |
| Burgundy outer petals | 4–4.5 cm (1.6–1.8 inches) |
These measurements may vary depending on yarn thickness, crochet tension, and the number of stitches used in each petal.
Crochet Abbreviations (US Terms)
| Abbreviation | Meaning |
|---|---|
| MR | Magic ring |
| ch | Chain |
| sl st | Slip stitch |
| sc | Single crochet |
| hdc | Half double crochet |
| dc | Double crochet |
| tr | Treble crochet |
| st | Stitch |
| sp | Space |
| BLO | Back loop only |
| rep | Repeat |
All stitch instructions in this tutorial use American crochet terminology.
The following instructions are an original, adaptable interpretation of the pictured flower. They are intended to recreate its layered appearance, rather than claim an exact stitch-for-stitch reproduction from the photograph.
2. How to Crochet the Raised Flower Center and Inner Petals
The most recognizable feature of this 3D crochet flower motif is its raised center. Starting with the golden yellow foundation, the flower gradually develops into a circular arrangement of dimensional petals.
The yellow center should remain slightly open, creating a small decorative hole in the middle. This opening emphasizes the circular construction and helps the raised petals sit naturally around the center.
Step 1: Create the Yellow Center
Using golden yellow yarn, begin with a magic ring.
Round 1: Ch 3 (counts as the first dc), work 15 dc into the ring, and join with a sl st to the top of the beginning ch-3. You should have 16 dc.
Gently tighten the ring, leaving a small opening approximately 5–8 mm wide. Fasten off and weave in the yarn tail carefully so the opening maintains its shape.
The result should be a bright yellow circular center that serves as the foundation for the decorative flower layers.
Step 2: Prepare the Foundation for the Pink Petals
Join the bright pink yarn to any stitch on the yellow ring.
Round 2: Ch 1, work 1 sc into each dc around, and join with a sl st to the first sc. There should be 16 sc.
Next, ch 1 and work 1 sc into the first stitch.
Ch 3, skip 1 stitch, sc into the next stitch. Repeat around to create eight chain-loop spaces. For the final loop, ch 3 and join with a sl st to the first sc.
These eight loops will hold the raised pink petals.
Step 3: Crochet the Pink Inner Petals
Work the following sequence into each ch-3 space:
1 sc, 1 hdc, 3 dc, 1 hdc, 1 sc.
Repeat the sequence in all eight spaces. Join with a sl st and fasten off.
To create a fuller appearance, gently push each petal upward with your fingers. The petals should sit close together, forming a delicate pink ring around the yellow center.
If you prefer a more rounded flower, use a slightly smaller hook for this layer. Tighter stitches will help the petals stand upright.
Step 4: Create the Peach Petal Foundation
Turn the flower over so the wrong side faces you.
Join peach yarn near the base of any pink petal. Work a sc around the base connection, then ch 4 and sc around the base of the next petal.
Repeat until you have eight chain-loop spaces behind the pink petals.
These loops will serve as the foundation for the second floral layer. Keeping them behind the pink petals is essential for achieving the three-dimensional crochet flower effect.
Step 5: Crochet the Peach Petals
Turn the flower to the right side.
Into each peach chain-loop space, work:
1 sc, 1 hdc, 5 dc, 1 hdc, 1 sc.
Repeat in each of the eight spaces. Join and fasten off.
The peach petals should be slightly larger than the pink petals, creating a layered flower with increased depth.
Gently arrange the peach petals so they peek out between the smaller pink petals. Avoid pulling them too tightly, since the design looks best when each layer has a little movement.
Step 6: Shape the Inner Flower
Lay the flower on a flat surface and arrange the petals using your fingertips.
The pink petals should remain close to the center, while the peach petals extend outward and sit slightly underneath them.
At this stage, the motif should resemble a small double-layered flower. The next crochet rounds will create the larger burgundy petals that give the project its dramatic appearance.
3. Creating the Burgundy Petals, Green Borders, and Square Background
The outer burgundy petals are responsible for much of the visual impact of this textured crochet flower granny square. Their deep color contrasts beautifully with the light peach and pink sections.
Adding a light green outline gives each petal a more natural botanical appearance. The green color also separates the burgundy petals from the cream square, making the flower look more defined.
Step 7: Make the Burgundy Petal Foundation
With the wrong side facing you, join burgundy yarn near the base of a peach petal.
Work 1 sc around the base connection, ch 5, and work 1 sc around the next petal connection.
Repeat eight times to create eight larger chain-loop spaces behind the peach petals.
Make sure these loops are distributed evenly. Uneven spacing can cause the flower to lean toward one side.
Step 8: Crochet the Large Burgundy Petals
Turn the flower to the right side.
Work the following stitches into each ch-5 space:
1 sc, 1 hdc, 2 dc, 5 tr, 2 dc, 1 hdc, 1 sc.
Repeat this sequence for all eight petals.
The treble crochet stitches create height and give the outer petals a broad, rounded shape.
For a more dramatic dimensional effect, gently curve each burgundy petal upward after completing the round.
Step 9: Add the Light Green Edging
Join light green yarn at the beginning of any burgundy petal.
Work 1 sc into each stitch along the outer edge of the petal. Place 2 sc in the central top stitch to maintain a smooth curve.
Continue around the remaining petals, working one stitch into each accessible stitch and adding an extra stitch at the highest point when needed.
Fasten off after completing the entire outer flower.
The green edging should form a thin decorative border around the burgundy petals. Keep your tension relaxed so the flower remains open and rounded.
Step 10: Prepare the Cream Square Foundation
Turn the flower over.
Join cream yarn behind the green-edged petals at one of the eight petal bases. Make a sc into the first anchor point and ch 5 to the next anchor point.
Repeat around the entire flower, forming eight ch-5 spaces.
These spaces will connect the circular flower to the surrounding square.
Step 11: Transform the Flower into a Square
To create a square around the flower, designate four alternating chain spaces as corners and use the remaining four spaces as sides.
Work the following sequence around the foundation:
- In a corner space: (3 dc, ch 2, 3 dc).
- In the next side space: 5 dc.
- Repeat the corner and side sequences until all eight spaces are worked.
Join the round with a sl st.
The four ch-2 spaces will form the corners of the granny square.
Although the flower is circular, arranging the cream stitches around four corners creates a balanced square shape.
Step 12: Complete the Cream Granny Square Border
Join cream yarn at any corner space, or continue with the same yarn.
Work (3 dc, ch 2, 3 dc) into each corner space.
Along each side, work 1 dc into each existing dc. If the fabric begins to ripple, reduce the number of stitches evenly along the sides.
Repeat until the square reaches approximately 15 × 15 cm (6 × 6 inches), or your preferred size.
Finish with one round of sc around the entire square, working (2 sc, ch 1, 2 sc) in each corner.
Fasten off and weave in all loose ends.
The finished motif should have a richly textured central flower surrounded by a neat cream frame.
4. Finishing Techniques, Creative Uses, and Helpful Crochet Tips
Completing the stitches is only part of making a beautiful 3D flower crochet square. Finishing techniques help the project maintain its shape and give the finished piece a polished, professional appearance.
Because the motif includes several raised layers, blocking should be done carefully. Flattening the petals too aggressively can reduce the dimensional effect that makes the design special.
How to Block the Granny Square
Lightly dampen the cream border using a spray bottle.
Place the crochet square on a blocking mat and gently stretch the corners until all four sides are even.
Secure the corners with rustproof pins, making sure not to stretch the flower itself.
Allow the square to dry completely before removing the pins.
The cream background should be flat and square, while the flower remains slightly raised.
Tips for Beautiful Layered Petals
Choose yarns of similar thickness for every layer. Combining yarns with very different weights can make the petals uneven.
Maintain consistent tension when working the pink and peach petals. These smaller layers should remain flexible rather than stiff.
Use stitch markers to identify the beginning of each round. This simple technique helps prevent mistakes when working behind raised petals.
Arrange the finished petals gently by hand. Small adjustments can make the flower appear fuller and more symmetrical.
Beautiful Color Combinations
The burgundy, peach, pink, green, and cream palette creates a romantic vintage appearance. However, this floral crochet granny square pattern can also be adapted to other attractive color schemes.
For a classic farmhouse look, combine dusty rose, ivory, sage green, and cream.
For spring decoration, use lavender, soft yellow, pastel pink, and mint green.
For autumn projects, choose burnt orange, mustard yellow, deep red, olive green, and beige.
For an elegant Christmas-inspired variation, use red, antique gold, forest green, and ivory.
Each color combination gives the same crochet flower a different personality.
Creative Projects Using the Flower Granny Square
This versatile motif can be used for many beautiful handmade projects.
Crochet blankets: Join multiple squares to create a richly textured floral blanket. Arrange the flowers in alternating color combinations for a colorful patchwork effect.
Decorative pillows: Sew several finished squares together to create a romantic cushion cover for a bedroom or living room.
Table runners: Connect a row of floral squares to make a beautiful centerpiece for a dining table.
Crochet bags: Use the squares as decorative panels for handbags, tote bags, or shoulder bags.
Wall decorations: Mount several motifs in a wooden frame or attach them to a crochet wall hanging.
Handmade gifts: Turn one square into a decorative coaster or ornament for a thoughtful handmade present.
For projects that receive heavy daily use, such as blankets and bags, consider using durable cotton yarn and securing all yarn tails carefully.
Joining Multiple Granny Squares
When creating a larger project, arrange the completed squares on a flat surface before joining them.
Make sure every square has approximately the same dimensions.
A simple slip stitch join produces a defined seam, while a whipstitch join creates a less noticeable connection.
For a softer appearance, use cream yarn to join the squares so the connecting seams blend naturally with the background.
Avoid catching the raised flower petals in the joining stitches. Only connect the outer cream borders.
Caring for Your Finished Crochet Work
Hand washing is a gentle option for dimensional crochet flowers.
Use cool water and a mild detergent suitable for the yarn fiber.
Avoid twisting or wringing the project, as this may distort the petals.
Instead, press out excess water with a clean towel and allow the piece to dry flat.
Once dry, reshape the flower gently with your fingers to restore its three-dimensional appearance.
Frequently Asked Questions (FAQ)
Is this 3D crochet flower granny square suitable for beginners?
This project is best suited for confident beginners or intermediate crocheters. It uses familiar stitches such as single crochet, double crochet, and treble crochet, but the layered construction requires additional attention.
What is the best yarn for this flower granny square?
Cotton yarn is an excellent choice because it provides clear stitch definition and helps the petals maintain their shape. DK or worsted-weight cotton works particularly well.
Can I make the flower granny square larger?
Yes. You can enlarge the square by adding extra rounds to the cream background. Increase consistently at all four corners to preserve the square shape.
How many granny squares do I need for a blanket?
The number depends on the finished square size and desired blanket dimensions. For example, a blanket measuring approximately 90 × 120 cm (35 × 47 inches) would require around 48 squares measuring 15 × 15 cm, arranged in six columns and eight rows, before accounting for joining and borders.
How do I keep the crochet petals raised?
Work the petals into separate chain-loop foundations behind the previous layers. Avoid excessive blocking or pressing, and choose yarn that holds its shape.
Can I use acrylic yarn instead of cotton?
Yes. Acrylic yarn can produce a soft and lightweight flower, particularly for blankets. However, the petals may be less structured than those made with cotton.
Why are my granny square edges curling?
Curling can result from tight tension, insufficient stitches, or uneven corner increases. Try using a slightly larger hook, checking your stitch counts, and gently blocking the finished square.
Can I turn this motif into a crochet bag?
Absolutely. Make several matching squares, join their outer borders, and add a lining, handles, and a secure closure if desired. The dimensional flowers create an attractive decorative surface.
Conclusion
The 3D Crochet Flower Granny Square Pattern is a beautiful example of how traditional crochet techniques can be transformed into an intricate floral design. Its golden center, raised pink and peach petals, burgundy outer petals, delicate green edging, and cream background create a striking combination of texture and color.
Whether used for a blanket, pillow, table decoration, or handmade accessory, this layered crochet flower granny square brings warmth, character, and handcrafted elegance to any project. With careful stitching and thoughtful color choices, each finished square becomes a small work of textile art that celebrates the beauty of crochet.