
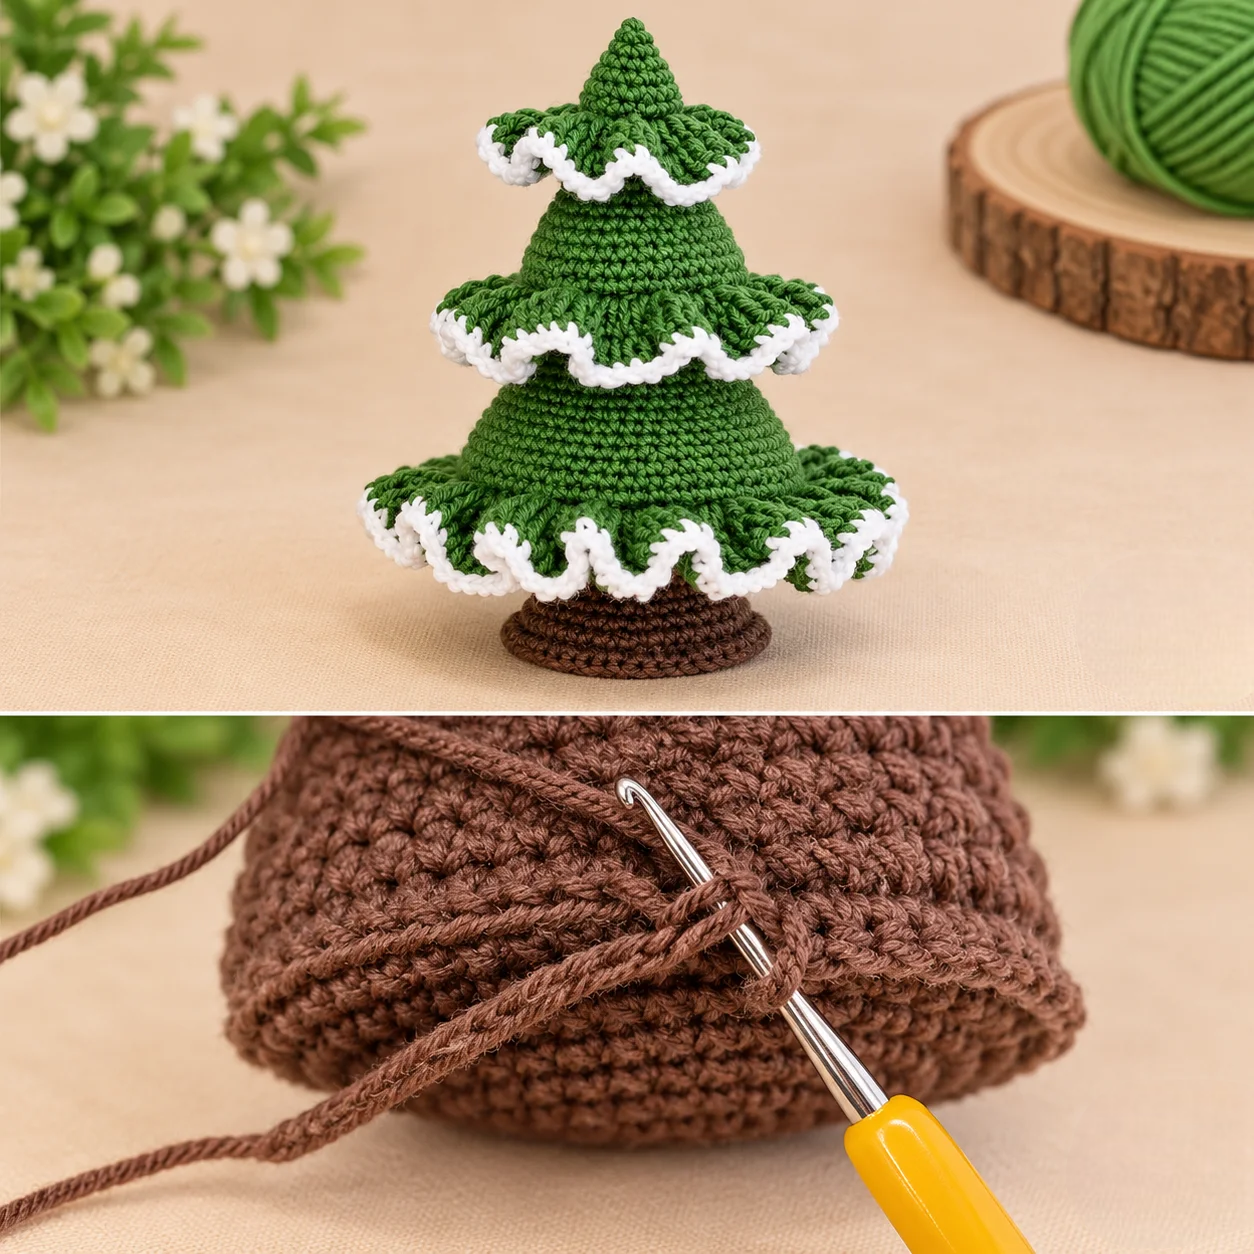
One of the most attractive features of this handmade crochet Christmas tree is its layered construction. The tree features three decorative tiers, each surrounded by beautiful ruffled edges that create the appearance of snow resting on evergreen branches. The combination of textured stitches and traditional Christmas colors makes this design especially appealing to crochet lovers who enjoy creating elegant seasonal decorations.
Whether you are an experienced crocheter or someone looking to explore the wonderful world of Christmas amigurumi, this project offers an enjoyable opportunity to practice shaping, increasing, and decorative edging.
It can become a lovely centerpiece, a thoughtful handmade gift, or a charming addition to your holiday collection. Best of all, the design can be customized with different yarn colors, embellishments, and sizes to suit your decorating style.
Materials and Supplies for the Crochet Christmas Tree
Creating this beautiful crochet Christmas decoration begins with choosing the right materials. The project works best with yarn that provides good stitch definition and enough structure to maintain the tree’s distinctive shape.
For a traditional Christmas appearance, use forest green for the branches, bright white for the decorative edging, and chocolate brown for the tree trunk. Cotton yarn is particularly suitable because it produces neat, defined stitches and provides a firm finish.
Materials needed:
-
Worsted-weight cotton yarn in forest green, white, and brown
-
3.5 mm (E/4) crochet hook, or a size appropriate for your yarn
-
Polyester fiberfill for shaping the tree
-
Yarn needle for sewing and finishing
-
Stitch markers
-
Sharp scissors
-
Measuring tape
-
Optional plastic canvas or sturdy circular insert for the base
-
Optional small decorative beads or a miniature star
The completed tree can measure approximately 7–9 inches (18–23 cm) tall, depending on the yarn, hook, tension, and number of rounds. The widest bottom layer can measure approximately 6–7 inches (15–18 cm) across.
These are suggested dimensions for a practical recreation inspired by the photograph rather than measurements taken from the original project.
Crochet Stitches and Abbreviations
This tutorial uses standard US crochet terminology, making the instructions easier to follow for American crochet enthusiasts.
| Abbreviation | Meaning |
|---|---|
| MR | Magic ring |
| ch | Chain |
| sl st | Slip stitch |
| sc | Single crochet |
| hdc | Half double crochet |
| dc | Double crochet |
| inc | Increase: 2 sc in one stitch |
| dec | Invisible single crochet decrease |
| BLO | Back loop only |
| FLO | Front loop only |
| st(s) | Stitch(es) |
| rnd | Round |
The main tree structure uses single crochet stitches, while the decorative branches feature taller stitches and increases to create a soft, flowing effect.
For the most attractive result, maintain consistent tension throughout the project. Tight, even stitches will help the tree keep its shape and prevent stuffing from showing through.
How to Crochet the Christmas Tree Step by Step
The design shown in the photograph features a narrow pointed top, three progressively wider green sections, and decorative white ruffled borders. The following instructions provide an original, adaptable construction method inspired by that appearance, rather than an exact reconstruction of an unseen original pattern.
Step 1: Crochet the Pointed Tree Top
Begin with forest green yarn and work in continuous rounds unless otherwise stated.
Round 1: Make 4 sc in a magic ring. (4)
Round 2: Sc in each stitch around. (4)
Round 3: Repeat (sc 1, inc) twice. (6)
Round 4: Sc around. (6)
Round 5: Repeat (sc 2, inc) twice. (8)
Round 6: Sc around. (8)
Round 7: Repeat (sc 3, inc) twice. (10)
Round 8: Sc around. (10)
Round 9: Repeat (sc 4, inc) twice. (12)
Continue widening the cone gradually by adding two evenly spaced increases every other round until you reach 24 stitches.
This creates the pointed upper section of the mini crochet Christmas tree.
Step 2: Create the First Decorative Branch Layer
When your cone reaches 24 stitches, crochet one round in BLO, leaving the front loops available for decorative branches.
Continue building the cone through the back loops or remaining working stitches. Increase evenly as needed to reach 36 stitches over the following rounds.
Return to the unused front loops of the 24-stitch round and attach green yarn.
For the first ruffle, work:
(Sl st in the next front loop, 3 dc in the next front loop) repeated around.
This creates 12 small scallops. To give the branches greater fullness, work an additional decorative round along the outer edge, adding stitches where necessary to allow the fabric to flare.
Attach white yarn around the outer edge and work an even round of sc, adding extra stitches at corners or curves when needed.
The contrast between dark green and white creates the snow-covered Christmas tree effect visible in the inspiration image.
Step 3: Build the Middle Tree Section
Continue working the main cone with green yarn, gradually increasing its circumference.
Aim for approximately 48 stitches before beginning the next decorative branch layer.
Work one round in BLO to reserve the front loops for the middle ruffle.
Continue the central cone separately, increasing toward 60 stitches for the lower section.
Return to the reserved front loops and attach green yarn.
For the middle ruffle, repeat:
(Sl st in next front loop, skip 1 front loop, 5 dc in next front loop, skip 1 front loop) around.
With 48 loops, this produces 12 fuller scallops.
Add white yarn along the outermost edge. Work sc around the scallops, adding stitches where necessary to maintain an attractive waving shape.
This middle tier should extend farther than the upper tier, giving the crocheted Christmas tree its recognizable triangular silhouette.
Step 4: Crochet the Large Bottom Branch Layer
The lowest section is the widest part of the tree and creates its elegant, full appearance.
Continue the central green cone until you reach approximately 60 stitches.
Work a round in BLO, reserving the front loops for the largest decorative ruffle.
Create the lower ruffle by joining green yarn to the reserved loops and working:
(Sl st in next front loop, skip 1 front loop, 7 dc in next front loop, skip 1 front loop) around.
With 60 loops, you will have 15 broad scallops.
Add a round of white sc along the outer edge, increasing selectively to preserve the gentle waves.
For extra fullness, you can work a second green round between the scallops and the white edging.
The bottom ruffle should be noticeably wider than the upper layers, closely resembling the soft cascading branches of a real evergreen tree.
Step 5: Shape and Close the Tree
After completing the branch layers, finish the main cone with a flat circular bottom.
If your cone has 60 stitches, work the following decrease rounds:
-
Round 1: (Sc 8, dec) around. (54)
-
Round 2: (Sc 7, dec) around. (48)
-
Round 3: (Sc 6, dec) around. (42)
-
Round 4: (Sc 5, dec) around. (36)
-
Round 5: (Sc 4, dec) around. (30)
-
Round 6: (Sc 3, dec) around. (24)
-
Round 7: (Sc 2, dec) around. (18)
-
Round 8: (Sc 1, dec) around. (12)
-
Round 9: Dec around. (6)
Work through both loops during these shaping rounds. Add fiberfill before the opening becomes too small, keeping the tree firm but not overly stuffed.
Close the remaining opening with a yarn needle and weave in the ends.
How to Make the Brown Crochet Tree Base
The rich brown base adds stability and creates a natural-looking trunk that complements the green branches. In the image, the base has a gently rounded shape, resembling a miniature tree stand.
Step 1: Crochet the Bottom Circle
Using brown yarn, begin with a magic ring.
Round 1: 6 sc in MR. (6)
Round 2: Inc in every stitch. (12)
Round 3: (Sc 1, inc) around. (18)
Round 4: (Sc 2, inc) around. (24)
Round 5: (Sc 3, inc) around. (30)
Round 6: (Sc 4, inc) around. (36)
This creates a flat circular base. If you want a wider stand, add another increase round.
Step 2: Add Height and Texture
Work one round in BLO using 36 sc.
Continue with two rounds of sc around to build the sides of the base.
For a slightly tapered appearance, decrease six evenly spaced stitches in the next round.
The resulting shape resembles a shallow brown pot or rounded wooden stand.
Step 3: Crochet the Short Trunk
Create a small cylindrical trunk using brown yarn.
Round 1: 6 sc in a magic ring. (6)
Round 2: Inc around. (12)
Rounds 3–6: Sc around. (12)
Fasten off, leaving a long tail for sewing.
Stuff the trunk lightly to prevent it from collapsing.
Sew one end to the center of the brown base and attach the other end beneath the Christmas tree.
For additional stability, insert a lightweight circular support inside the base before closing it. Avoid using sharp or exposed materials.
Step 4: Assemble the Finished Decoration
Position the tree carefully on the trunk and check that it stands upright.
Use the yarn needle to sew the tree securely to the trunk, passing through several stitches for strength.
Adjust the decorative branches with your fingers until the scallops are evenly distributed.
Finally, smooth the white edging around each tier to make the snowy borders more visible.
Your three-tier crochet Christmas tree is now ready for display.
Creative Decoration Ideas and Helpful Crochet Tips
One of the wonderful advantages of this easy Christmas crochet project is its versatility. The basic tree can be transformed into many different holiday styles without changing its overall construction.
For a classic Christmas appearance, keep the traditional forest green, white, and brown color combination. These timeless colors coordinate beautifully with rustic decorations, wooden ornaments, pinecones, and natural holiday arrangements.
If you prefer a sophisticated look, replace the white edging with champagne, ivory, or soft gold yarn. The subtle contrast gives the decoration an elegant appearance that works especially well with neutral Christmas interiors.
For a playful version, use bright green yarn and decorate the branches with miniature red, yellow, and blue crocheted ornaments. A tiny handmade star can be attached to the top for an extra festive touch.
Ideas for Displaying Your Handmade Tree
A small crochet Christmas tree looks beautiful on a mantelpiece, bookshelf, coffee table, or holiday dining arrangement.
You can also create a charming collection of trees in different sizes. Arrange three handmade trees together to create a miniature Christmas forest.
For a delightful handmade gift, place the finished tree in a decorative box with a personalized holiday message. These small creations are especially meaningful because they reflect the time and care invested in making something by hand.
Another creative idea is to combine the tree with crochet snowflakes, miniature stockings, and handmade Christmas ornaments to create a coordinated holiday display.
Tips for Achieving Beautiful Results
Choose yarn with good stitch definition. Cotton yarn makes the decorative scallops more visible and helps the tree maintain its shape.
Use stitch markers regularly. Marking the beginning of each round is especially important when crocheting the cone in a continuous spiral.
Check your increases carefully. Evenly distributed increases prevent the central cone from becoming lopsided.
Keep your decorative ruffles flexible. If the edges pull inward, add more stitches. If they curl too dramatically, remove a few increases.
Avoid overstuffing. Too much fiberfill can distort the cone and make the tree appear rounded instead of triangular.
Secure every attachment firmly. Strong seams are important, particularly if you plan to display your Christmas tree every year.
Make a small practice swatch. Testing your hook and yarn combination helps you achieve the desired size and stitch density.
With careful finishing, your DIY crochet Christmas tree will look neat, balanced, and beautifully handmade.
Frequently Asked Questions About the Crochet Christmas Tree Pattern
Is this crochet Christmas tree suitable for beginners?
This project is best suited to confident beginners or intermediate crocheters. Basic stitches are simple to learn, but shaping the cone and creating decorative ruffles require attention to stitch counts and tension.
What is the best yarn for a crochet Christmas tree?
Worsted-weight cotton yarn is an excellent choice because it provides structure and clearly defined stitches. Acrylic yarn can also work, especially if you prefer a softer finish.
Can I make the tree larger?
Yes. Use thicker yarn and a larger crochet hook, or add more increase rounds to the central cone. Keep the decorative ruffles proportional to the growing circumference.
How can I make the tree stand upright?
Use firm stuffing, a stable circular base, and a securely attached trunk. A lightweight plastic insert inside the base can improve stability.
Can I wash the finished crochet decoration?
If you use washable yarn and fiberfill, gentle hand washing may be suitable. Check the yarn label and any materials used inside the base. Allow the decoration to dry completely before storing it.
Can I add Christmas lights to this tree?
Battery-operated LED lights designed for decorative crafts can be used carefully, provided they remain cool and are installed according to the manufacturer’s instructions. Keep electrical components accessible and avoid enclosing batteries inside stuffing.
How long does it take to crochet this Christmas tree?
The time depends on your experience, yarn choice, and desired level of detail. A small version may take several hours, while a more elaborate tree with decorative elements will take longer.
Can I make this pattern in different colors?
Absolutely. Try snowy white, sage green, dusty blue, blush pink, or emerald green with gold edging for a personalized holiday decoration.
Conclusion
The Crochet Christmas Tree Pattern is a delightful way to bring handmade charm into your holiday celebrations. Its pointed green silhouette, three beautifully ruffled branch layers, delicate white borders, and rounded brown base create a festive decoration that feels both traditional and creative.
Beyond its decorative appeal, this project offers an enjoyable opportunity to practice crochet increases, shaping techniques, textured edging, and simple amigurumi construction. Each finished tree can be personalized to reflect your favorite Christmas colors and decorating traditions.
Whether displayed as a centerpiece, shared as a thoughtful gift, or added to a growing collection of handmade crochet Christmas ornaments, this beautiful little tree is a wonderful reminder that some of the most meaningful holiday decorations are the ones we create ourselves.