
One of the reasons the classic granny square crochet pattern remains so popular is its flexibility. Unlike larger crochet projects that require continuous work, granny squares are made individually and can be joined together later. This makes them perfect for crocheting during relaxing evenings, traveling, or using leftover yarn from previous projects. You can work with soft cotton yarn for decorative accessories, acrylic yarn for affordable and durable blankets, or a beautiful cotton blend for a more refined finish. The square shown in the reference image features a textured circular center that gradually transforms into a traditional square shape, surrounded by contrasting rounds of cluster stitches. Its harmonious combination of deep turquoise, creamy white, and pale blue highlights the raised crochet texture and creates an appealing handmade look. This easy crochet square pattern can be customized in almost any color palette, making it suitable for farmhouse decor, coastal-inspired accessories, baby blankets, and thoughtful handmade gifts.
In this complete Classic Crochet Square Pattern tutorial, we will explore everything you need to know before beginning your project, including yarn selection, crochet hook sizes, materials, stitch abbreviations, measurements, and detailed round-by-round instructions. You will also learn how to maintain even tension, prevent curling edges, and make clean color transitions without visible knots. The instructions use standard U.S. crochet terminology, making the pattern easy to follow for American crochet enthusiasts and international readers familiar with U.S. stitch names.
While the finished square looks intricate because of its beautiful combination of crochet clusters, the construction follows a logical sequence that becomes easier with practice. Each completed square can be used individually as a coaster or combined with others to make larger projects. With a little patience and creativity, this traditional crochet square tutorial can become the foundation of many treasured handmade creations.
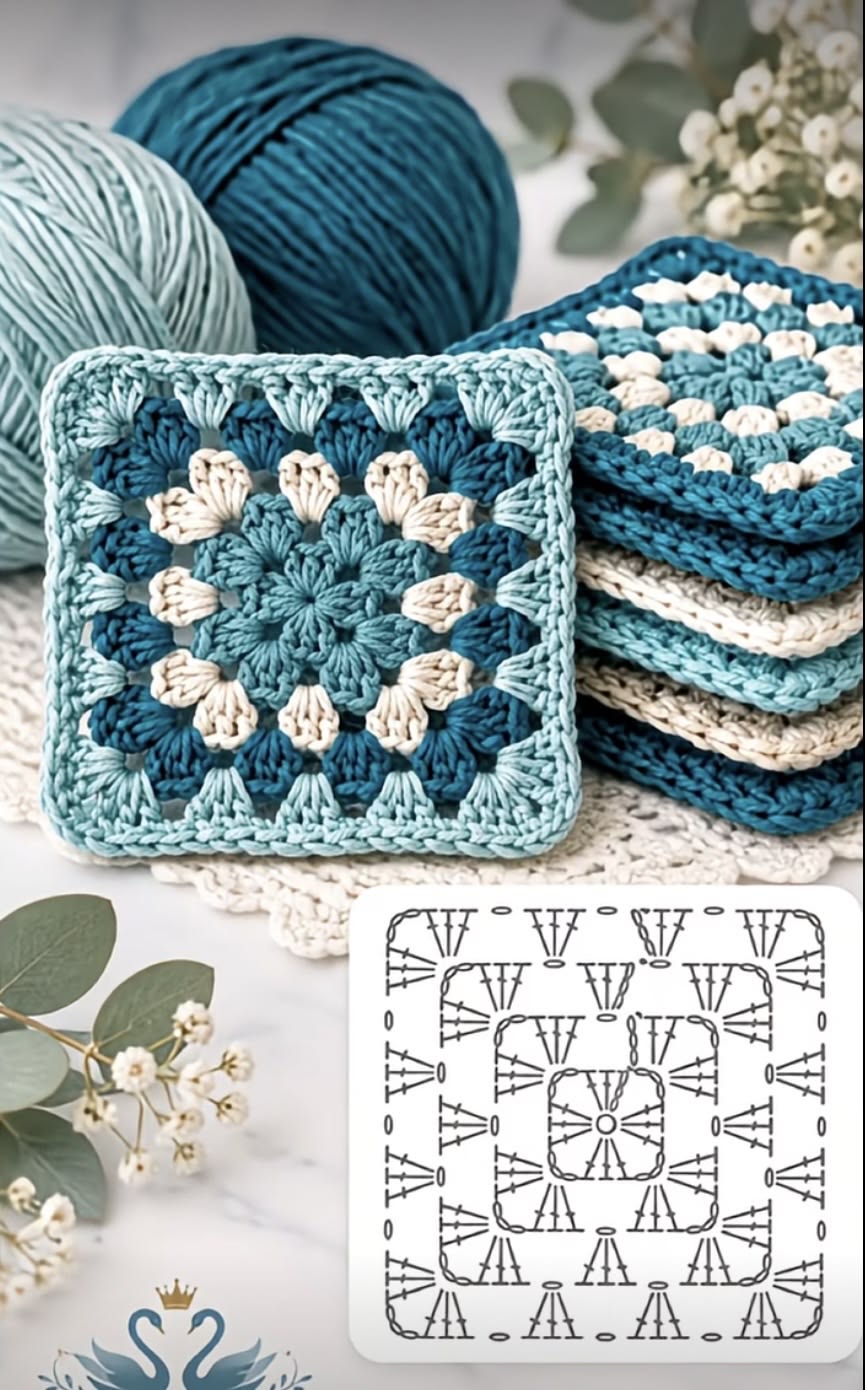
Materials, Measurements, and Basic Stitches for the Classic Crochet Square Pattern
Before starting your Classic Crochet Square Pattern, choosing the right materials is essential for creating a neat and comfortable project. For a square similar to the example, medium-weight cotton yarn is an excellent choice because it provides good stitch definition and maintains its shape after blocking. Cotton yarn is particularly suitable for coasters, table decorations, and household accessories, while acrylic yarn offers softness and warmth for blankets. A cotton-acrylic blend provides another attractive option, combining durability with a pleasant texture. For a beginner-friendly version, select worsted-weight yarn, Category 4, and a crochet hook between 4.0 mm and 5.0 mm, depending on the yarn label and your personal tension. If you prefer smaller, more delicate squares, lightweight cotton yarn and a smaller hook can create a refined result.
For this three-color crochet square, the recommended palette includes deep teal for the contrasting sections, soft cream for the decorative clusters, and light aqua for the center and outer border. These colors work together beautifully, emphasizing the geometric structure of the granny square and giving it a polished appearance. You can also experiment with dusty rose, ivory, sage green, lavender, or classic Christmas colors. For one approximately 6-inch square, begin with about 35–50 yards (32–46 meters) of worsted-weight yarn in total, allowing extra yarn for testing and color changes. Actual consumption varies with stitch tension, yarn thickness, and the number of rounds. If you plan to create an entire blanket, making one sample square first will help you calculate how much yarn you need for the complete project.
The essential materials for this beginner crochet square pattern include a crochet hook, three complementary yarn colors, small scissors, a yarn needle, and optional stitch markers. A measuring tape or ruler is useful for checking the finished dimensions, while rustproof pins and a blocking mat help produce crisp, even edges. A yarn needle is especially important when working with multiple colors because each color change creates loose ends that need to be secured carefully. Although this project does not require specialized equipment, using comfortable tools can make the crocheting experience much more enjoyable. Choose a hook that moves easily through the yarn without splitting the fibers, and keep your stitches relaxed enough to allow the hook to glide through each loop.
Understanding the basic stitches is another important step before working on the Classic Crochet Square Pattern. This tutorial uses chain stitches (ch) to create starting loops, corner spaces, and small openings between groups of stitches. Slip stitches (sl st) are used to join rounds and move the working yarn into the proper position. Double crochet stitches (dc) form the tall stitches that give the square its recognizable granny-style texture, while single crochet stitches (sc) provide a firm and decorative finishing edge. You will also use double crochet clusters, in which several stitches are worked into the same space to create the attractive fan-like groups seen throughout the pattern. Familiarizing yourself with these techniques before beginning will make the following rounds easier to understand.
For clarity, the crochet terminology used throughout this tutorial follows standard American conventions. The abbreviation ch means chain, sl st means slip stitch, sc means single crochet, dc means double crochet, sp means space, and st means stitch. The abbreviation rep means repeat, while rnd identifies the current round. A 3-dc group consists of three complete double crochet stitches worked into the same space. When the instructions mention a corner, they refer to the chain space that allows the fabric to turn naturally through a 90-degree angle. In the conventional granny-square construction used here, the beginning chain three counts as the first double crochet unless otherwise specified. Understanding these abbreviations will help you follow not only this project but also many other crochet patterns.
The finished measurement of your Classic Crochet Square Pattern depends on your yarn weight, hook size, and stitch tension. Using worsted-weight cotton yarn with a 4.5 mm crochet hook, a five-round square may measure approximately 5–6 inches (12.5–15 cm) across after gentle blocking, although your results may differ. The sample construction below uses a four-round granny-square foundation, followed by a fifth decorative edging round. If you want a larger square, additional rounds can be added before the final border. For a coaster, an average measurement of 4–5 inches may be more practical, while larger squares are useful for blankets and cushions. Regardless of the finished size, keeping every side equal is more important than matching an exact measurement, especially when joining several squares together.
Classic Crochet Square Pattern: Step-by-Step Instructions for Every Round
To begin the Classic Crochet Square Pattern, create the central ring using your light aqua yarn. Make a magic ring, or chain four stitches and join them with a slip stitch to form a small circle. The magic ring is especially helpful because it allows the center opening to be tightened after completing the first round. Hold the yarn comfortably, making sure that the working strand is not twisted around your fingers. Insert the crochet hook into the center of the ring and prepare to work the first set of double crochet groups. This opening will become the foundation of the square, and taking a little extra care at this stage will help create a balanced center.
For Round 1, chain three, which counts as your first double crochet, then work two additional double crochet stitches into the center ring. Chain two to create the first corner space. Next, work three double crochet stitches into the ring, chain two, and repeat this sequence two more times. You should have four groups of three double crochet stitches separated by four chain-two corner spaces. Join with a slip stitch into the top of the beginning chain three. Gently tighten the magic ring if you used one, leaving a small, neat center opening. At this point, the project should resemble a small flower with four distinct sections. Fasten off the light aqua yarn if you are changing colors for the next round.
For Round 2, attach the deep teal yarn in any chain-two corner space. Chain three and work two double crochet stitches into the same corner, followed by chain two and another three double crochet stitches in that corner. This forms the first complete corner of your growing square. Chain one, then move to the next chain-two corner space. Work (3 dc, ch 2, 3 dc) into that space and chain one again. Repeat this sequence around the remaining corners. Once you have completed all four corners, join the round with a slip stitch into the top of the starting chain three. You will now see a recognizable square shape, with the chain-two spaces defining the corners and the double crochet groups creating the classic granny-square texture.
For Round 3, introduce the cream yarn to create the contrasting decorative details. Attach the yarn in any corner chain-two space, then work (ch 3, 2 dc, ch 2, 3 dc) into that corner. Chain one and work three double crochet stitches into the chain-one space along the next side. Chain one again and work (3 dc, ch 2, 3 dc) into the next corner. Continue following the same sequence around all four sides, placing one three-double-crochet group into each existing side chain-one space. Keep the chain-one spaces between neighboring groups, and finish by joining with a slip stitch. This round creates the familiar contrast between the colored clusters, giving the square a balanced and visually interesting appearance.
For Round 4, switch back to the deep teal yarn to create a stronger outer frame. Attach your yarn in a corner chain-two space and work the standard corner combination: (ch 3, 2 dc, ch 2, 3 dc). Chain one and work three double crochet stitches into the first side chain-one space. Chain one again, work three double crochet stitches into the next side chain-one space, and chain one before reaching the next corner. Repeat the same construction around the entire square, working (3 dc, ch 2, 3 dc) in each corner and a 3-dc group in each side chain-one space. When the round is completed, each side should have two groups between its corners. Join with a slip stitch and fasten off neatly.
For Round 5, create the decorative light aqua border that frames the design. Attach the light aqua yarn in any corner chain-two space. Work (3 sc, ch 2, 3 sc) into that corner space. Continue with one single crochet into each double crochet stitch along the next side, and one single crochet into each chain-one space. When you reach the next corner, work (3 sc, ch 2, 3 sc) into the corner chain-two space. Repeat along all four sides and join the final stitch with a slip stitch into the first single crochet. This border creates a tidy, slightly raised frame around the square while emphasizing its shape. If you want a wider edging similar to the textured finish in the reference image, add another round of single crochet stitches, working (sc, ch 2, sc) in each corner to preserve the square shape.
Color Combinations, Stitch Techniques, and Creative Uses for Crochet Squares
One of the most enjoyable aspects of the Classic Crochet Square Pattern is the freedom to experiment with color. The combination of teal, cream, and light aqua produces a calm, elegant appearance, but the same pattern can look completely different with another palette. For a romantic style, try dusty pink, ivory, and pale lavender. For a vintage-inspired design, use mustard yellow, olive green, and warm beige. Bright red, white, and forest green create a festive combination, while navy blue, cream, and gray produce a sophisticated coastal look. When selecting your colors, consider the room or accessory where the finished project will be used, and choose shades that complement the surrounding decor.
Creating a balanced color arrangement is especially important when making a multicolor granny square. A useful approach is to select one dominant color, one secondary color, and one lighter accent shade. The dominant color can be used for the central or middle rounds, while the accent color highlights the surrounding clusters and outer border. Repeating the same colors throughout an entire blanket creates a coordinated appearance, even when individual squares vary slightly. If you enjoy bold patchwork designs, you can reverse the color order in alternating squares. This creates visual movement without changing the basic crochet instructions. Keep a small record of the colors used in each round if you plan to reproduce the same combination across several projects.
Maintaining consistent crochet tension is essential for producing evenly shaped squares. If your stitches are too tight, the square may curl inward or develop stiff corners. If they are too loose, the fabric may become uneven and lose its defined geometric structure. Practice working relaxed, uniform double crochet stitches, allowing enough space for the hook to move comfortably. Pay particular attention to the chain-two corner spaces, since these help the fabric expand without pulling. If your project begins to curl, inspect whether you have accidentally skipped a side space or corner group. Measuring the square occasionally and laying it flat on a table are simple ways to identify problems before continuing.
Another helpful technique when following a crochet granny square tutorial is learning how to change yarn colors cleanly. For a tidy transition, finish the final stitch of the previous round, cut the yarn with a short tail, and draw it through to secure the work. Attach the new color at a corner or another inconspicuous location, leaving a tail long enough to weave in securely. A standing double crochet may be used instead of a beginning chain three if you are familiar with that technique. Avoid tying bulky knots on the front of the square, as they may create visible bumps after finishing. Weaving the loose ends through the backs of several stitches, changing direction at least once, helps keep the work secure.
The Classic Crochet Square Pattern can be transformed into many practical handmade accessories. A single square can become a decorative coaster, depending on the yarn and finished dimensions. Two matching squares can be joined and lightly stuffed to create a small pincushion, while four or nine squares can form the front panel of a cushion cover. For a crochet tote bag, arrange several squares into panels and join them with slip stitches or single crochet seams. Larger projects, including baby blankets, lap blankets, table runners, and decorative throws, can be assembled by repeating the square in coordinating colors. Because the design is modular, you can build a project gradually rather than completing the entire item in one sitting.
Finishing techniques can greatly improve the appearance of your handmade crochet square. After weaving in the ends, gently shape the square by hand and check that the corners are symmetrical. If necessary, use a blocking mat and rustproof pins to stretch the square gently into an even shape. Cotton yarn can usually be damp-blocked, while acrylic yarn requires extra caution because excessive heat can permanently change the fibers. Allow the square to dry completely before removing the pins. When joining multiple squares, arrange them on a flat surface first to check the color distribution and overall design. A little attention to finishing makes the difference between an ordinary crochet project and a beautifully coordinated handmade piece.
How to Customize, Join, and Care for Your Classic Crochet Square Pattern
Once you have mastered the basic Classic Crochet Square Pattern, adjusting its size becomes simple. To create a larger square, continue adding traditional granny rounds before working the final single crochet border. Each new round follows the same principle: place (3 dc, ch 2, 3 dc) into every corner and work a 3-dc group into each chain-one space along the sides, separating groups with chain one. Each additional round adds one more three-double-crochet group along each side between the corners. This simple repetition allows you to create squares in many sizes without learning a completely new pattern. Always check your tension and corner spacing as the project grows, especially when working with heavier yarn.
Joining several squares together is one of the most rewarding ways to use this easy granny square pattern. The simplest method is the whip stitch join, which uses a yarn needle to sew the edges of two squares together. Place the squares with their right sides facing outward and carefully stitch through corresponding edge loops. Another popular option is the single crochet join, which creates a visible, textured seam between squares. The slip stitch join produces a flatter seam and works particularly well for blankets and decorative accessories. Whatever method you choose, use the same joining technique throughout the project to keep the finished appearance consistent. Blocking the squares to matching dimensions before joining makes assembly considerably easier.
When designing a crochet granny square blanket, it helps to calculate the required number of squares before starting. For example, if each finished square measures approximately 6 inches, a blanket arranged in eight columns and ten rows would contain 80 squares. Before adding seams or borders, that arrangement represents a nominal size of approximately 48 by 60 inches (122 by 152 cm). However, the final measurements may change slightly depending on joining methods, blocking, and edging. A smaller baby blanket might require fewer squares, while a full-sized decorative throw may need significantly more. Making a small sample layout on a table or floor allows you to visualize the finished design and adjust the arrangement before permanently joining the pieces.
Proper washing and storage are important for maintaining the beauty of your crochet square projects. Always follow the care instructions printed on the yarn label, particularly when working with delicate fibers or blends. Many cotton and acrylic yarns can be washed gently, but some require handwashing or special temperature settings. For handmade blankets and accessories, washing in cool water with a mild detergent is often a suitable approach when permitted by the yarn manufacturer. Avoid aggressive wringing or stretching, which can distort the stitches and corners. To dry, gently remove excess moisture with a towel and lay the item flat on a clean surface. Proper care helps preserve the color, texture, and original shape of the completed crochet work.
Common mistakes in the Classic Crochet Square Pattern are usually easy to correct once you know what to look for. Uneven sides often result from accidentally skipping a chain-one space or adding an extra three-double-crochet group. Rounded corners may occur when the chain-two corner space is missing or worked too tightly. If your square develops wavy edges, the stitch count may be too high or the hook may be too large for the yarn. Curling edges can indicate tight tension, an insufficient number of stitches, or a missed corner increase. Rather than continuing with a visible mistake, carefully unravel the affected round and work it again. This small correction helps keep the completed project symmetrical and makes joining multiple squares much easier.
For crocheters interested in developing their skills, this Classic Crochet Square Pattern provides an excellent foundation for more advanced techniques. Once you feel comfortable with traditional double crochet clusters, try incorporating puff stitches, popcorn stitches, bobble stitches, or textured borders into future designs. You can also experiment with solid granny squares, floral granny squares, and geometric motifs. Using different yarn textures creates another opportunity for customization, although combining yarns of very different thicknesses may require adjustments to stitch counts and hook sizes. Most importantly, enjoy the creative process and do not feel pressured to make every square perfect immediately. With each completed motif, your confidence, tension control, and understanding of crochet construction will naturally improve.
Frequently Asked Questions About the Classic Crochet Square Pattern
1. Is the Classic Crochet Square Pattern suitable for beginners?
Yes. The Classic Crochet Square Pattern is an excellent choice for beginners who already know how to make chains, slip stitches, and double crochet stitches. The repeated stitch groups make the pattern easy to memorize, and the compact size allows new crocheters to practice without feeling overwhelmed. If you are completely new to crochet, spend a little time practicing the individual stitches before starting your first square.
2. What is the best yarn for a classic crochet granny square?
The best yarn depends on the intended project. Cotton yarn is ideal for coasters, placemats, bags, and decorative accessories because it offers excellent stitch definition and durability. Acrylic yarn is often preferred for blankets because it is lightweight, affordable, and available in many colors. Cotton-acrylic blends can provide a balance of softness and structure. For beginners, a smooth, medium-weight yarn is generally easier to manage than highly textured or fuzzy yarn.
3. What crochet hook size should I use for this pattern?
A 4.0 mm to 5.0 mm crochet hook works well with many medium-weight yarns, although the exact size depends on the yarn manufacturer’s recommendation and your tension. If your square feels too stiff or curls inward, try using a slightly larger hook. If the stitches appear loose and uneven, a smaller hook may help. Always make a sample square before committing to a large project.
4. How do I keep my crochet squares perfectly square?
The most important factors are consistent tension, correct stitch placement, and properly formed corners. Make sure that every corner contains the required 3-dc groups and chain-two space during the traditional granny rounds. Count the stitch groups after completing each round, and check that all four sides match. Blocking the finished squares can also improve their shape and help create straight edges.
5. Why is my granny square curling instead of lying flat?
Curling usually occurs when the fabric is too tight or does not have enough room to expand. Check that you have worked the correct corner increases and have not accidentally skipped any chain spaces. Your yarn tension may also be too tight for the chosen hook size. If necessary, try a larger crochet hook and work the square again with more relaxed stitches.
6. Can I make the Classic Crochet Square Pattern using only one color?
Absolutely. A single-color crochet granny square can look just as attractive as a multicolor version, particularly when made with high-quality yarn that highlights the stitch texture. One-color squares are especially suitable for minimalist blankets, elegant cushion covers, and coordinated home accessories. Using one yarn color also eliminates frequent color changes and reduces the number of loose ends that need to be woven in.
7. How many granny squares do I need to make a blanket?
The number depends on the finished dimensions of each square and the desired blanket size. If each square measures 6 inches, an arrangement of eight squares across and ten squares down requires 80 crochet squares and produces an approximate pre-border layout of 48 by 60 inches. You may need to adjust the number depending on your joining method and the width of the outer border.
8. What is the difference between a classic granny square and a solid granny square?
A classic granny square contains groups of double crochet stitches separated by chain spaces, giving it a traditional openwork appearance. A solid granny square generally uses more continuous stitches with fewer decorative openings, creating a denser fabric. Classic granny squares are particularly popular for blankets, patchwork bags, and decorative accessories, while solid squares can be useful when a more closed surface is desired.
9. Can I use this crochet square pattern to make a handbag?
Yes. The Classic Crochet Square Pattern is an excellent foundation for handmade bags. You can join several completed squares to create the front, back, and sides of a tote or shoulder bag. For improved durability, consider using tightly worked cotton yarn, reinforcing the handles, and adding a fabric lining. The number and arrangement of squares can be adjusted to suit the desired bag size.
10. How do I change yarn colors without leaving visible knots?
The easiest approach is to complete the current round, fasten off neatly, and attach the new yarn in a corner space. Leave a yarn tail long enough to weave into the back of the finished stitches. Use a yarn needle to secure the loose ends carefully without pulling the fabric out of shape. Avoid bulky knots when possible, as they may become visible on the front of the square.
11. Do I need to block every granny square before joining them?
Blocking is not always required, but it is highly recommended when making blankets, bags, or other projects that involve joining multiple squares. Blocking crochet squares helps even out minor differences in size, defines the corners, and makes the joining process easier. For the best results, shape all squares to the same measurements and allow them to dry completely before assembly.
12. How long does it take to crochet one classic granny square?
The time depends on your experience, yarn choice, and the number of rounds. An experienced crocheter may complete a small five-round square in approximately 15–30 minutes, while a beginner may need considerably longer. Color changes and decorative borders can also increase the working time. As you become familiar with the repeated stitch sequence, your speed and consistency will naturally improve.
13. Can I add more rounds to make my crochet square larger?
Yes. Continue working traditional granny-square rounds before adding the final decorative border. In each additional round, maintain the corner combination of (3 dc, ch 2, 3 dc) and work three-double-crochet groups into the chain-one spaces along the sides. Keep the stitch spacing consistent and monitor the shape as the square grows.
14. What is the best way to join granny squares for a professional finish?
The whip stitch join, slip stitch join, and single crochet join are all excellent options. Whip stitching creates a flexible sewn seam, slip stitching can provide a flatter finish, and single crochet joining produces a raised decorative texture. The most suitable technique depends on the appearance you want for your finished project. For a clean, professional result, make sure the squares are evenly sized and align their corners carefully before joining.
15. Can this pattern be used to create gifts or handmade items for sale?
Yes. Completed squares can be used to make practical and attractive handmade products such as blankets, cushions, table accessories, and bags. If you plan to sell finished items, focus on consistent stitch quality, secure finishing, appropriate materials, and clear product descriptions. When making items intended for frequent washing or heavy use, choose durable yarns and construction methods suitable for that purpose.
Conclusion
The Classic Crochet Square Pattern is a timeless crochet technique that combines simplicity, creativity, and versatility. Throughout this tutorial, you learned how to select suitable yarn and crochet hooks, understand essential U.S. crochet abbreviations, construct the central ring, create traditional granny-square rounds, change colors, and finish the project with a decorative border. You also discovered practical techniques for maintaining even tension, correcting common mistakes, blocking finished squares, and joining individual motifs into larger handmade creations.
Whether you choose the elegant teal, cream, and light aqua palette shown in the inspiration image or experiment with your favorite colors, this easy classic crochet square pattern provides endless opportunities to create something beautiful and personal. From cozy blankets and decorative pillows to stylish handbags and handmade gifts, each completed square is another opportunity to improve your skills and express your creativity.
The most rewarding part of crocheting is seeing a simple ball of yarn gradually transform into something meaningful. With practice, patience, and attention to detail, even beginners can create attractive squares that look carefully crafted and professionally finished.