
One of the most appealing features of this Spiral Christmas Tree Pattern is how ordinary crochet stitches can transform into a decorative three-dimensional ornament. The design shown in the inspiration image combines a rich green spiral with a small golden star and a delicate bell at the bottom, creating a classic Christmas appearance. The spiral gradually becomes wider as it descends, resembling the natural silhouette of an evergreen tree. This effect is achieved by crocheting a long, gradually widening strip and shaping it into a suspended spiral. The ornament does not require stuffing or a complicated internal structure, which helps keep the finished decoration lightweight and easy to display. With appropriate yarn, consistent tension, and careful finishing, the project develops into an attractive handmade piece that can be enjoyed throughout the Christmas season. The same technique also works beautifully with ivory yarn for a snowy winter appearance or complementary colors for a coordinated collection of ornaments.
Creating your own crochet spiral Christmas tree ornament is also an excellent way to practice essential crochet skills while making something practical and decorative. Throughout this tutorial, you will learn how to select suitable materials, understand common U.S. crochet abbreviations, work a shaped crochet strip, and arrange the finished piece into its characteristic spiral form. You will also discover how to crochet a simple star topper, attach a hanging loop, and finish the ornament with a decorative bell.
The instructions provide an approachable version inspired by the photographed design rather than claiming to reproduce every stitch of the original. The project can be completed with relatively small quantities of yarn, making it a convenient way to use leftover supplies from other Christmas crafts. Best of all, the finished handmade Christmas tree decoration can become a thoughtful gift, a festive addition to your home, or part of a matching collection of holiday ornaments.
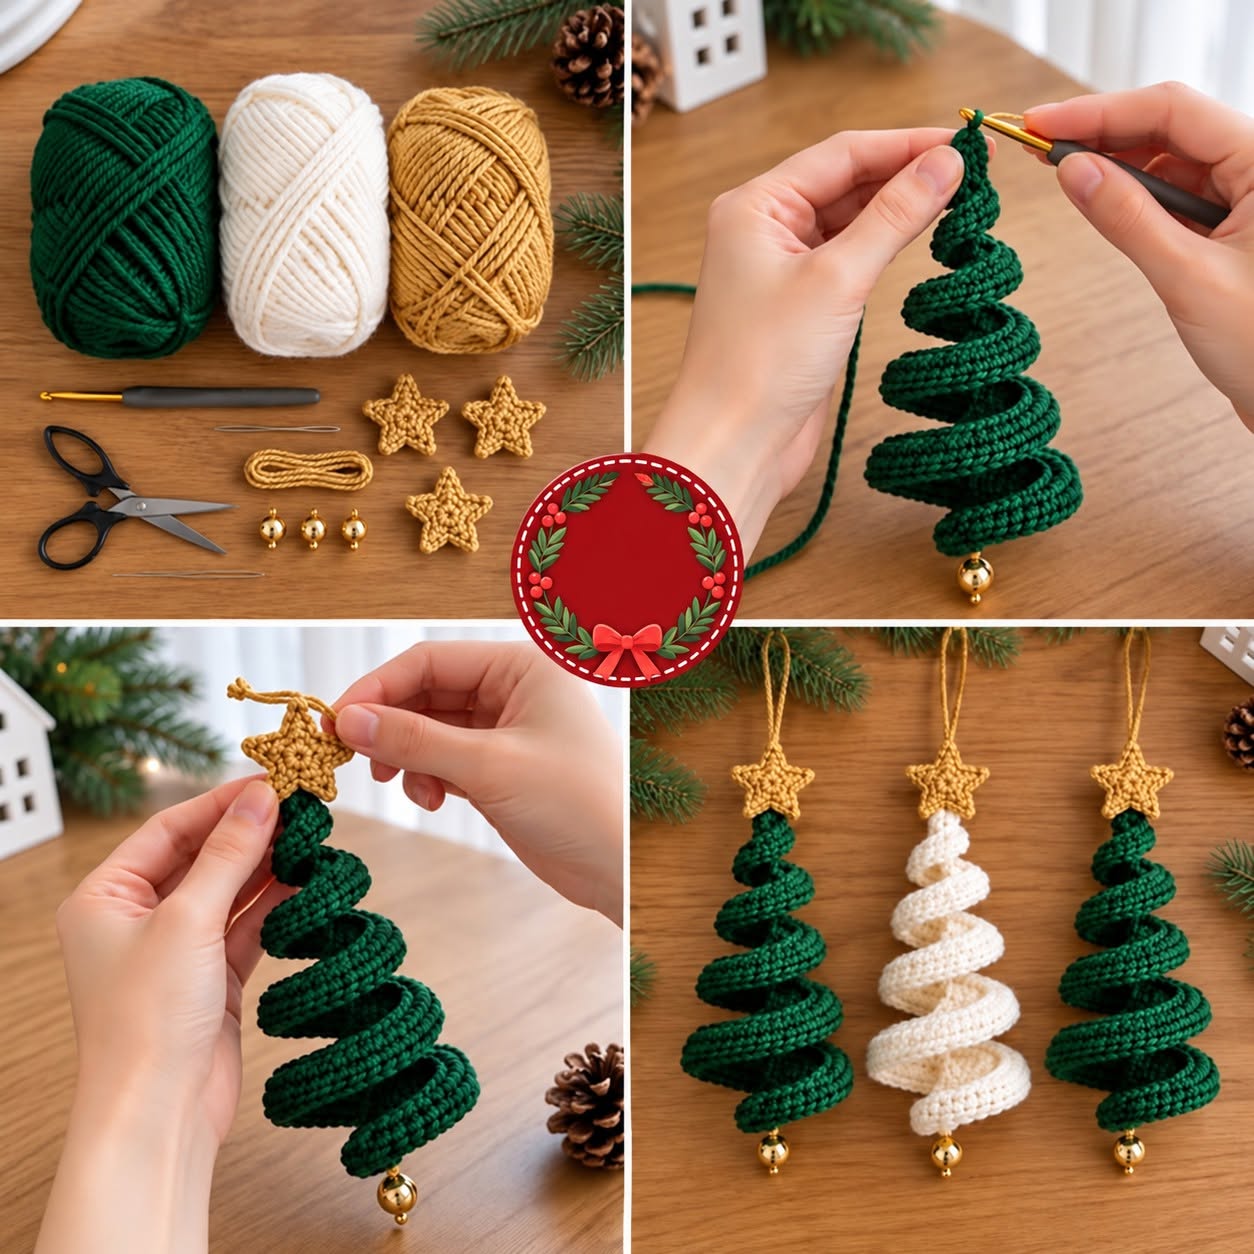
Materials and Crochet Supplies for the Spiral Christmas Tree Pattern
1. Choosing the right yarn for your Christmas tree. The first step in creating a beautiful Spiral Christmas Tree Pattern is selecting yarn that provides enough structure to maintain the curved shape. Medium-weight yarn, commonly labeled as worsted weight or Category 4, is a suitable choice for this project. Cotton yarn produces well-defined stitches and a firmer spiral, while acrylic yarn can create a softer, more flexible ornament. For a traditional Christmas appearance, choose dark forest green or evergreen yarn for the tree and metallic-looking gold or mustard-yellow yarn for the star. Cream, ivory, burgundy, and muted sage green are also attractive alternatives. Approximately 25–40 yards (23–37 meters) of green yarn should be sufficient for many ornaments of this size, depending on the finished dimensions and your stitch tension. Keep a small amount of contrasting yarn available for the decorative finishing details.
2. Selecting an appropriate crochet hook. The crochet hook plays an important role in the appearance and stability of your 3D crochet Christmas tree. For medium-weight cotton or acrylic yarn, a 3.5 mm to 4.0 mm crochet hook is a practical starting point, although the best size depends on the yarn and your personal tension. Using a slightly smaller hook than the yarn label recommends can create denser stitches that help the spiral maintain its shape. Avoid pulling each stitch excessively tight, since this may make the decorative strip difficult to shape. Instead, aim for even, firm stitches with enough flexibility to form smooth curves. If you prefer a miniature Christmas ornament, consider using lighter yarn and a smaller hook. Always crochet a small sample first if you are unfamiliar with your chosen yarn, particularly when you want several finished ornaments to have matching dimensions.
3. Gathering additional tools and decorations. In addition to yarn and a crochet hook, you will need a yarn needle, sharp scissors, stitch markers, and a measuring tape. A small golden bell, approximately 10–12 mm in diameter, can be added to the lower end of the tree to recreate the decorative appearance shown in the photograph. For the topper, you can crochet a miniature five-pointed star using golden yarn. A hanging loop made from matching yarn or decorative cord completes the ornament and allows it to be displayed easily. If you want to stabilize the spiral further, you may use a matching yarn strand running through the center of the ornament. All decorative accessories should be securely attached, especially if you plan to give the finished item as a gift. Small bells and other detachable embellishments are not suitable for decorations intended for young children.
4. Understanding the finished ornament dimensions. The approximate finished size of this Spiral Christmas Tree Pattern is 5–6 inches (13–15 cm) tall, including the star but excluding the hanging loop, with a maximum width of approximately 3–3.5 inches (7.5–9 cm). These measurements are estimates because the final dimensions depend on yarn weight, hook size, stitch tension, and how loosely or tightly you arrange the spiral. The crocheted strip itself will be considerably longer than the finished ornament, since it must wind around the central axis several times. A moderately flexible strip creates the best balance between movement and shape retention. Before beginning, decide whether you want a compact ornament for a traditional Christmas tree or a slightly larger decorative piece for a wreath, garland, or wall hanging. The written pattern below provides a small tree that can be adjusted after assembly.
5. Learning the essential U.S. crochet abbreviations. This easy crochet Christmas ornament tutorial uses standard U.S. crochet terminology, which is important because stitch names differ between American and British instructions. The main abbreviations are ch (chain), sc (single crochet), hdc (half double crochet), dc (double crochet), sl st (slip stitch), st (stitch), and sts (stitches). You will also encounter inc, meaning two stitches worked into the same stitch, and FO, meaning fasten off. The principal tree strip uses single crochet stitches, making it particularly approachable for crocheters who have mastered basic chain and turning techniques. The decorative star introduces taller stitches, but the instructions explain how to work them. Reading the abbreviations before starting helps prevent confusion and makes the project more enjoyable.
6. Preparing your workspace and planning the colors. Before crocheting, organize your supplies on a clean, well-lit surface where you can comfortably measure the growing strip. Keep the main yarn, contrasting star yarn, hook, scissors, and finishing needle within reach. The photographed design illustrates how elegant a green and gold Christmas decoration can look, especially when paired with natural wood and seasonal greenery. However, you can also create a coordinated collection using white and gold, deep red and cream, or several shades of green. For additional texture, try combining matte cotton yarn with a small amount of metallic-look yarn in the topper. When creating multiple ornaments, choose yarns of similar thickness so the finished decorations retain consistent proportions. A simple color plan makes the project visually cohesive while allowing every handmade tree to have its own personality.
Step-by-Step Crochet Instructions for the Spiral Christmas Tree Pattern
1. Crochet the narrow beginning of the spiral strip. To begin your Spiral Christmas Tree Pattern, create a slip knot with green yarn and ch 3. For Row 1, work 1 sc into the second chain from the hook and 1 sc into the next chain, giving you 2 sc. Ch 1 and turn. For Row 2, work 1 sc in each stitch across, maintaining 2 sc. Repeat the same instruction for Rows 3 and 4. These first rows form the narrow upper tip of the tree, which will sit directly beneath the decorative star. Keep the stitches even, but avoid stretching the starting section. The small initial width is essential because it allows the tree to begin with a delicate point before gradually expanding into broader coils. At this stage, the work should resemble a short, narrow crochet strip rather than a Christmas tree.
2. Gradually increase the width of the crochet strip. The distinctive silhouette of this spiral crochet tree pattern depends on making the strip wider as you work toward the bottom. For Row 5, work 2 sc into the first stitch, then 1 sc into the second stitch, resulting in 3 sc. Ch 1 and turn. Work Rows 6–12 evenly with 3 sc in each row. On Row 13, work 2 sc in the first stitch and 1 sc in each remaining stitch, bringing the total to 4 sc. Repeat the same increase method on Row 21 for 5 sc and Row 29 for 6 sc. This gradual shaping creates a widening strip without abrupt changes. Continue maintaining consistent stitch tension so both long edges remain relatively smooth. The wider lower section will form the fuller bottom coils of the ornament, while the narrower upper section will become the smaller turns near the top.
3. Complete the remaining rows of the tree body. Continue crocheting the shaped strip by working Rows 30–36 with 6 sc in each row. Increase at the beginning of Row 37 to obtain 7 sc, then work Rows 38–44 evenly. Increase again on Row 45 to reach 8 sc, and work Rows 46–52 with 8 sc each. For Row 53, make one final increase to obtain 9 sc, then crochet Rows 54–62 evenly with 9 sc in each row. Fasten off, leaving a long yarn tail for finishing. This produces a gradually widening strip that can be arranged into approximately four to five descending turns, depending on the yarn and the spacing between coils. If your strip appears too short for the desired shape, add several more rows at the widest end. These additional rows will extend the bottom coil without changing the narrow top section. The goal is a smooth, tapered appearance rather than an exact measurement.
4. Shape the strip into the Christmas tree spiral. Once the strip is finished, lay it flat on your workspace with the narrow beginning at the top and the widest section at the bottom. This step transforms the crocheted strip into the recognizable 3D spiral Christmas tree ornament. Hold the narrow tip in one hand and gently wind the strip around an imaginary vertical axis, allowing each successive turn to sit slightly lower and farther outward than the previous one. The narrowest section should create the upper coil, while the widest section becomes the broad base. Arrange the strip into a descending corkscrew shape with visible spaces between the turns. Insert a yarn strand through the inner portions of the coils if necessary to help maintain their positions. Adjust the spacing until the ornament resembles a small evergreen tree. The coils should hang naturally without being compressed into a flat stack.
5. Secure the spiral with a central support strand. To help your crochet Christmas tree decoration maintain its beautiful shape, use a sturdy length of matching yarn as an internal support. Thread approximately 18–24 inches (46–61 cm) of yarn through a needle, and secure one end to the narrow upper tip. Guide the yarn downward through the inner edge of each spiral turn, positioning the coils at progressively greater distances from the center. Use small securing stitches at selected points rather than pulling the yarn tightly through every coil. A firm but flexible central connection helps prevent the spiral from collapsing when the ornament hangs. The center strand should remain discreet and should not pull the coils together. Adjust the shape by hand as you work, creating an evenly spaced spiral that is narrow at the top and wider near the bottom. Secure the strand at the last coil with a strong knot and weave in the remaining end.
6. Check the tree silhouette and prepare for decoration. Before attaching the star or bell, hold the ornament upright by the narrow upper tip and examine the shape from several angles. The completed Spiral Christmas Tree Pattern should display a gently descending sequence of coils with an attractive triangular outline. If one side appears wider than the other, rotate or reposition the individual turns until the ornament looks balanced. The bottom coil should be the broadest portion, and the upper tip should remain centered above it. If the tree stretches excessively, shorten the central support strand slightly or add another discreet securing stitch between neighboring coils. This shaping stage is especially important when using soft acrylic yarn, since different fibers naturally respond differently to gravity. Once you are satisfied with the overall structure, the tree body is ready for its finishing touches.
How to Crochet the Star Topper and Assemble the Christmas Ornament
1. Begin the golden crochet star. A small crochet star topper adds a charming finishing detail to the Spiral Christmas Tree Pattern and helps establish its festive appearance. Using golden yarn and the same crochet hook, create a magic ring. Work ch 1, then 10 sc into the ring, and join with a slip stitch to the first sc. Pull the magic ring closed carefully so the center becomes compact. This small circular foundation forms the central portion of the star. If you are uncomfortable using a magic ring, you can ch 4, join into a circle, and work the same 10 sc into that ring. However, the magic ring generally creates a neater center with a smaller opening. Keep the tension consistent because the star needs to be firm enough to retain its five-pointed outline when hanging above the tree.
2. Form the five decorative star points. To create the points of the mini crochet Christmas star, repeat the following sequence five times: ch 4, work 1 sc into the second chain from the hook, 1 hdc into the next chain, and 1 dc into the final chain; then skip the next sc of the foundation round and sl st into the following sc. You should finish with five evenly spaced points around the center. Adjust each point gently with your fingers to emphasize its shape. If the star looks slightly curled, this can often be corrected through gentle shaping and blocking. Fasten off, leaving a long tail for assembly. The finished star should measure approximately 1–1.5 inches (2.5–4 cm), depending on the yarn and hook size. A small, well-defined topper complements the spiral tree without overwhelming its elegant structure.
3. Create the hanging loop. Every handmade crochet Christmas ornament needs a reliable hanging loop so it can be displayed securely. Cut a length of golden yarn or decorative cord measuring approximately 8–10 inches (20–25 cm). Fold the cord in half to create a loop and pass the two loose ends through the top of the star. Secure the ends with a firm knot on the back of the star, leaving a hanging loop approximately 2–3 inches (5–7.5 cm) long. For added stability, thread the loose ends into the back of the ornament and weave them through several stitches. If using slippery metallic cord, secure the knot with additional stitches rather than relying on a single knot. The loop should be centered above the star so the tree hangs vertically. A correctly positioned loop prevents the finished ornament from leaning noticeably to one side when suspended from a Christmas branch.
4. Attach the star to the tree. Position the completed golden star at the narrow upper tip of the Spiral Christmas Tree Pattern, making sure the hanging loop remains visible above it. Using the yarn tail left from crocheting the star, sew the lower back portion of the star securely to the top rows of the green spiral strip. Pass the needle through several stitches of both pieces, taking care not to distort the star points. Keep the stitches small and concealed behind the star whenever possible. Once attached, lift the ornament by its hanging loop to check whether the tree hangs straight. If the spiral tilts, reposition the attachment slightly before securing the final stitches. This joining process is simple, but careful placement makes an important difference in the finished appearance. A centered star creates a polished ornament that looks especially attractive when displayed among traditional Christmas decorations.
5. Add the decorative bell at the base. The small golden bell featured in the inspiration image gives this crochet spiral Christmas tree ornament an elegant holiday finishing touch. Choose a lightweight bell with an attachment loop, then secure it to the center of the widest lower coil using a strong yarn strand. If the bell is intended to hang slightly beneath the tree, allow approximately 0.4–0.8 inches (1–2 cm) of space between the crochet fabric and the bell. The bell should remain centered underneath the ornament to maintain balance. Sew through the attachment loop several times and fasten the yarn securely. You can also replace the bell with a small crocheted bead, a soft tassel, or a fabric-covered decorative element. For households with young children or pets, consider omitting small detachable decorations and using sewn-on yarn embellishments instead.
6. Finish, block, and inspect the ornament. The final stage of your Spiral Christmas Tree Pattern involves weaving in loose ends, adjusting the shape, and gently blocking any uneven sections. Use a yarn needle to hide remaining tails within the crochet stitches, working in more than one direction for security. If the star or spiral edges are slightly curled, lightly dampen the yarn and reshape the pieces by hand. Allow the decoration to dry completely before hanging it. Avoid direct heat, particularly when using acrylic yarn, because excessive temperatures can damage the fibers. Once dry, examine the star, support strand, hanging loop, and bell attachments to ensure everything is secure. Hold the ornament by its loop and allow it to settle naturally. Your finished tree should display a defined spiral structure, balanced proportions, and attractive handmade details suitable for seasonal decorating.
Creative Variations, Decorating Ideas, and Expert Crochet Tips
1. Experiment with elegant Christmas color combinations. One of the easiest ways to personalize the Spiral Christmas Tree Pattern is by changing the yarn colors. Traditional forest green paired with gold creates a timeless holiday appearance, while ivory and champagne gold provide a sophisticated winter-inspired alternative. Deep burgundy combined with cream can produce a warm vintage look, and sage green with natural beige offers a softer farmhouse style. You can also create multiple trees in different shades and display them together for an attractive coordinated collection. When selecting color combinations, consider the surrounding decorations in your home so the handmade ornaments complement your existing holiday theme. Metallic-look yarn can be especially effective for the star, although it may be slightly more challenging to work with. A carefully selected palette allows this simple crochet project to look refined and festive.
2. Adjust the size for different holiday decorations. The spiral crochet Christmas tree can be adapted to produce ornaments in several sizes. To create a smaller tree, use thinner yarn, a smaller hook, and fewer rows in the shaped strip. For a larger decoration, choose thicker yarn, a corresponding hook, and additional rows at each width before increasing. The exact dimensions will vary because the spiral can be arranged more tightly or loosely. When enlarging the project, remember that additional weight may cause the strip to stretch downward, so a stronger central support may be necessary. A compact version works beautifully as a gift topper or miniature tree ornament, while a larger design can become a decorative accent for a Christmas wreath or seasonal wall display. Making a few different sizes adds visual variety to a handmade ornament collection.
3. Explore different yarn textures and finishing effects. Yarn texture has a significant influence on the final appearance of a 3D crochet Christmas ornament. Smooth cotton yarn emphasizes the individual stitches and often creates a defined, structured spiral. Soft acrylic yarn produces a comfortable, lightweight decoration that can look especially inviting in traditional Christmas settings. Slightly textured yarn can add visual richness, although heavily fluffy fibers may hide the stitch definition and make assembly more challenging. For a modern appearance, try a matte yarn with a subtle metallic accent in the topper. For a more rustic look, use natural-colored cotton with wooden-style decorative elements. Beginners will generally find smooth yarn easiest to manage, since every stitch remains visible during construction. Choosing a yarn that complements the intended design helps make the completed tree both beautiful and practical.
4. Prevent common crochet and shaping mistakes. A successful Spiral Christmas Tree Pattern depends on consistent stitch counts and careful shaping. One common mistake is forgetting the increase rows, which can produce an uneven silhouette or a strip that remains too narrow at the bottom. Another issue occurs when the central support strand is pulled excessively tight, compressing the coils and eliminating the open spiral spaces. To avoid these problems, count your stitches at the end of each increase row and inspect the strip before assembly. Use stitch markers if necessary to identify important shaping points. When arranging the spiral, work gradually rather than forcing the strip into position. If the ornament twists unevenly, loosen the supporting stitches and readjust the spacing. Small corrections during assembly are much easier than reshaping a fully decorated ornament after everything has been attached.
5. Use handmade spiral trees throughout your Christmas décor. Finished crochet Christmas tree ornaments offer numerous decorating possibilities beyond a traditional Christmas tree. Hang several spiral trees at different heights from a seasonal branch arrangement, attach them to a handmade garland, or use them as charming accents on wrapped gifts. A coordinated collection can also decorate a mantel, holiday centerpiece, or festive craft display. When decorating with several ornaments, vary their size and color slightly while maintaining a consistent style. Green, white, and gold trees look particularly attractive together because they combine familiar Christmas colors with an elegant neutral palette. Since the ornaments are lightweight, they can be attached to many types of decorative arrangements. However, avoid placing yarn decorations near open flames, candles, heaters, or other sources of excessive heat.
6. Care for your crochet Christmas ornaments year after year. Proper storage helps preserve the beauty of a handmade spiral Christmas tree long after the holiday season ends. Before packing the ornaments away, make sure they are completely clean and dry. Remove any dust gently with a soft brush or by lightly shaking the decoration. If washing is necessary, follow the care instructions for the yarn used and consider removing any metal embellishments beforehand. Allow the ornament to dry fully in its intended shape so the spiral retains its definition. Store each tree in a breathable fabric bag or a box with enough space to prevent crushing the coils. Avoid placing heavy decorations on top of delicate crochet pieces. When the next Christmas season arrives, gently reshape the spirals, straighten the stars, and check that the hanging loops remain secure before displaying them again.
Frequently Asked Questions About the Spiral Christmas Tree Pattern
Is the Spiral Christmas Tree Pattern suitable for beginners?
Yes, this easy crochet Christmas tree pattern is suitable for beginners who already know how to make chains, single crochet stitches, and simple increases. The main tree body uses basic stitches worked in rows, making it easier to follow than many complicated three-dimensional crochet projects. The most challenging part is arranging and securing the strip into a stable spiral. Beginners can take their time during this stage and adjust the coils until the desired Christmas tree silhouette appears. The small star requires a few additional crochet stitches, but it can be completed with practice.
How long does it take to crochet a spiral Christmas tree ornament?
Most crocheters can complete a spiral Christmas tree ornament in approximately one to three hours, depending on their experience, yarn choice, and the amount of decorative finishing involved. Experienced crocheters may work the main strip relatively quickly, while beginners may need additional time to count stitches and arrange the spiral. Crocheting the star, attaching the bell, and securing the hanging loop also require careful attention. Making several ornaments becomes faster once you become familiar with the construction process.
What type of yarn works best for a 3D spiral Christmas tree?
Medium-weight cotton yarn is an excellent choice because it provides stitch definition and enough firmness to support the spiral shape. Acrylic yarn is another practical option, particularly when you want lightweight and soft holiday decorations. For a structured crochet Christmas ornament, choose a yarn that does not stretch excessively and use an appropriately sized hook. Smooth yarn is especially helpful for beginners because the stitches are easier to identify and count during construction.
Can I make the Spiral Christmas Tree Pattern without a bell?
Absolutely. The bell is an optional decorative element rather than a structural requirement. You can finish the lower coil with a small crochet bead, a yarn tassel, or no additional embellishment at all. A minimalist spiral Christmas tree with a simple star topper can look equally elegant, especially when crocheted in ivory, gold, or muted green. Omitting small decorative pieces is also a sensible option for ornaments displayed in households with young children or curious pets.
Why is my crochet Christmas tree losing its spiral shape?
A crochet spiral tree may lose its shape if the yarn is too soft, the stitch tension is too loose, or the center support is not secure enough. Another possible reason is uneven spacing between the coils. To correct this, reposition the spiral turns and add discreet securing stitches along the inner edge. If the tree remains too flexible, consider using a firmer cotton yarn or a slightly smaller crochet hook for your next ornament. Gentle blocking can also improve the finished appearance, although it will not replace the need for structural support.
How can I make the spiral Christmas tree larger?
To increase the finished size, use thicker yarn and a larger crochet hook or extend the shaped strip with additional rows. If you add rows, distribute them gradually between the increase points so the strip continues to widen smoothly. A larger 3D crochet Christmas tree will need additional support to maintain its shape, particularly if the finished decoration becomes heavy. Check the proportions before attaching the star or bell, and adjust the spacing between the coils to achieve a balanced appearance.
Can I use this crochet pattern to make Christmas gifts?
Yes. Handmade ornaments created from the Spiral Christmas Tree Pattern make thoughtful seasonal gifts for friends, family members, neighbors, and craft enthusiasts. You can personalize the colors to match the recipient’s Christmas décor or create a coordinating set of green, white, and gold trees. A handmade gift tag or decorative ribbon can make the presentation even more special. If giving the ornament to a household with young children, avoid small detachable embellishments and ensure all components are securely sewn in place.
How do I keep my crochet star from curling?
A crochet star may curl when the stitches are worked too tightly or when the yarn tension varies between points. Make sure each star point contains the correct stitches and gently spread the points into position after completing the pattern. Light blocking can help flatten the star, particularly when using cotton yarn. Allow it to dry completely before attaching it to the tree. Using a smaller hook can create a firmer star, but excessively tight stitches may actually increase curling, so aim for balanced tension.
Do I need to use wire inside the Spiral Christmas Tree Pattern?
No. The version explained in this tutorial is designed to use a crocheted strip and a central yarn support rather than a wire frame. This creates a softer, lightweight ornament that can be reshaped by hand. Some alternative decorative designs incorporate wire for additional structure, but it is not necessary for this pattern. A carefully secured yarn support can maintain the spacing between the coils while preserving the handmade appearance of the tree.
What is the best way to display several spiral crochet Christmas trees together?
A coordinated set of crochet Christmas ornaments looks attractive when displayed at varying heights. You can hang them from different branches of a Christmas tree, incorporate them into a seasonal garland, or arrange them on a decorative branch display. Combining green, ivory, and gold creates a classic look, while mixing different tree sizes adds depth and visual interest. Keep enough space between ornaments so their spiral shapes remain visible and do not become tangled.
Conclusion:
The Spiral Christmas Tree Pattern is a delightful crochet project that combines simple techniques with an eye-catching three-dimensional design. Throughout this tutorial, you have learned how to choose suitable yarn and tools, understand essential U.S. crochet abbreviations, create a gradually widening strip, and transform that strip into an elegant hanging Christmas tree. You have also discovered how to crochet a golden star topper, attach a decorative bell, and secure the ornament so it maintains its beautiful spiral silhouette.
One of the greatest advantages of this handmade crochet Christmas tree decoration is its versatility. You can experiment with different colors, adjust the size, explore alternative yarn textures, or create an entire collection of matching ornaments. Whether you make a traditional forest-green version or an elegant winter-white tree, each finished piece brings a personal handmade touch to your Christmas celebrations.