
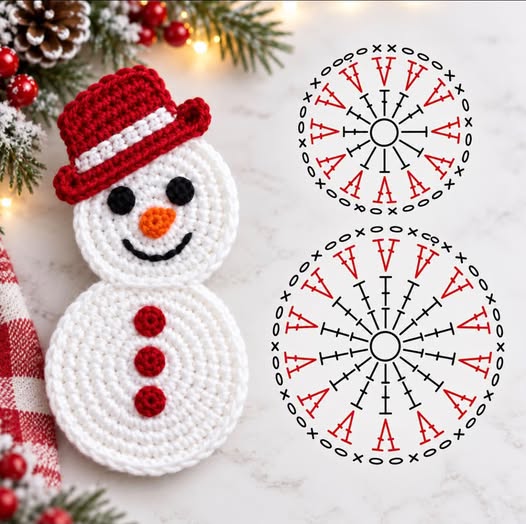
Crochet Snowman Pattern is a cheerful winter project that combines simple crochet circles, small decorative details, and classic Christmas colors into an adorable handmade decoration. This design is especially appealing because the snowman is built from two flat crocheted circles rather than a complicated three-dimensional body, making it approachable for confident beginners as well as experienced crocheters. The larger white circle forms the body, while a slightly smaller circle becomes the head. Once these pieces are joined, the personality comes from the tiny black eyes, orange carrot nose, curved smile, red buttons, and festive red-and-white hat. The finished Crochet Snowman can be displayed on a table, attached to a wreath, turned into a hanging ornament, or incorporated into other Christmas decorations. Because the basic shapes are easy to customize, the project is also a wonderful way to use small amounts of yarn left over from previous holiday crafts.
One of the greatest advantages of this Crochet Snowman Pattern is that it teaches several useful crochet techniques in one manageable project. You will practice working in continuous or joined rounds, making increases, keeping a flat circle smooth, changing colors, creating small appliqué pieces, and sewing individual components together neatly. The body and head can be worked mainly in single crochet, although some crocheters may prefer half double crochet for a slightly softer and quicker result. The decorative pieces require only small amounts of yarn, so the project is economical and easy to personalize. For a traditional appearance, white, bright red, black, and orange yarn create the familiar winter palette shown in the design. You can also experiment with burgundy, forest green, gold, icy blue, or pastel shades if you want a completely different seasonal look.
The instructions below explain the construction of the snowman step by step using standard U.S. crochet terminology. Exact dimensions may vary depending on yarn weight, hook size, and personal tension, so the most important goal is maintaining flat, even circles that do not cup or ripple excessively. A medium-weight yarn paired with an appropriately sized crochet hook creates a sturdy decoration with clearly visible stitches. If you prefer a smaller ornament, choose lightweight yarn and a smaller hook. For a larger wall decoration, use thicker yarn and increase the number of rounds while following the same basic increase formula. Take your time when attaching the facial features and hat, because careful placement transforms simple crocheted circles into a polished handmade snowman crochet decoration.
Materials, Crochet Terms, and Preparing the Snowman Pieces
For this Crochet Snowman Pattern, prepare white yarn for the head and body, red yarn for the hat and buttons, a small amount of black yarn for the eyes and mouth, and orange yarn for the nose. Medium-weight acrylic or cotton yarn works especially well because it provides enough structure for a flat decoration while still producing comfortable, flexible stitches. You will also need a crochet hook suited to your chosen yarn, a yarn needle, scissors, stitch markers, and optional fiberfill if you want the finished snowman to have a slightly padded appearance.
The main crochet abbreviation used throughout the project is sc, meaning single crochet. Other useful abbreviations include ch for chain, sl st for slip stitch, st for stitch, inc for increase, and MR for magic ring. An increase means working two single crochet stitches into the same stitch. Regular increases are essential when crocheting flat circles because they provide enough extra stitches for each new round to remain level.
Begin with the larger body circle using white yarn. Make an MR, then work 6 sc into the ring and gently pull the ring closed. If you prefer not to use a magic ring, chain 2 and work the first-round stitches into the second chain from the hook. Place a stitch marker in the first stitch if you are working in continuous rounds. This small step makes counting much easier and reduces the possibility of accidentally adding or missing stitches.
For Round 2, work 2 sc into every stitch around, giving you 12 stitches. For Round 3, repeat 1 sc, inc around for 18 stitches. In Round 4, repeat 2 sc, inc around for 24 stitches. Continue expanding the circle by placing one additional regular single crochet between each increase on every new round. The sequence naturally becomes 3 sc, inc, then 4 sc, inc, and so on.
Continue adding rounds until the body measures approximately 5 to 6 inches, or about 13 to 15 cm, across. The exact size is flexible. If the circle begins forming a bowl shape, you may need slightly more frequent increases or looser tension. If the edge becomes noticeably wavy, there may be too many increases. A well-made crochet circle should lie comfortably flat without requiring aggressive stretching.
Make the head using the same circular method, but stop several rounds earlier so it remains smaller than the body. A finished diameter of approximately 4 to 4.5 inches, or 10 to 11.5 cm, creates balanced proportions for this style of Crochet Snowman. Fasten off both pieces while leaving a long tail on at least one circle. These yarn tails can later be used to join the head and body securely.
Step-by-Step Crochet Snowman Face, Buttons, and Assembly
Before joining the main circles, place the head above the body on a flat surface and experiment with positioning. The circles should overlap slightly so the connection looks natural rather than appearing as two unrelated pieces. Thread the long white yarn tail onto a yarn needle and sew through both layers along the overlapping section. Make several secure stitches while keeping the seam hidden as much as possible.
The eyes can be made as small black crocheted circles. Start with black yarn and create a magic ring. Work 5 or 6 single crochet stitches into the ring, close it tightly, and slip stitch to finish. Depending on your yarn thickness, one round may be enough. Make a second identical circle. Position both eyes evenly in the upper half of the head and sew them into place using black yarn.
For the orange carrot nose, crochet a tiny tapered triangle or cone-shaped appliqué. One simple option is to chain 4, work a slip stitch into the second chain from the hook, single crochet into the next chain, and half double crochet into the final chain. Fasten off and shape the little piece with your fingers. Sew it horizontally or at a slight angle between and below the eyes to create the classic snowman face.
The smile can be embroidered rather than crocheted separately. Thread a length of black yarn onto your yarn needle and create several short stitches in a gentle upward curve beneath the nose. Avoid pulling the yarn too tightly because this may distort the white head circle. Five to seven small embroidered segments usually provide a friendly expression while keeping the design simple.
To crochet the red buttons, make three miniature circles in the same way you created the eyes. Start each with a magic ring and work approximately 5 or 6 single crochet stitches into the center. Close the ring tightly and fasten off. Arrange the three red circles vertically down the center of the body. Leave even spacing between them before sewing each button securely into place.
At this stage, examine the entire Crochet Snowman Pattern from a short distance. Check whether the head sits straight, the eyes are level, the nose is centered, and the buttons follow a balanced vertical line. Small placement adjustments can dramatically improve the finished appearance. Once you are satisfied, weave all yarn ends into the back of the project and trim excess yarn carefully.
How to Crochet the Red and White Snowman Hat
The hat is one of the most charming parts of this Crochet Snowman Pattern, and it can be created separately before being stitched onto the head. Begin with red yarn and chain enough stitches to create a short foundation that will eventually form the top section of the hat. For a medium-sized snowman, a chain of approximately 15 to 18 stitches is a practical starting point, although you should adjust this according to the width of your crocheted head.
Work back across the foundation chain using single crochet. Continue working in rows until the red section is tall enough to cover approximately the upper third of the snowman head. To create a slightly rounded crown instead of a perfect rectangle, decrease one stitch near each edge during the final few rows. This creates the gentle tapered appearance commonly seen in handmade winter hats.
Change to white yarn to create the decorative hat band. Join the white yarn along the lower edge of the red hat and work one or two rows of single crochet. A bright white stripe provides attractive contrast and visually connects the hat to the snowman’s white body. Keep your stitches neat and avoid working the band too tightly, which could cause the hat to curl.
The red brim can be worked as a separate strip. Chain enough stitches to extend slightly beyond both sides of the snowman’s head. Beginning in the second chain from the hook, work single crochet across. Make two or three rows depending on the thickness you prefer. A slightly wider brim gives the hat a playful handcrafted appearance and creates the impression that it is sitting naturally on the head.
Position the main hat section above the white band, then arrange the long red brim across the lower edge. Use red yarn and a yarn needle to stitch the pieces together. Once the hat is assembled, place it at a slight angle on top of the snowman. This tilted position often adds more character than attaching it perfectly straight.
Sew the hat firmly to the white head, taking care that your stitches remain mostly hidden. Attach the brim across the front and secure the upper hat section along the back and sides. If desired, add a small red crocheted bump, pom-pom, or curved extension near one side. The hat is also an excellent place to personalize your Crochet Snowman with colors that coordinate with your holiday décor.
Finishing, Sizing, Decorating, and Customizing Your Crochet Snowman Pattern
Once all the main components are attached, gently shape the snowman by hand. Lay it flat and smooth the circular edges outward. If you used acrylic yarn and the piece needs additional shaping, light steam blocking may help, but avoid touching the yarn directly with a hot iron. Cotton pieces can usually be damp-blocked by pinning them into shape and allowing them to dry completely.
The completed Crochet Snowman Pattern can remain as a flat decorative piece, or you can add a backing layer to make it more substantial. To create a thicker snowman, crochet a second body circle and a second head circle. Place matching circles together and single crochet around their outer edges. Before closing completely, insert a small amount of fiberfill. This creates a lightly padded ornament while preserving the recognizable flat-circle construction.
If you want to hang the snowman, crochet a simple loop at the top of the hat. Join yarn to the upper edge, chain approximately 15 to 25 stitches, and slip stitch back into the same area. Adjust the chain length depending on where you plan to display the ornament. A shorter loop works beautifully on a Christmas tree, while a longer loop may be better for a wall hook or door decoration.
You can also transform this snowman crochet pattern into a holiday garland. Make several snowmen in slightly different sizes, then join them to a long crocheted chain. Another option is to alternate snowmen with stars, circles, or Christmas tree motifs. Keeping the body construction simple allows you to create multiple pieces without having to learn a completely different pattern for every ornament.
Color customization provides another easy way to create a unique result. Instead of a red hat, try forest green, navy blue, burgundy, gold, or icy turquoise. The buttons can match the hat or provide extra contrast. You may even embroider tiny snowflakes onto the hat or add a narrow crocheted scarf around the neck. These additions should remain lightweight so they do not pull the flat snowman out of shape.
Proper finishing is essential for a project that looks neat from every angle. Weave yarn tails beneath several stitches on the back before trimming them. Check every appliqué piece to make sure it is firmly attached. If the snowman will be handled frequently, reinforce the eyes, buttons, and hat with additional sewing stitches. Your finished Crochet Snowman Pattern should feel secure, balanced, and ready to become part of your seasonal decorating collection.
Frequently Asked Questions About the Crochet Snowman Pattern
Is this Crochet Snowman Pattern suitable for beginners?
Yes. The project is beginner-friendly for crocheters who already understand basic stitches such as single crochet, chain stitches, slip stitches, and simple increases. Most of the snowman’s construction is based on flat circles, making it much easier than complicated amigurumi projects that require extensive shaping.
What yarn is best for a Crochet Snowman?
Medium-weight acrylic or cotton yarn is a practical choice. Acrylic yarn is affordable, soft, widely available, and easy to work with, while cotton provides excellent stitch definition and creates a slightly firmer decorative piece. The most important factor is choosing yarn that works well with your crochet hook and desired finished size.
How do I keep my crochet circles flat?
Use evenly spaced increases in every round. Starting with 6 single crochet stitches, increase to 12, then 18, 24, 30, and continue following the same pattern. If the circle curls upward, you may need more increases or looser tension. If it becomes very wavy, reduce the number of increases slightly.
Can I make the snowman larger or smaller?
Absolutely. To make a larger snowman, continue crocheting additional increase rounds. For a smaller version, stop after fewer rounds or use thinner yarn and a smaller hook. Try to maintain a proportional difference between the head and body so the design remains visually balanced.
Can the snowman be turned into a Christmas tree ornament?
Yes. Simply add a crocheted chain loop to the top of the hat. For a lightweight tree ornament, avoid heavy stuffing and use a thinner yarn. The flat construction makes this project particularly suitable for hanging decorations.
Do I need to stuff the snowman?
No. The pattern works beautifully as a flat decoration. Stuffing is optional and only necessary if you want a thicker or slightly dimensional snowman. If you decide to stuff it, create matching back pieces for the head and body and join the corresponding circles around their edges.
How can I make the face look more symmetrical?
Place all facial pieces temporarily before sewing anything down. Measure or visually compare the distance between the eyes, then position the nose in the center. Create the smile only after the eyes and nose are securely attached. Taking a photo before sewing can also help you notice small alignment issues.
Can I use double crochet instead of single crochet?
You can, but the appearance will change. Single crochet creates a dense surface that works especially well for appliqués and ornaments. Double crochet produces a softer, more open fabric. If you substitute another stitch, the increase formula may also need adjustment to keep the circles flat.
How long does a Crochet Snowman take to make?
The time depends on experience and size, but this type of flat project can usually be completed much faster than a fully stuffed amigurumi figure. The basic circles are repetitive, while attaching the facial details and hat usually requires the most careful work.
What can I do with leftover yarn from this project?
The small decorative elements make excellent use of leftover yarn. Tiny amounts of red, black, orange, white, and other colors can be saved for additional snowman buttons, miniature hats, noses, hanging loops, or other seasonal crochet appliqués.
Conclusion
The Crochet Snowman Pattern is a charming way to turn basic crochet techniques into a festive handmade decoration. Throughout this tutorial, you learned how to create flat circular pieces using evenly spaced increases, crochet separate head and body sections, join them securely, create simple eyes and buttons, shape an orange carrot nose, embroider a friendly smile, and construct a red-and-white winter hat.
You also learned how important tension and stitch placement are when making a flat crochet snowman, along with practical methods for adjusting the size, adding a hanging loop, creating a padded version, customizing colors, and improving the final appearance through careful finishing. Because the project uses relatively small amounts of yarn and mainly relies on basic stitches, it can become a relaxing addition to your Christmas crafting routine.
The finished snowman can be used as a tree ornament, wall decoration, gift embellishment, garland piece, table decoration, or handmade holiday keepsake. Once you understand the basic construction, you can easily create an entire collection with different hats, buttons, expressions, colors, and sizes while following the same Crochet Snowman Pattern foundation.