
The Crochet Snowflake Pattern is a beautiful way to turn a small amount of yarn into an elegant handmade decoration that can be used for Christmas trees, winter garlands, gift packages, windows, wreaths, or seasonal table displays. This project is especially appealing because it combines simple crochet stitches with a delicate geometric structure, creating an ornament that looks much more complicated than it really is. The snowflake shown in this style begins with a compact center, expands through evenly spaced spokes, and finishes with decorative loops or picots around the outer edge. Because the design is worked in rounds, it is easy to repeat the same sequence around the piece and maintain symmetry. Cotton yarn gives the snowflake excellent definition, while a slightly softer yarn can create a more relaxed and textured finish. Once you understand how the center ring, chains, double crochet stitches, and decorative points work together, the pattern becomes very enjoyable to repeat.
A handmade crochet snowflake is also an excellent project for crocheters who want to practice working in the round without committing to a large blanket or garment. Each round introduces an important crochet technique, including joining with a slip stitch, creating chain spaces, working several stitches into one space, and shaping decorative points. Since snowflakes are naturally symmetrical, the pattern encourages you to count carefully and recognize repeated stitch groups. That makes this project useful for improving consistency as well as creating something attractive. The finished ornament can be made in traditional white, icy blue, silver-gray, cream, or even rich jewel colors such as navy blue, burgundy, or emerald. A blue version, similar to the decorative style pictured, creates a sophisticated winter appearance that works well with neutral home décor. The Crochet Snowflake Pattern can also be adapted simply by changing yarn thickness or hook size.
Before beginning, it helps to understand that gauge is not as important for this project as it would be for clothing. Instead, the most important goals are even tension, clearly defined stitches, and symmetrical points. For a small ornament, a fine cotton or lightweight yarn paired with approximately a 2.5 mm to 3.5 mm crochet hook is a practical combination. Medium-weight yarn and a larger hook will create a larger snowflake that can be used as a coaster, wall decoration, or centerpiece element. You will also need scissors, a yarn needle, and optionally blocking pins and fabric stiffener if you want a particularly crisp finished shape. In U.S. crochet terminology, the main stitches used in this tutorial are chain (ch), slip stitch (sl st), single crochet (sc), double crochet (dc), and picot. Once those basic techniques are familiar, the entire Crochet Snowflake Pattern becomes a sequence of repeated sections.
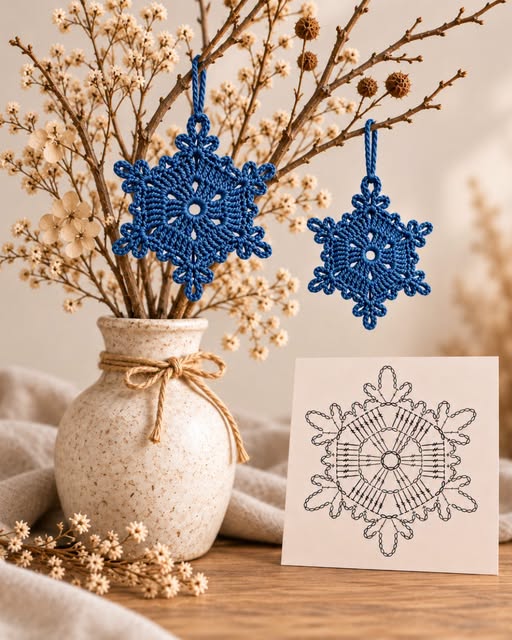
Materials, Crochet Stitches, and Snowflake Construction
For this Crochet Snowflake Pattern, choose a smooth yarn that allows the decorative stitches to remain visible. Mercerized cotton is particularly effective because it creates crisp stitch definition and can hold its shape after blocking. Approximately 15 to 30 yards of yarn is normally enough for one ornament, depending on its size. A 2.75 mm or 3.0 mm hook works nicely with fine cotton, although you should always choose a hook that produces firm but comfortable stitches. Keep a yarn needle nearby for weaving in the ends neatly after the final round.
The chain stitch, abbreviated as ch, is used throughout the snowflake to create open spaces and decorative loops. To make a chain, yarn over and pull the yarn through the loop already on your hook. Long chain sections become the open spaces between the snowflake points, while shorter chains help form picots. Try to keep every chain similar in size. Uneven chains can make one section longer than another and disturb the balanced appearance of the finished snowflake.
The slip stitch, written as sl st, is primarily used to join rounds and move the working yarn without adding much height. Insert the hook into the indicated stitch, yarn over, and pull the yarn through the stitch and the loop on your hook at the same time. When joining a round, avoid pulling the slip stitch too tightly. A tight join can distort the center and make the following round difficult to work.
The single crochet, abbreviated sc, creates a compact stitch that is useful around delicate decorative areas. Insert the hook, yarn over, pull up a loop, yarn over again, and pull through both loops. Single crochet can be used between larger loops to anchor the snowflake points firmly. Because this stitch is short, it provides stability without adding unnecessary bulk around the outer edge.
The double crochet, abbreviated dc, creates the height needed for the radiating center of the snowflake. Yarn over, insert the hook into the required stitch or chain space, yarn over and pull up a loop. Yarn over and pull through two loops, then yarn over and pull through the final two loops. Double crochet stitches create longer vertical lines that visually resemble the narrow rays extending outward from the center.
A picot is a small decorative loop that adds the tiny pointed details commonly associated with crocheted snowflakes. One simple picot can be created by chaining 3 and slip stitching into the first chain. Larger picots may use four or five chains. In this pattern, picots are added near the outer points so the finished ornament develops a delicate, crystalline appearance instead of looking like a simple circle.
Step-by-Step Crochet Snowflake Pattern
Begin the Crochet Snowflake Pattern with a magic ring, or chain 5 and join the first and last chains with a slip stitch to create a small center ring. The magic-ring method makes it easier to tighten the center after the first round. If you prefer the chain-ring method, make sure the opening is large enough to comfortably hold all of the first-round stitches. Do not tighten the foundation too much because you will need to insert your hook into the center several times.
For Round 1, chain 3 to represent the height of the first double crochet. Work 1 double crochet into the center ring, then chain 2. Continue by working 2 double crochets into the ring followed by chain 2. Repeat this sequence until you have created six evenly spaced groups of 2 double crochets. Join with a slip stitch at the top of the beginning chain. If you prefer an eight-point variation similar to many decorative crochet motifs, create eight repeated groups instead.
For Round 2, slip stitch until your hook reaches the first chain-2 space. Chain 3, then work 2 double crochets into the same space, chain 3, and work 3 more double crochets into that space. This creates a small fan-shaped section. Move directly to the next chain space and repeat the same sequence: 3 double crochets, chain 3, and 3 double crochets. Continue around the entire center and join the round with a slip stitch.
For Round 3, move into the first chain-3 space. This round begins to transform the circular motif into a recognizable snowflake. Work 1 single crochet into the space, chain 5, and work another single crochet into the same space. Chain 3, then move to the next major chain space and repeat. The longer chain-5 sections form the beginning of each snowflake point, while the chain-3 sections provide separation between them.
For Round 4, work carefully around each long chain loop. Into the first chain-5 loop, work 1 single crochet, chain 3, make a picot, chain 5, make another picot, chain 3, and then work another single crochet into the same loop. This sequence creates a decorative branch with a longer center tip. You can adjust the exact chain lengths if you prefer narrower or longer snowflake arms. The important detail is that every repeated section uses the same stitch sequence.
Continue Round 4 around every remaining chain-5 loop, keeping the decorative points consistent. Where you reach the smaller chain-3 spaces between the main points, work a slip stitch or single crochet to keep the edge compact. Join the final section carefully and fasten off, leaving approximately 6 inches of yarn. Thread the tail through a yarn needle and weave it invisibly through several nearby stitches. At this stage, the Crochet Snowflake Pattern is structurally complete, although blocking will dramatically improve its appearance.
How to Shape, Block, and Finish the Crochet Snowflake
Blocking is one of the most important finishing steps for a detailed crochet snowflake ornament. The motif may look slightly curled or uneven when it first comes off the hook, especially if it contains several chain loops. Light blocking allows every point to open and gives the snowflake a balanced geometric form. Place the snowflake on a blocking mat or another pin-friendly surface and gently stretch each main point outward.
Measure from the center to each outer point while pinning if you want a particularly symmetrical result. Place one pin at the tip of every main arm and additional pins in the smaller side picots. Rather than stretching aggressively, adjust the piece gradually. The goal is to straighten the stitches while preserving their natural structure. When all the points are positioned evenly, the Crochet Snowflake Pattern should resemble a delicate radial star.
For cotton yarn, lightly misting the snowflake with clean water is often enough for basic blocking. Allow it to dry completely before removing the pins. Another option is steam blocking, but the heat should never touch the yarn directly. If you are using acrylic yarn, excessive heat can permanently alter the fibers, so follow a cautious approach. Traditional wet blocking remains one of the simplest choices for many snowflake projects.
If you want the snowflake to remain firm as a hanging ornament, you can apply an appropriate craft stiffening solution after testing it on a small yarn sample. A firmer snowflake works especially well for Christmas trees because the points stay visible when hanging vertically. However, stiffening is optional. A tightly crocheted cotton snowflake often maintains enough structure after blocking without any additional treatment.
To create a hanging loop, join yarn to the top point with a slip stitch. Chain approximately 20 to 30 stitches, depending on how long you want the hanger to be, then slip stitch back into the same attachment point. Fasten off and weave in the tail. You can also use a narrow ribbon or decorative cord instead. Keeping the hanging loop simple allows the detailed crochet motif to remain the main visual feature.
The finished size can vary significantly according to yarn and hook choice. With fine cotton, the Crochet Snowflake Pattern may measure approximately 3.5 to 5 inches (9 to 13 cm) across. A medium-weight yarn could produce a piece measuring 6 inches (15 cm) or more. This makes the pattern easy to adapt for ornaments, window decorations, gift toppers, table accents, garlands, or larger winter-themed displays.
Crochet Snowflake Pattern Variations, Tips, and Common Mistakes
One of the easiest ways to personalize a Crochet Snowflake Pattern is through color. White creates the classic snowy appearance, while icy blue gives the piece a peaceful winter style. Navy blue can look elegant and dramatic, especially against cream or beige décor. Silver-gray yarn adds a modern appearance, and metallic thread can add subtle sparkle when used carefully alongside cotton yarn.
You can also change the character of the snowflake by adjusting the outer chains. Longer chains create elongated points and a more dramatic ornament. Shorter chains produce a compact shape that is easier to stiffen. Additional picots can make the outer edge look more intricate, while fewer picots result in a cleaner minimalist design. When modifying the pattern, repeat the same changes on every section to preserve symmetry.
A common mistake is losing track of the number of repeated sections. Because the snowflake is built around a central ring, even one missing stitch group can make the finished piece appear noticeably uneven. Count your groups at the end of every round. If your version uses six points, confirm that there are six identical sections before moving forward. Catching a counting mistake early saves time later.
Another problem is inconsistent tension. Chains that are much tighter on one side can pull the snowflake inward, while very loose chains can create oversized loops. Try to crochet with the same relaxed hand throughout the project. If the center feels comfortable but the decorative edge becomes tight, consider intentionally loosening your chain stitches rather than changing hook sizes halfway through the pattern.
Blocking can correct small irregularities, but it cannot completely repair missing stitches or dramatically different chain lengths. Before fastening off, spread the crochet snowflake flat and compare all of the outer points. If one branch is clearly shorter or simpler than the others, check the stitch sequence. Because the project is small, undoing a short section and correcting it is usually quick.
Once you are comfortable with the basic version, this Crochet Snowflake Pattern becomes an excellent foundation for experimentation. Make several snowflakes using different shades of the same color, create an entire garland, attach smaller motifs to handmade cards, or crochet larger versions for decorative table settings. The same core technique—center ring, repeated spokes, chain loops, and decorative picots—can produce many different snowflake styles.
Frequently Asked Questions About the Crochet Snowflake Pattern
What is the best yarn for a Crochet Snowflake Pattern?
Cotton is one of the best choices because it provides excellent stitch definition and responds well to blocking. Fine crochet cotton creates delicate ornaments, while lightweight or medium cotton makes larger and more noticeable snowflakes. Acrylic yarn can also work, particularly if you want a softer decoration rather than a very crisp ornament.
What crochet hook size should I use?
For fine cotton, a hook around 2.5 mm to 3.5 mm is a practical starting point. Choose a hook that creates firm stitches without making the fabric uncomfortably tight. For thicker yarn, move to a larger hook according to the yarn weight and the size of snowflake you want.
Can beginners make this crochet snowflake?
Yes. A confident beginner who understands chains, slip stitches, single crochet, and double crochet should be able to complete the pattern. The decorative outer round requires careful counting, but every section repeats the same basic sequence. Working slowly through the first snowflake will make additional versions much easier.
Why does my crochet snowflake curl?
Slight curling before blocking is normal. Severe curling may indicate overly tight tension or too few chains around the outer rounds. First finish the complete motif and block it. If it still refuses to lie flat, consider using a slightly larger hook or adding a little more chain space in your next snowflake.
How can I make the snowflake larger?
The simplest option is to use thicker yarn and a larger hook while following the same Crochet Snowflake Pattern. You can also lengthen some of the outer chain loops. Remember that any adjustment should be repeated evenly on every snowflake arm so the finished piece remains symmetrical.
How can I make the snowflake smaller?
Use finer crochet thread with a smaller hook. You can also shorten the decorative chains by one or two stitches. When reducing chain lengths, make small adjustments so that there is still enough space for the stitches and picots to sit comfortably.
Do I have to stiffen a crochet snowflake?
No. Stiffening is optional. A cotton snowflake worked with firm tension and properly blocked may already hold its shape beautifully. Stiffening is most useful when you want a rigid ornament that will hang vertically without the points folding.
Can I make an eight-point snowflake instead of six points?
Yes. The construction method can easily be adapted by beginning with eight evenly spaced stitch groups instead of six. Every following round must then repeat its stitch sequence eight times. This creates a fuller, highly decorative motif while preserving the radial structure of the design.
What does picot mean in crochet?
A picot stitch is a small decorative loop commonly created by making a few chains and joining them back to the starting point with a slip stitch. Picots are useful in a Crochet Snowflake Pattern because they resemble tiny crystal-like tips around the edges.
How long does one crochet snowflake take to make?
The time depends on experience and the complexity of the outer round. An experienced crocheter may complete a simple snowflake relatively quickly, while a beginner may prefer to work more slowly and check each repeated section. Accuracy is more important than speed because even spacing creates the most attractive result.
Conclusion
The Crochet Snowflake Pattern combines simple crochet techniques with a decorative structure that looks elegant, detailed, and suitable for many winter projects. You learned how to begin with a center ring, create repeated double crochet groups, form chain spaces, shape the snowflake arms, add picots, finish the outer edge, weave in the yarn tails, and block the final motif. You also learned how yarn thickness, hook size, tension, chain length, color, and blocking can completely change the appearance of the finished snowflake.
Once you have completed the first motif, try experimenting with different colors, yarn weights, and outer-edge details while keeping the repeated sections symmetrical. A collection of handmade crochet snowflakes can become ornaments, garlands, package decorations, window accents, or thoughtful handmade gifts. If you make this Crochet Snowflake Pattern, leave your sincere opinion about the tutorial and share any suggestions for future patterns or improvements you would like to see.