
Crochet Star for Decoration Pattern is a charming handmade project that turns a small amount of yarn into a beautiful five-pointed star that can be used for Christmas trees, garlands, gift wrapping, windows, wreaths, nursery decorations, or seasonal displays. The design shown in the reference image has a textured center, clearly defined points, and a neat decorative border, giving the finished piece a polished appearance without requiring complicated construction. Because the star is worked mainly from the center outward, it is an enjoyable project for crocheters who want to practice working in rounds while also learning how increases and stitch height can create a recognizable shape. Using basic crochet stitches, careful stitch placement, and consistent tension, you can create a firm ornament that looks attractive from either side.
One of the greatest advantages of this crochet star decoration is its versatility. A neutral beige, cream, or natural cotton yarn creates a rustic farmhouse appearance, while red, green, gold, silver, white, or sparkling yarn can transform the same Crochet Star for Decoration Pattern into a festive holiday ornament. You can also experiment with pastel yarn for baby-room decorations or bright colors for party garlands. The project is small enough to complete relatively quickly, making it practical for creating several matching stars. Once you understand how the center circle develops into five sections and how those sections become pointed tips, it becomes easy to customize the size, texture, and finishing details.
This tutorial uses U.S. crochet terminology and explains the construction in a way that allows you to understand why each section is worked instead of simply copying stitches without context. The exact finished size depends on yarn weight, hook size, tension, and blocking, but a medium cotton yarn with an appropriate hook usually produces a compact ornament suitable for hanging. The most important techniques are the magic ring, chain stitch, slip stitch, single crochet, half double crochet, double crochet, and controlled increases. The decorative points are created by gradually increasing stitch height toward the tip and decreasing again as you return to the valley between points. This combination gives the star a balanced and symmetrical shape.
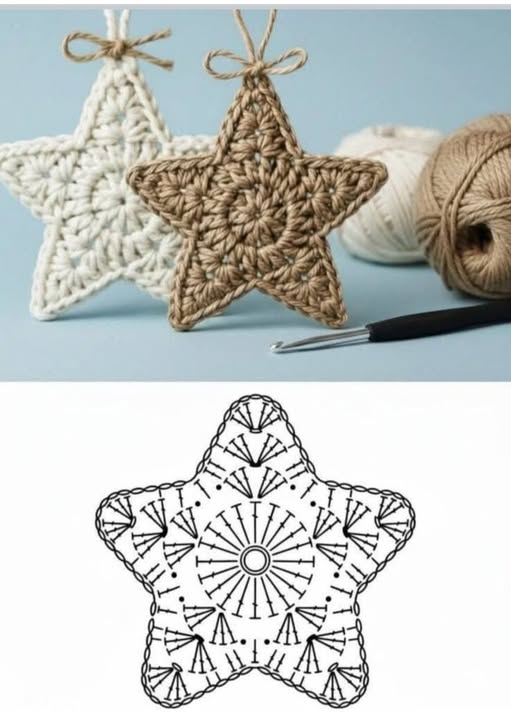
Materials, Crochet Abbreviations, and Preparation
For this Crochet Star for Decoration Pattern, choose a yarn that provides enough stitch definition to show the structure of the star clearly. Cotton yarn is especially useful because it holds its shape well after blocking, although acrylic yarn can also be used successfully. A medium or light-medium yarn creates a sturdy decoration without becoming excessively bulky. You will also need a crochet hook suitable for your yarn, scissors, a yarn needle for weaving in ends, and optional twine, ribbon, or yarn for making the hanging loop.
The following crochet abbreviations use standard U.S. terminology: ch means chain, sl st means slip stitch, sc means single crochet, hdc means half double crochet, dc means double crochet, tr means treble crochet, st means stitch, sts means stitches, sp means space, and rnd means round. When the instruction says to repeat a sequence five times, try to keep every section as similar as possible because each repeated section eventually becomes one point of the star.
Begin with a magic ring. This technique creates an adjustable center, allowing you to pull the middle closed after completing the first round. If you prefer not to use a magic ring, chain four or five stitches and join the first chain with a slip stitch to create a small circle. Working through the ring rather than into individual chains makes the first round easier to manage and gives the center a smooth, rounded appearance.
For Round 1, chain 3 to establish the height of the first double crochet. Work approximately 14 additional double crochet stitches into the center ring, giving you 15 stitch positions around the circle when the beginning chain is counted as the first stitch. Join to the top of the beginning chain with a slip stitch. Pull the magic ring closed gently. The objective is to create a flat central wheel rather than a tight raised ball, so do not pull the yarn so firmly that the stitches become distorted.
For Round 2, begin creating five evenly spaced sections around the circle. Chain 3, then work a small group of double crochet stitches into the same or neighboring stitch according to the spacing of your center. Chain 1 to create a small gap, then work the next stitch group. Continue around until you have formed five approximately equal groups separated by chain spaces. Join with a slip stitch. These five groups are important because they establish the locations where the five star points will develop.
Before beginning the pointed sections, place the work flat on a table and examine the spacing. The five groups should resemble five small wedges surrounding the center. If one section looks much larger or smaller than the others, it is easier to correct the problem now than after the tips are added. Good stitch distribution is one of the most important parts of making a professional-looking crochet star ornament, because symmetrical foundations produce symmetrical points.
How to Crochet the Five Star Points Step by Step
The next stage of the Crochet Star for Decoration Pattern transforms the round foundation into the recognizable star shape. Each point is created over one section of the previous round. Begin at one chain space or marked section. Work a single crochet near the valley, followed by a half double crochet, then a double crochet. The gradual increase in stitch height starts lifting the fabric toward the tip instead of creating an abrupt corner.
Continue toward the center of the first point by working another taller stitch, such as a double crochet or treble crochet, depending on how long you want your point to appear. At the highest section, create the tip by working a combination such as tr, ch 2, tr into the same stitch or chain space. The small chain at the top forms the sharp corner. For an even more pointed finish, you can work ch 2, sl st into the first chain, then continue down the other side.
After forming the tip, reverse the stitch sequence. Work a double crochet, then a half double crochet, and finally a single crochet as you approach the valley between the first and second points. This ascending-and-descending stitch pattern is what creates the triangular appearance. Taller stitches occupy more vertical space, so placing the tallest stitches at the center naturally extends the fabric outward.
To begin the second point, repeat the same stitch-height sequence in the next designated section: sc, hdc, dc, tr, create the pointed chain tip, then work tr, dc, hdc, sc down the opposite side. Repeat this construction around the star until all five points are complete. Keeping the same number and type of stitches in every section is essential. Even a small difference can make one point noticeably wider or shorter.
At the valley between two points, keep the stitches relatively short. A slip stitch or single crochet can help pull the fabric inward and make the separation between points more pronounced. If the valley contains too many tall stitches, the star may begin to resemble a flower rather than a clearly defined five-point star. The contrast between the short valley stitches and tall tip stitches gives this crochet star pattern its characteristic geometry.
When the fifth point is finished, join the round neatly with a slip stitch. Place the star on a flat surface and gently arrange all five tips. At this stage, the piece may curl slightly or the points may appear uneven. This is normal, especially when using cotton yarn. A finishing round and proper blocking will help stabilize the shape and make the final decoration much more polished.
Creating the Decorative Border and Hanging Loop
A border adds definition to the Crochet Star for Decoration Pattern and helps reinforce the five points. Begin the edging round with a chain 1 and work single crochet stitches evenly along the first side of the star. Instead of forcing one stitch into every visible loop, concentrate on producing an even line. Too many stitches can create ruffles, while too few can cause the edge to pull inward.
As you approach the tip of each point, work additional stitches into the tip space to preserve the sharp corner. A useful sequence is sc, ch 1, sc into the tip. For a slightly more decorative result, use sc, ch 2, sc. The chain space creates enough room for the edging to turn naturally without rounding off the point. Repeat the same corner treatment on every tip.
At each inner valley, you can use a single crochet decrease, a slip stitch, or simply skip one small stitch if necessary. This encourages the border to follow the inward angle instead of stretching straight across it. Work slowly around these areas because neat valleys dramatically improve the appearance of a handmade crochet star decoration. The goal is a smooth continuous border that emphasizes both the outer points and the inner indentations.
Continue around all five points using consistent tension. If your yarn is slightly thick, loosen the edging stitches so they do not compress the star. If you are using lightweight cotton, a firmer border can provide extra structure. Join the final stitch to the first stitch of the edging round with a slip stitch. Fasten off unless you want to create the hanging loop directly from the working yarn.
To make the hanging loop, position your yarn at the top point of the star. Join with a slip stitch and chain approximately 15 to 25 chains, depending on how long you want the loop. Bring the chain back to the starting point and secure it with another slip stitch. A shorter loop works well for Christmas tree branches, while a longer loop can be useful for door handles, wall hooks, garlands, or decorative displays.
For a rustic appearance similar to the inspiration, you can attach a short piece of natural twine instead of crocheting the hanging loop. Thread the twine through the top point, tie the ends together, and optionally add a small bow. This simple detail pairs beautifully with cream, beige, taupe, or natural-colored yarn and gives the finished Crochet Star for Decoration Pattern a warm handmade appearance suitable for farmhouse and holiday decorating.
Blocking, Size Adjustments, Colors, and Finishing Tips
Blocking is one of the best ways to improve the final shape of a crochet star ornament. Lightly dampen the finished piece and place it on a blocking mat or thick towel. Gently stretch each point until all five are approximately equal in length. Use rust-resistant pins to hold the tips and valleys in position. Allow the star to dry completely before removing the pins.
If you want a firmer ornament, choose cotton yarn and crochet with a hook slightly smaller than you would normally use for garments. This produces dense stitches that maintain their shape. You can also apply a suitable fabric-stiffening method after completing the star if you want an especially rigid Christmas ornament. Always test any finishing treatment on a yarn sample first, particularly when using colored yarn.
The size of the Crochet Star for Decoration Pattern can easily be changed. For a smaller star, use lightweight yarn and a smaller hook. For a larger decorative piece, use thicker yarn and a larger hook. You can also add an extra round before forming the points, but remember that increasing the center diameter may require adjusting the number of stitches used in each point so the proportions remain balanced.
Color selection can completely change the personality of this pattern. White crochet stars look clean and classic, while natural beige produces a rustic effect. Red and green are ideal for traditional Christmas decorating, gold or metallic yarn creates an elegant holiday appearance, and pastel colors can turn the same pattern into spring or nursery decor. You can even make each point in a different color for a cheerful scrap-yarn project.
When weaving in the yarn ends, use a yarn needle to pass the tail through several stitches on the back of the work. Change direction once or twice so the tail cannot easily work loose. Trim the remaining yarn only after you are confident that it is secure. Good finishing is especially important for decorations because they may be handled, stored, hung, and reused for many seasons.
Once the star is complete, you can use it in many creative ways. Several stars can be joined into a crochet star garland, individual ornaments can decorate gifts, and larger versions can become wall decorations or table accents. You can also sew a star onto a fabric bag, cushion, stocking, or handmade wreath. Because this Crochet Star for Decoration Pattern uses simple shaping principles, it is also a useful project for understanding how different crochet stitch heights can create geometric forms.
Frequently Asked Questions About the Crochet Star for Decoration Pattern
What crochet skill level is recommended for this pattern?
This project is suitable for an adventurous beginner or intermediate crocheter. You should be comfortable making basic stitches such as chain, slip stitch, single crochet, half double crochet, and double crochet. Learning the stitch placement for the five points may require a little concentration, but the pattern becomes easier once the first point is completed.
What yarn works best for a crochet star decoration?
Cotton yarn is an excellent choice because it gives the stitches strong definition and helps the ornament keep its shape. Acrylic yarn can also work well, especially when you want softer stars or a wider choice of colors. The best yarn ultimately depends on the appearance you want to create.
Why is my crochet star curling?
Curling usually happens because the stitch count is too tight, the hook is too small, or the edging contains too few stitches. Minor curling is common before blocking. Gently blocking the finished piece usually helps the points and center lie flat.
How do I make the star points sharper?
Use taller stitches near the center of each point and place a small chain space at the tip. A combination such as tr, ch 2, tr creates a noticeable point. Blocking each tip outward after finishing will make the shape even more defined.
Can I make this Crochet Star for Decoration Pattern larger?
Yes. You can use thicker yarn and a larger crochet hook for the simplest size adjustment. You can also increase the number of center rounds before forming the points, although the stitch distribution must remain divisible into five balanced sections.
Can I use this pattern for Christmas decorations?
Absolutely. The design is especially attractive as a crochet Christmas star ornament. Try white, red, forest green, gold, beige, or sparkling yarn. Add a hanging loop and use the stars on a Christmas tree, wreath, garland, gift package, or holiday table display.
How can I make several stars the same size?
Use the same yarn brand and weight, the same crochet hook, and the same stitch count for every ornament. Consistent tension is also important. Blocking all the stars using the same measurements can make a handmade set look much more uniform.
Should I starch or stiffen the finished star?
It is optional. Cotton stars made with relatively tight stitches may already be firm enough. If you want the ornament to stay perfectly flat and pointed, a light fabric-stiffening treatment can provide additional structure. Allow the piece to dry in the desired shape.
Can leftover yarn be used for this project?
Yes. This is an excellent scrap yarn crochet project because each star requires only a modest amount of yarn. Small quantities left from other projects can be turned into colorful decorations instead of being discarded.
What should I do if one star point is larger than the others?
Check the number of stitches in that section. Each point should follow the same stitch sequence and contain the same increases. If the difference is minor, blocking may correct it. If the point is significantly larger, undoing that section and correcting the stitch count will usually give a better result.
Conclusion
The Crochet Star for Decoration Pattern is a simple yet attractive project that combines basic crochet techniques with clever shaping. Starting with a magic ring, you create a circular foundation, divide the work into five balanced sections, and then use gradually taller and shorter stitches to build the recognizable star points. A final single crochet border, carefully shaped tips, and defined valleys give the finished ornament a clean and professional appearance.
Throughout this tutorial, you learned how to use essential U.S. crochet stitches, including ch, sl st, sc, hdc, dc, and tr, how to create five symmetrical points, how to add a hanging loop, and how blocking can improve the final shape. You also learned how different yarn weights, hook sizes, colors, and finishing methods can transform the same pattern into rustic, traditional, modern, or festive decorations.