
Mini Crochet Trees Pattern is a charming holiday crochet project that turns simple stitches into a decorative Christmas tree that can be used as an ornament, gift topper, garland element, or handmade seasonal decoration. Inspired by the tree shape and stitch diagram shown in the reference image, this project is built with expanding groups of crochet stitches that create rounded branches while keeping the overall silhouette light and delicate. The combination of green yarn, open spaces, and fan-like stitch groups gives the tree a traditional Christmas appearance without making the pattern overly complicated. A small ribbon bow can be added near the top for extra color, while a hanging loop transforms the finished piece into an ornament in just a few minutes. Because the project uses only a small amount of yarn, it is also a practical way to use leftover green yarn from larger projects. Once you understand how the branching sections are formed, making several mini crochet trees becomes surprisingly quick and enjoyable.
One of the most appealing characteristics of this Mini Crochet Trees Pattern is the way the shape grows naturally from a narrow top toward a wider lower edge. Instead of crocheting a solid triangle, the design uses decorative shells and spaces to create texture and definition. These open areas make the ornament lightweight, which is especially useful if you plan to hang it on a Christmas tree. The pattern can also be adjusted by changing yarn thickness, hook size, or the number of branch sections. Cotton yarn produces crisp stitches and excellent definition, while acrylic yarn creates a softer and slightly fuller appearance. Beginners who already know basic crochet stitches can use this project to practice working multiple stitches into the same space, while experienced crocheters can easily customize the design with different colors, beads, bows, or edging.
The finished size will depend on the materials you select, but a tree made with medium-fine yarn and a 3.0 mm to 3.5 mm crochet hook will generally measure approximately 4 to 5 inches (10 to 13 cm) tall and around 3.5 to 4.5 inches (9 to 11.5 cm) across the widest section. You will usually need only about 15 to 25 yards (14 to 23 meters) of green yarn for one ornament. In addition to yarn and a crochet hook, prepare scissors, a yarn needle, a small piece of ribbon, and optional fabric stiffener if you prefer a firmer ornament. The pattern below uses U.S. crochet terminology, making it easier to follow standard stitch abbreviations. Gauge is not critical because this is a decorative piece rather than a fitted garment, but even tension will help the branches remain balanced. Blocking the completed tree is recommended because it makes the decorative shells and open spaces much more visible.
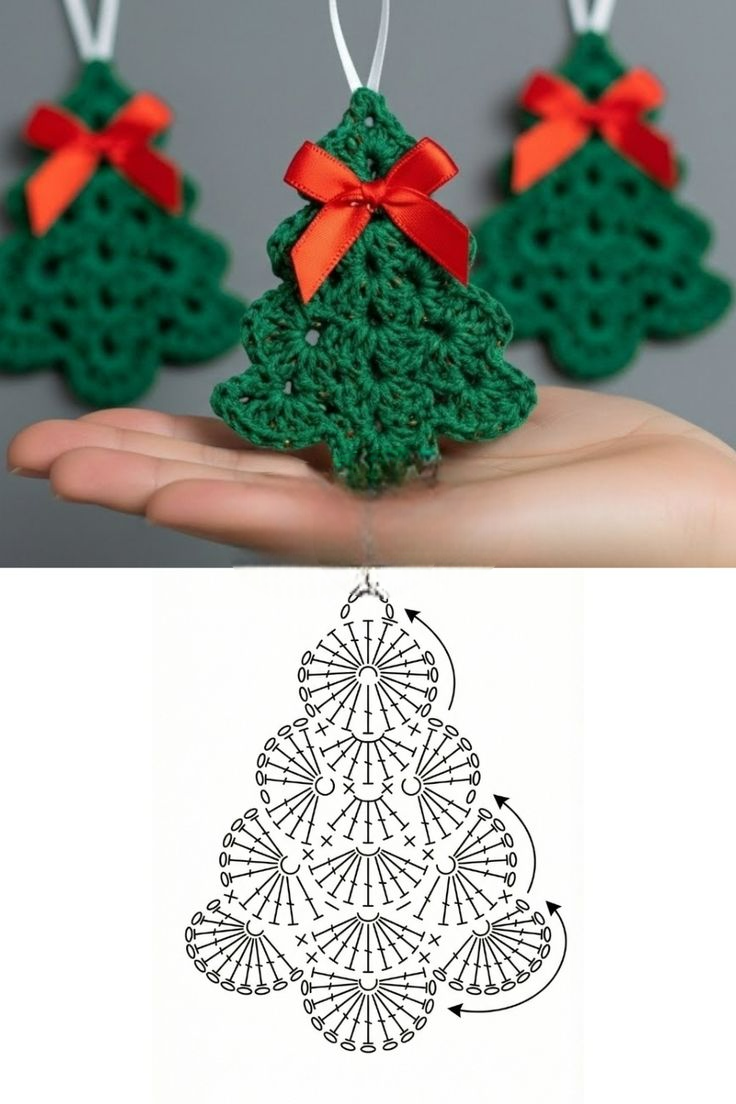
Materials, Crochet Abbreviations, and Preparing the Tree
For this Mini Crochet Trees Pattern, choose a green yarn that shows stitch definition clearly. A light worsted, DK, or sport-weight yarn works especially well. Cotton is an excellent option when you want sharp branches and a structured ornament, while acrylic can give the tree a softer, fuller texture. A hook between 3.0 mm and 3.5 mm is a useful starting point, although you should adjust the hook according to the thickness of your yarn. The objective is to create stitches that are neat but not excessively tight, since the openwork areas need enough flexibility to spread during blocking.
The main crochet abbreviations used in this project are ch = chain, sl st = slip stitch, sc = single crochet, dc = double crochet, tr = treble crochet, sp = space, st = stitch, and sts = stitches. When the instructions say to work several stitches into the same space, all of those stitches should be inserted into one chain space or designated stitch. This technique creates the fan or shell shape seen throughout the tree. The double crochet stitch provides most of the height, while chains separate the groups and help shape the branches.
Begin with a small foundation loop at the top of the tree. You can make a magic ring or chain 4 and join the first chain with a slip stitch to form a ring. If you are uncomfortable using a magic ring, the chain-ring method works perfectly for this decorative project. Leave a yarn tail of approximately 5 inches (13 cm) so you can weave it securely into the back later. Keep the starting loop relatively small because it will become the pointed upper section of the tree.
Into the foundation ring, work a small fan that establishes the first visible branch section. A useful sequence is ch 3, 5 dc into the ring, ch 3, and sl st into the ring. The beginning chain 3 can be counted as the first double crochet, giving the top a gently rounded fan shape. Spread the stitches evenly around the ring with your fingers. Do not worry if the motif initially looks curved or slightly uneven, because blocking will flatten the tree at the end.
After completing the first fan, turn or rotate your work so the next section can be placed beneath it. The tree is constructed by building larger fans underneath earlier sections rather than working endless straight rows. This method is what produces the layered evergreen appearance. Chain spaces become important anchor points, so avoid making your chains too tight. Loose, consistent chains create enough room to comfortably insert several double crochet stitches when building the following branch groups.
Before continuing, examine the top section and identify the center. Maintaining a visible center line helps the crochet Christmas tree ornament remain symmetrical. The lower sections should expand roughly equally on the left and right sides. If one side appears noticeably larger, check whether you accidentally added an extra double crochet or skipped a chain space. Correcting small counting mistakes early is easier than trying to reshape the tree after all branch levels have been completed.
Step-by-Step Crochet Instructions for Building the Branches
To begin the second level, create a short chain that reaches toward one side of the first fan. Work a slip stitch into the appropriate outer chain space or edge stitch, then begin a larger fan with ch 3, 5 to 7 dc in the same space, ch 3, and sl st into that same area. This forms one rounded branch. Repeat a similar fan on the opposite side so that the tree begins widening. The exact number of double crochets can be adjusted slightly depending on your yarn, but keeping the two sides equal is essential.
For the center of the second level, work another fan underneath the first upper section. A practical combination is sl st to the center space, ch 3, 6 dc in the same space, ch 3, sl st. You should now see several connected shell shapes creating a triangular formation. These shells are the visual foundation of the Mini Crochet Trees Pattern. Use your fingers to gently spread them as you crochet so you can see where the next spaces should be positioned.
Continue downward by creating another row of branching shells. Chain 2 or 3 as needed to reach the next anchoring point, then work a fan using approximately 6 or 7 dc, depending on the desired fullness. Work one fan near the left side, one near the center, and one near the right side. Each new level should be slightly wider than the level above it. Think of the design as a series of connected semicircular fans arranged to imitate natural tree branches.
The open spaces between these fans are an important part of the design rather than empty areas that need to be filled. They prevent the ornament from becoming heavy and help each shell stand out individually. If your work begins to look too dense, use an additional chain between fans or reduce the number of double crochet stitches slightly. If it looks too narrow, increase the number of stitches in the outer fans. Small adjustments are perfectly acceptable for a decorative crochet tree pattern because there is no fitted measurement that must be maintained.
For the final major branch level, work the widest collection of shells. The lower left and lower right shells can contain 7 to 9 dc each, while the central shell can use approximately 7 dc. Allow the side fans to angle slightly outward. This creates the recognizable lower corners of the Christmas tree. Keep checking that both sides have approximately the same width before fastening off.
To create a more decorative bottom edge, you may add one additional small fan at the center bottom. Join the yarn in the central lower space, work ch 3, 6 dc, ch 3, and sl st into the same space. This final shell adds a gentle point and makes the bottom of the ornament feel finished. If you want the tree to resemble the reference design more closely, keep this bottom fan compact so it complements rather than overpowers the larger side branches.
Shaping, Finishing, Ribbon, and Hanging Loop
Once the crochet section is complete, fasten off by cutting the yarn while leaving a 5-inch (13 cm) tail. Pull the tail completely through the final loop and tighten gently. Thread the yarn tail into a tapestry needle and weave it through several stitches on the back of the tree. Change direction at least once while weaving so the yarn does not work loose during use. Trim the remaining yarn close to the surface without cutting any structural stitches.
Blocking is especially helpful for this Mini Crochet Trees Pattern because the fan sections may curl immediately after crocheting. Lightly dampen the ornament with clean water, then place it on a blocking mat or folded towel. Arrange the top point, side branches, and lower shells into a symmetrical tree shape. Pin the outer edges carefully and allow the ornament to dry completely. Avoid stretching the stitches excessively because the goal is to define the design rather than enlarge it.
If you would like a firmer tree, apply a small amount of fabric stiffener after blocking according to the product instructions. Another simple option is to use diluted craft-safe starch. A slightly stiff ornament hangs more evenly and keeps its shape when stored between holiday seasons. However, stiffening is optional. If you prefer a soft handmade appearance, normal blocking is usually sufficient.
For the hanging loop, cut approximately 6 to 8 inches (15 to 20 cm) of thin ribbon or decorative cord. Pass it through the top crochet loop, bring both ends together, and tie them securely. Adjust the finished loop so the ornament hangs straight. White, metallic gold, silver, or red ribbon can contrast beautifully with green yarn. A narrow ribbon keeps the focus on the crochet work while still providing enough strength to hang the tree.
To add the decorative bow shown in the inspiration image, cut approximately 8 to 10 inches (20 to 25 cm) of narrow red satin ribbon. Tie a small bow and adjust the loops until both sides are balanced. Position the bow just below the top branch section, then hand-sew it to the crochet fabric with matching thread. Use only a few secure stitches so the ribbon does not distort the crochet underneath.
Additional decorations can be added carefully if desired. Tiny beads can imitate Christmas ornaments, metallic thread can create subtle sparkle, and a small star-shaped embellishment can be sewn at the top. Avoid adding heavy accessories because they may pull the lightweight mini crochet tree ornament out of shape. The clean green-and-red version is already visually effective, so decoration should enhance the stitches rather than cover them.
Customizing the Mini Crochet Trees Pattern and Getting Better Results
One of the easiest ways to personalize a Mini Crochet Trees Pattern is by changing the yarn color. Traditional forest green creates the classic Christmas tree appearance, but white can resemble a snowy tree, cream creates a vintage style, and red or burgundy produces a bold holiday decoration. Metallic or lightly sparkling yarn can be used for elegant ornaments. You can also crochet several colors and combine them into a coordinated Christmas garland.
Yarn thickness dramatically changes the final dimensions. Fine cotton thread and a small hook can produce trees suitable for gift tags, cards, or small decorations. DK yarn creates a medium-sized ornament similar to the project pictured, while worsted-weight yarn produces a larger and more substantial tree. If you change yarn size, choose a hook that keeps the shells flexible enough to spread naturally. The correct combination should create visible stitch definition without stiff, crowded loops.
You can also make the tree larger by repeating the expanding branch concept. After the widest original level, create another level with additional fan sections underneath. Continue increasing the overall width gradually to preserve the triangular shape. A larger tree could be used as an appliqué on a cushion, holiday bag, wall hanging, or handmade table decoration. When enlarging the design, pay close attention to symmetry because small differences become more visible as the project grows.
For a flatter crochet Christmas tree, keep all fan groups approximately the same thickness and block aggressively into position. For a more textured tree, use front-loop or back-loop variations in selected stitches or add picots along the shell edges. A simple picot can be made by chaining 3 and slip stitching into the first chain. Small picots added sparingly can resemble pointed evergreen needles while still keeping the original structure recognizable.
A common problem with shell-based crochet is unwanted curling. This usually happens when stitches are too tight, when there are not enough chains between fan sections, or when too many stitches are crowded into one space. If the tree cups inward, move up one hook size or loosen your tension slightly. If the edges ripple excessively, there may be too many stitches in one or more shells. Consistent stitch height is often more important than achieving a precise gauge.
The best way to improve your results is to crochet the first tree as a practice piece. Once you understand where each shell begins and ends, the second tree will usually be much faster. Keep track of the number of double crochet stitches used in each branch if you want several ornaments to match. A small handmade collection of Mini Crochet Trees can then be used for a tree garland, holiday centerpiece, gift wrapping decoration, or coordinated Christmas ornament set.
Frequently Asked Questions (FAQ)
What skill level is recommended for the Mini Crochet Trees Pattern?
This project is suitable for confident beginners and intermediate crocheters. You should be comfortable making chains, slip stitches, single crochet, and double crochet stitches. The main technique involves placing multiple double crochet stitches into the same space to create shell or fan shapes.
How long does one mini crochet tree take to make?
After becoming familiar with the pattern, many crocheters can complete one tree in approximately 30 to 60 minutes. A first attempt may take longer because you will need time to identify the correct spaces and shape each branch carefully.
What is the best yarn for crochet Christmas tree ornaments?
Cotton, DK acrylic, sport-weight yarn, and light worsted yarn are all good choices. Cotton gives excellent stitch definition, while acrylic creates a softer ornament. The most important factor is choosing yarn that is not so fuzzy that it hides the openwork pattern.
Can I make the Mini Crochet Trees Pattern larger?
Yes. You can use thicker yarn and a larger hook or add extra branching levels underneath the existing design. When adding levels, continue increasing the number of fan sections so the triangular Christmas tree shape remains balanced.
Do I need to block the finished crochet tree?
Blocking is strongly recommended. Shell stitches can curl or overlap when they first come off the hook. Light blocking opens the spaces, defines the tree branches, and gives the ornament a cleaner finished appearance.
Can I use a magic ring for the top?
Yes. A magic ring works very well and allows the center opening to be tightened. If you prefer not to use a magic ring, chain 4 and join with a slip stitch to create a small foundation ring.
Why is my crochet tree curling?
Curling is often caused by tight tension, insufficient chain spaces, or too many stitches being placed in one shell. Try using a slightly larger hook, relaxing your tension, or reducing one double crochet from the affected shell.
Can these crochet trees be turned into a garland?
Yes. Crochet several trees, block them to similar dimensions, and connect them with a long crocheted chain, ribbon, or cord. Leave equal spacing between each tree for a balanced decorative garland.
Can I add beads or decorations?
Small lightweight beads, bows, sequins, or metallic thread can be added. Attach decorations securely and avoid heavy pieces that could stretch the crochet fabric. If the ornament will be used around small children or pets, avoid loose detachable embellishments.
How much yarn is needed for one tree?
Most small versions require only approximately 15 to 25 yards (14 to 23 meters) of yarn. Because the amount is so small, the Mini Crochet Trees Pattern is an excellent project for using leftover yarn from previous crochet work.
What size should the finished tree be?
With DK or similar yarn and a 3.0 mm to 3.5 mm hook, a typical tree may measure around 4 to 5 inches (10 to 13 cm) tall. Exact measurements can vary depending on yarn thickness, hook size, tension, and the number of branch sections.
Can this pattern be made without a ribbon bow?
Absolutely. The ribbon is purely decorative. The crochet tree can be left simple, decorated with a small yarn bow, embellished with beads, or finished with a star at the top.
Conclusion
The Mini Crochet Trees Pattern is a practical and creative way to transform basic crochet techniques into a festive handmade decoration. Throughout this tutorial, you learned how to prepare the foundation ring, use chains, slip stitches, and double crochet stitches, create decorative fan-shaped branches, gradually expand the tree, finish the lower edge, weave in the yarn ends, block the ornament, and add a hanging loop and ribbon bow.
The most important part of this design is understanding how the shells work together. Each fan contributes to the triangular silhouette, while the chain spaces keep the tree lightweight and allow the branch sections to remain clearly visible. Once you become comfortable with the structure, you can easily modify the number of stitches, yarn weight, hook size, color, and decorations to create your own version.
This pattern is also a useful project for leftover yarn because each ornament requires only a small amount. You can make one special tree for your own Christmas decorations or create several matching mini crochet trees for gifts, garlands, package decorations, or seasonal displays. Different yarn colors and ribbons can make every tree unique while using the same basic construction method.
If you make this Mini Crochet Trees Pattern, leave your sincere opinion about the project and share any suggestions you may have. Your ideas about colors, yarn choices, decorations, sizes, or pattern variations can inspire new versions and help make future crochet projects even more useful and enjoyable.