
Crochet Angels for Christmas Tree Pattern is a beautiful handmade Christmas project for anyone who enjoys creating delicate ornaments with yarn and a crochet hook. These charming angels combine a rounded crocheted head, a flowing bell-shaped body, soft decorative wings, and a simple hanging loop that allows each finished piece to be displayed on a Christmas tree, wreath, garland, window, or holiday gift. The design shown in the reference uses a lovely combination of purple and cream, but the same construction can easily be adapted to traditional Christmas colors such as white, gold, red, silver, champagne, or soft pastel shades. Because the individual pieces are relatively small, this pattern is also an excellent way to use leftover yarn from previous projects while creating something meaningful for the holiday season.
A handmade Crocheted Angels for Christmas Tree Pattern has a special quality that mass-produced decorations cannot easily reproduce. Small variations in stitch tension, yarn texture, wing shape, and finishing give every angel its own personality. The project can also be customized for different decorating styles. A white-and-gold angel can create an elegant traditional appearance, while red-and-cream combinations feel warm and festive. Lavender, pink, pale blue, or metallic yarns can create a more whimsical Christmas display. The finished ornament does not require complicated construction, but several basic crochet techniques are combined to form the head, body, wings, and hanging loop, making this project enjoyable for confident beginners and intermediate crocheters.
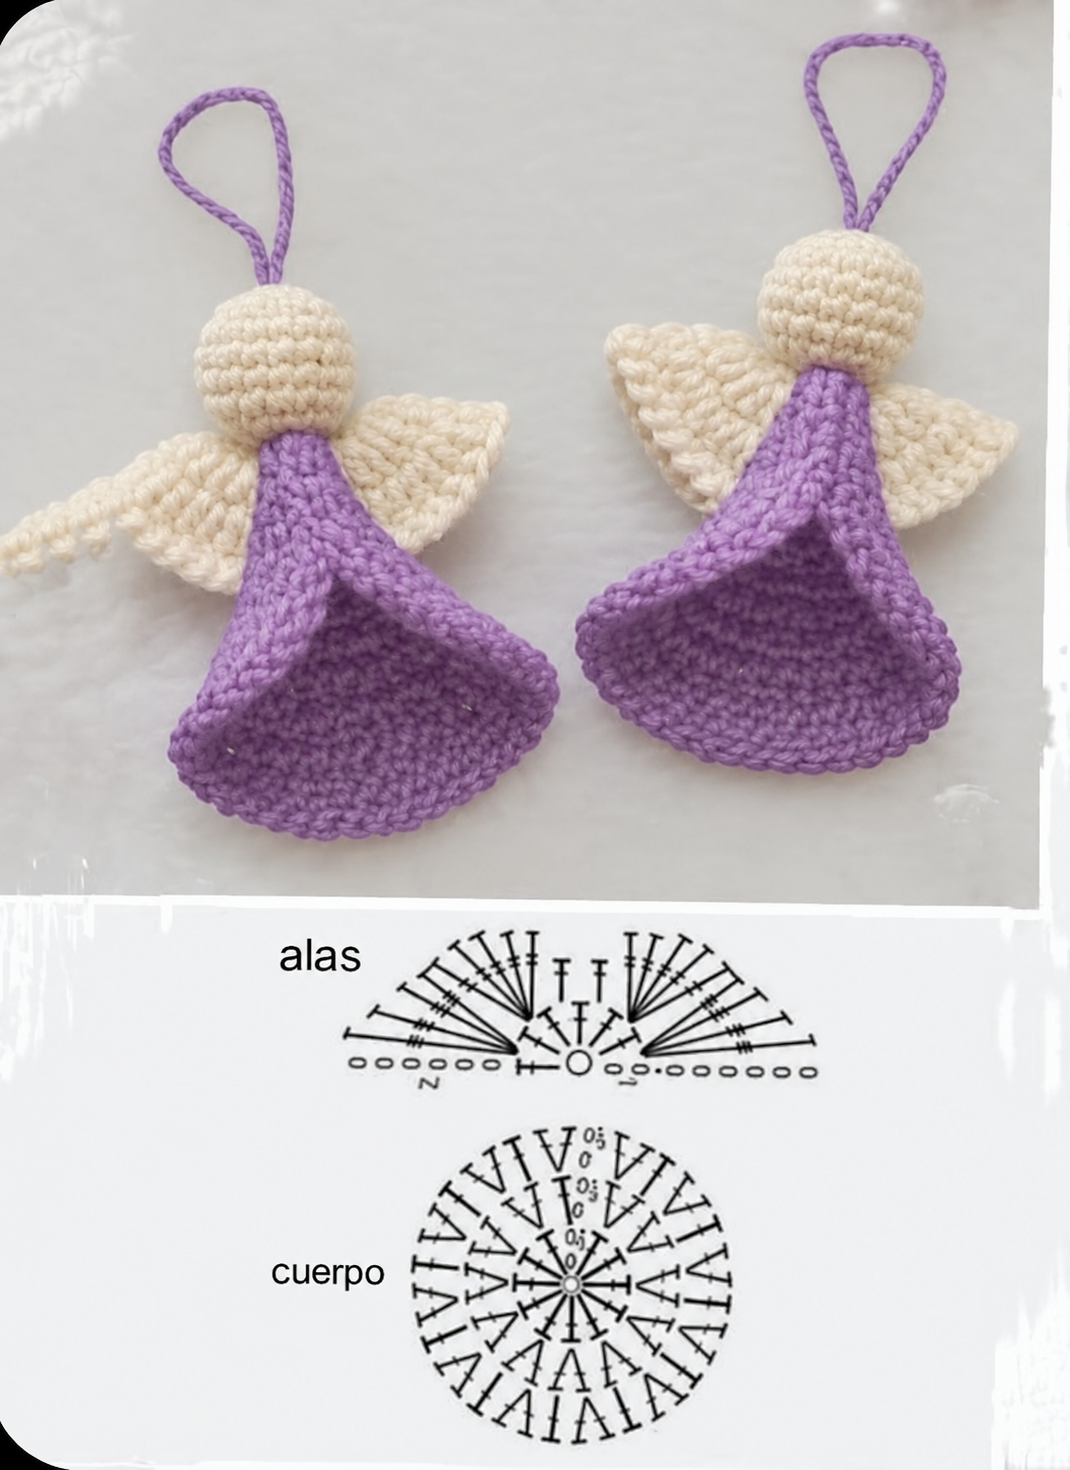
The following tutorial explains how to recreate the general appearance of the angel shown in the photograph using U.S. crochet terminology. Instead of depending on one rigid finished size, the instructions focus on construction principles so you can adjust the ornament according to your yarn and preferred dimensions. A finished angel made with light worsted or DK yarn will generally measure approximately 4 to 6 inches (10 to 15 cm) from the top of the head to the lower edge of the dress, excluding the hanging loop. The body is crocheted with gradual increases to produce the open bell shape, while the wings are formed separately and attached behind the upper body. Understanding these sections will make the Crochet Angels for Christmas Tree Pattern much easier to personalize.
Materials, Crochet Terms, and Preparing the Angel
For one angel, prepare approximately 25 to 40 yards of yarn for the body color and about 15 to 25 yards for the head and wings. A smooth cotton, cotton blend, acrylic, or lightweight wool yarn works especially well because it allows the stitches to remain clearly defined. For an ornament similar to the photograph, choose purple for the dress and hanging loop and cream for the head and wings. A 3 mm to 4 mm crochet hook is suitable for many DK or light worsted yarns, although the exact size should be adjusted according to your yarn.
You will also need a yarn needle, scissors, a small amount of polyester fiberfill, stitch markers, and optional fabric stiffener. Fiberfill is used only inside the head, so very little is required. A stitch marker is especially useful while working the head because the rounds are usually crocheted continuously rather than joined. If the wings feel too soft after finishing, a small amount of fabric stiffener can help them maintain a decorative shape, although this step is completely optional.
Several basic abbreviations are useful when following this Crocheted Angels for Christmas Tree Pattern. ch means chain, sl st means slip stitch, sc means single crochet, hdc means half double crochet, dc means double crochet, inc means two stitches worked into the same stitch, and dec means decreasing two stitches together. Because this article uses U.S. crochet terminology, remember that a U.S. single crochet is different from a U.K. double crochet.
The most important concept when creating this angel is controlled increasing. The head should remain round, so increases are added during the first half and decreases are worked during the second half. The dress is different. It begins narrow near the neck and gradually becomes wider toward the bottom. This creates the attractive flared shape visible in the photograph. Working increases evenly around the dress prevents unwanted bumps or uneven sections.
Gauge is not critical for this decorative project, but consistent tension is important. If your stitches are extremely loose, the stuffed head may show gaps between stitches. If they are extremely tight, shaping the dress and wings may become difficult. Crochet a few practice stitches before beginning if you are using unfamiliar yarn. Ideally, your fabric should feel firm enough to hold its shape while remaining flexible.
Color selection is another important element of the Crochet Angels for Christmas Tree Pattern. Cream and purple create a graceful handcrafted look, but white wings with a red body produce a classic Christmas ornament. Champagne with gold creates a sophisticated effect, while pale pink and white work beautifully for softer holiday décor. If using metallic yarn, consider combining it with a smoother yarn because some metallic fibers can be uncomfortable to crochet by themselves.
Before beginning, cut no yarn unless specifically needed during assembly. Leaving longer tails of approximately 8 to 10 inches (20 to 25 cm) on the head, wings, and body pieces will make sewing easier. These yarn tails can often be used for assembly, reducing the number of knots hidden inside the finished angel.
Crocheting the Round Head and Bell-Shaped Body
Begin the head using the cream yarn. Create a magic ring and crochet 6 sc into the ring. Pull the ring closed. For the next round, work 2 sc into each stitch, increasing the stitch count from 6 to 12. During the following round, alternate 1 sc and 1 increase around. This gradual increasing forms the base of the spherical head without creating sharp corners.
Continue expanding the head for another round if necessary by working 2 sc between increases. Once the head has reached the desired width, crochet approximately two or three rounds evenly without increases. These straight rounds create the central portion of the sphere. For a small Christmas ornament, a head approximately 1¼ to 1½ inches (3 to 4 cm) in diameter usually looks well proportioned with the body.
Now begin decreasing. Work approximately 2 sc followed by a decrease around the first decreasing round. On the next round, reduce again using approximately 1 sc followed by a decrease. Before the opening becomes too small, lightly fill the head with polyester fiberfill. Avoid overstuffing because excessive filling can stretch the stitches and create visible gaps. The head should feel round and firm rather than extremely hard.
Finish decreasing until only a small opening remains. Close the opening with the yarn needle by weaving the yarn tail through the remaining front loops and pulling gently. Do not cut the tail too short because you can use it later to help attach the head to the body. Roll the head lightly between your palms to distribute the stuffing evenly and improve the round shape.
To make the dress, switch to your primary body color. Begin with a magic ring or a small chain ring and work approximately 10 to 12 stitches into the center. Double crochet or half double crochet can be used depending on the texture you prefer. The photograph shows a dense yet flexible fabric, so half double crochet or closely worked double crochet provides an attractive result.
Increase gradually during the next several rounds. For example, work one increase every second or third stitch during the early rounds, then separate the increases farther apart as the body becomes wider. Continue crocheting until the dress reaches approximately 3 to 4 inches (7.5 to 10 cm) long. The goal is to create a gently expanding cone or bell rather than a flat circle. If the fabric begins lying completely flat, reduce the number of increases.
For the final round, create a neat decorative edge. A simple round of single crochet produces a clean border, while reverse single crochet, small picots, or a subtle shell edging can make the lower edge more decorative. The Crochet Angels for Christmas Tree Pattern looks especially attractive when the hem holds a slightly curved shape. Fasten off, leaving enough yarn for assembly if necessary.
Making the Crochet Wings and Hanging Loop
The wings are one of the most recognizable features of these Crocheted Angels for Christmas Tree Pattern ornaments. Each wing can be worked separately, or both wings can be created as one connected piece. For a shape similar to the photograph, begin each wing with a short foundation chain of approximately 7 to 10 chains using the same cream yarn as the head. The exact length depends on the size of your angel.
Work back across the foundation using progressively taller stitches. For example, begin with slip stitch or sc, continue with hdc, and then work several dc stitches toward the widest section of the wing. This variation in stitch height produces the triangular, feather-like silhouette. Work multiple stitches into the final chain if you want a gently rounded outer tip.
Turn the work and crochet another row while adding a few increases through the widest portion. You can also create a more dramatic decorative wing by using small groups such as 2 dc, 3 dc, or fan stitches in selected spaces. The objective is not to produce a perfect geometric triangle, but rather a soft shape that spreads outward behind the angel. Make the second wing using exactly the same sequence.
After both wings are completed, place them side by side and compare their dimensions. Small handmade differences are normal, but major differences can make the ornament hang unevenly. Lightly stretch the wings with your fingers and shape the outer edges. If necessary, damp blocking can improve their symmetry. Pin them to a towel or blocking mat and allow them to dry completely before assembly.
The hanging loop can be made using a simple crochet chain. Attach the body-color yarn securely to the upper rear portion of the angel or prepare the loop separately. Chain approximately 25 to 35 stitches, depending on how large you want the loop. Bring the final chain back to the beginning and join with a slip stitch. A loop approximately 3 to 4 inches (7.5 to 10 cm) tall is practical for most Christmas tree branches.
For a thicker loop like the one shown in the photograph, work slip stitches back across the chain before joining the ends. This produces a rounded cord rather than a thin chain. Another option is to crochet two strands together. The loop should be secure enough to support the ornament without stretching significantly after several seasons of use.
Before assembling the complete angel, weave in any yarn ends that will not be required for sewing. Keep the attachment tails from the wings and head accessible. Lay the dress, head, wings, and loop on a flat surface and arrange them until the proportions look balanced. This simple preparation makes the final stage of the Crochet Angels for Christmas Tree Pattern much easier.
Assembling, Shaping, and Decorating Your Christmas Angel
Begin assembly by positioning the head at the narrow upper opening of the dress. The lower portion of the head should sit securely against the top of the body without disappearing deeply inside it. Using the remaining yarn tail and a yarn needle, sew around the connection point several times. Work through sturdy stitch loops rather than individual yarn fibers so the connection remains strong.
Next, position the wings behind the angel. Their inner edges should meet near the center back, slightly below the head. Angle the wings gently upward or outward according to your preferred style. Sew through the base of each wing and the upper portion of the body several times. Avoid sewing through the entire front surface of the dress whenever possible so the stitches remain hidden.
Attach the hanging loop at the center back of the head or at the junction between the head and body. Reinforce this area carefully because the entire ornament will hang from this point. After sewing, gently pull on the loop to test the attachment. If there is movement, add several additional stitches before weaving in the yarn tail.
Shape the dress by inserting your fingers inside the lower opening and gently spreading the fabric. The body should resemble a soft bell. If you want a more structured ornament, lightly block the skirt over a small cup or cone-shaped object. Allow it to dry completely before removing it. Fabric stiffener can also be used sparingly, but keeping the natural crochet texture often gives the angel a warmer handmade appearance.
Personalization is where this Crocheted Angels for Christmas Tree Pattern becomes especially enjoyable. A tiny gold bow can be attached below the head, or a small bead can decorate the center of the wings. You can crochet a miniature halo using metallic yarn, add a thin decorative border along the dress hem, or use sparkly yarn for the hanging loop. Keep embellishments lightweight so the ornament continues hanging properly.
Finally, inspect the angel from every direction. Check that the head sits straight, the wings appear balanced, the skirt opens evenly, and the loop is centered. Weave in every remaining yarn tail securely. Once these finishing details are complete, your handmade Crochet Angels for Christmas Tree Pattern ornament is ready to decorate the tree, accompany a wrapped gift, or become part of a complete collection of crocheted Christmas angels.
Frequently Asked Questions About Crochet Angels for Christmas Tree Pattern
What yarn is best for crocheted Christmas angels? Cotton and cotton-blend yarns are excellent choices because they create defined stitches and maintain their shape well. Acrylic also works beautifully and is often softer and more economical. DK or light worsted yarn is especially convenient for small ornaments.
What crochet hook size should I use? A hook between approximately 3 mm and 4 mm works well with many lightweight yarns. However, always consider your yarn thickness and personal tension. For the stuffed head, using a slightly smaller hook can help create a dense fabric without visible gaps.
Can beginners make this angel ornament? Yes. A confident beginner who understands single crochet, double crochet, increases, decreases, magic rings, and slip stitches should be able to complete the project. The construction is divided into manageable pieces, making mistakes easier to correct.
How large should the finished crochet angel be? With lightweight yarn, a typical finished ornament may measure approximately 4 to 6 inches (10 to 15 cm) from the head to the lower edge of the dress. Using thicker yarn and a larger hook will naturally produce a larger angel.
Do I need to stuff the entire angel? No. Only the head needs light stuffing. The dress remains hollow so it can maintain the open bell-shaped appearance seen in the reference design.
How do I keep the angel’s skirt open? Good stitch tension and controlled increases often provide enough structure. You can also block the dress over a small rounded object. For an especially rigid ornament, a small amount of fabric stiffener may be applied.
Can I make the wings larger? Absolutely. Increase the foundation chain, add another row, or use taller stitches such as double crochet and treble crochet. Larger wings create a more dramatic appearance, while smaller wings give the angel a delicate minimalist look.
Can I use different colors for Christmas angels? Yes. Traditional combinations include white and gold, red and cream, green and white, and silver and white. Purple, pink, blue, or multicolored yarn can also create distinctive ornaments.
How can I make several angels the same size? Use the same yarn, hook, stitch counts, and tension for every ornament. It can also help to write down your exact number of rounds for the head, body, and wings after completing the first angel.
Can these crocheted angels be used as gifts? Yes. Handmade crochet ornaments can be included with Christmas cards, tied onto gift packages, used as stocking decorations, or given as small holiday keepsakes. A coordinated set in several colors can also make an attractive handmade gift.
How can I make the pattern look more elegant? Try using cream cotton for the head and wings with gold, burgundy, deep green, or champagne yarn for the dress. A small metallic border, subtle bead, or tiny crocheted halo can add detail without overwhelming the design.
How long does one crochet angel take to make? The time varies according to experience, but once the construction becomes familiar, these small ornaments can be completed relatively quickly. Making several angels in an assembly-line style—crocheting all heads first, followed by bodies and wings—can make creating a full collection more efficient.
Conclusion
The Crochet Angels for Christmas Tree Pattern combines several classic crochet techniques into a charming holiday decoration. Throughout this tutorial, you learned how to prepare the appropriate yarn and materials, crochet a round stuffed head, construct a gradually expanding bell-shaped dress, make decorative wings, create a secure hanging loop, and assemble all the pieces into one balanced Christmas ornament.
You also learned how increases and decreases control the shape of each section, why consistent stitch tension is important, how blocking can improve the finished appearance, and how different yarn colors and embellishments can transform the same basic pattern into many unique designs. These techniques can be reused for other handmade ornaments and small decorative crochet projects.
The greatest advantage of the Crocheted Angels for Christmas Tree Pattern is its flexibility. You can create a classic white angel, reproduce the beautiful cream-and-purple combination, add metallic details for an elegant tree, or make an entire collection in different colors for family and friends. Every angel can become a unique handmade piece while following the same basic construction.