
Crochet-Framed Candy Cane Pendants Pattern is a charming holiday crochet project that combines traditional Christmas colors, simple decorative stitches, and the unmistakable shape of a candy cane. These lightweight ornaments are ideal for decorating a Christmas tree, adding personality to wrapped gifts, creating handmade stocking decorations, or preparing small seasonal favors for family and friends. The finished design features a real or decorative candy cane resting inside a crocheted frame, surrounded by soft scallops that give the ornament a delicate handmade appearance. Because the project uses only a small amount of yarn, it is also an excellent way to transform leftover cotton yarn into something festive and useful. Even crocheters who have never created an ornament around an object can follow the construction gradually and learn how the straight section, curved hook, border, ties, and hanging loop work together.
The term Crochet-Framed Candy Cane Pendants Pattern describes a crochet method in which a narrow crocheted structure forms a decorative frame around the recognizable J-shaped candy cane. Instead of completely covering the candy, the crochet remains open enough for its striped surface to remain visible. The frame provides both decoration and support, while small crocheted loops or ties keep the candy cane positioned inside the ornament. In the version inspired by the pictured project, white yarn creates the main structure while bright red or deep green edging gives each pendant a classic Christmas finish. You can recreate that traditional combination or experiment with burgundy, emerald, metallic gold, silver, icy blue, or other seasonal colors. The construction is highly adaptable, making this holiday crochet pattern useful for coordinated ornaments as well as individually customized gifts.
One of the nicest features of this crochet candy cane ornament is that it does not require complicated shaping or a large collection of materials. Most of the design can be completed with basic crochet stitches such as chain, slip stitch, single crochet, half double crochet, and double crochet. Decorative shells or scallops are added around the outer edge to imitate the soft floral appearance visible in the inspiration image. A hanging loop is then crocheted at the top so the finished piece can be placed directly on a branch, wreath, garland, gift bag, or holiday display. For best results, work slowly around the curve and check the frame against your candy cane frequently. Candy canes vary noticeably between manufacturers, so treating the measurements below as a flexible guide rather than an absolute rule will produce a cleaner, better-fitting ornament.
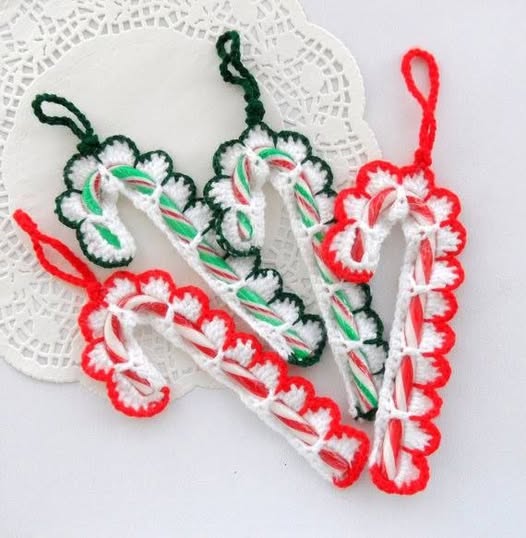
Materials, Crochet Abbreviations, Sizing, and Pattern Preparation
For one Crochet-Framed Candy Cane Pendants Pattern, gather approximately 15 to 25 yards of white cotton or cotton-blend yarn and about 8 to 15 yards of a contrasting color for the border. Size 3 crochet thread, sport-weight yarn, or lightweight DK yarn can all work, depending on how delicate you want the ornament to appear. A 2.25 mm to 3.0 mm crochet hook is generally suitable. You will also need scissors, a yarn needle, several removable stitch markers, and one standard wrapped candy cane measuring roughly 5½ to 6½ inches (14 to 16.5 cm) tall. If the pendant is intended only as reusable décor, a plastic or wooden candy-cane-shaped insert can replace the edible candy.
The main stitches used throughout this Christmas crochet ornament pattern are straightforward. Ch means chain, sl st means slip stitch, sc means single crochet, hdc means half double crochet, and dc means double crochet. When the instructions mention a shell, work several stitches into the same stitch to create a rounded decorative section. A simple shell of five double crochet stitches produces a fuller petal shape, while a shell of three double crochet stitches creates a more delicate result. The project is worked mainly in rows before the edging is added, making it approachable for confident beginners.
Gauge is not extremely important because the finished piece is decorative rather than wearable. However, the frame should remain firm enough to hold its shape. With lightweight cotton yarn and a 2.5 mm hook, approximately 6 to 7 single crochet stitches per inch (2.5 cm) usually produces a stable fabric. If your stitches are very loose, switch to a slightly smaller hook. If the fabric becomes stiff and difficult to shape around the curved candy cane, move up one hook size. Maintaining consistent tension is more important than achieving an exact gauge.
Before beginning, measure the candy cane that will be placed inside the crochet frame. Measure from the bottom tip to the beginning of the curved section, then measure around the outside of the hook. A typical candy cane might have a straight section of approximately 4 inches (10 cm) and a curved portion of about 2 to 2½ inches (5 to 6.5 cm). These measurements help determine how long the foundation section should be. Keep the wrapped candy cane beside you while crocheting so you can compare the frame to it as you work.
The candy cane crochet holder is designed as a narrow open frame rather than a tightly fitted sleeve. Leaving part of the candy visible creates the attractive striped effect and makes the piece lighter. The crocheted frame should extend slightly beyond the candy cane on both sides, providing room for decorative scallops. A frame width of approximately ¾ to 1 inch (2 to 2.5 cm) is usually enough. When finished, the border may increase the total width to approximately 1½ inches (3.8 cm).
Choose your colors before starting the project. White with red edging gives a cheerful traditional appearance, while white with dark green looks elegant and slightly more rustic. You can also reverse the colors and crochet a red frame with white scallops. For a coordinated tree, create several crochet candy cane pendants in the same palette. For a playful collection, alternate border colors so that every ornament is slightly different while maintaining the same construction.
Step-by-Step Crochet Instructions for the Main Candy Cane Frame
Begin with the bottom of the straight section. Ch 7. Starting in the second chain from the hook, work 1 sc into each chain across. You should have 6 sc. Ch 1 and turn. Work 1 sc in every stitch across for the second row. Continue repeating this row until the strip measures approximately 3¾ to 4¼ inches (9.5 to 10.8 cm), depending on the length of your candy cane. Keep the fabric flat and check that the width comfortably frames the candy without completely covering it.
To create the open appearance shown in the Crochet-Framed Candy Cane Pendants Pattern, introduce small spaces along the center as you continue. On the next row, ch 1, sc in the first stitch, ch 2, skip 2 stitches, sc in the next 2 stitches, ch 2, and finish with sc where needed to maintain the width. The exact spacing can be adjusted according to your stitch count. These openings are useful because short yarn ties can later pass through them and secure the candy cane without requiring permanent attachment.
Continue alternating solid single crochet rows with open rows every ¾ to 1 inch (2 to 2.5 cm). This creates several natural attachment points along the straight stem. Generally, three securing areas are enough: one near the bottom, one around the center, and one just below the curve. Do not make the openings too large, because the purpose is to hold the candy cane neatly while keeping the frame visually delicate. If you prefer an even simpler construction, work the entire strip in solid single crochet and add surface ties afterward.
When the straight section has reached the base of the candy cane hook, begin shaping the curve. Instead of continuing in perfectly straight rows, increase gradually along one edge. Ch 1 and turn, work 2 sc into the first stitch, then 1 sc across the remaining stitches. On the next row, work normally without an increase. Repeat this two-row sequence several times. The extra stitches accumulate on one side, causing the strip to begin bending naturally.
Continue forming the hook by adding increases approximately every second row. Place the candy cane over the crochet piece frequently to check the angle. The crocheted curve should follow the outside contour without pulling tightly against the candy. If the crochet is still too straight, increase slightly more frequently. If the curve is becoming too tight, crochet one or two rows without increases. This visual fitting method is particularly useful because candy cane hook shapes vary widely.
Once the crocheted strip follows the entire hook and reaches the short inner tip, finish with one or two plain sc rows. Fasten off the main color, leaving a 6-inch (15 cm) tail for weaving. Lay the piece flat and compare it with the candy cane. At this stage, the frame may appear simple, but the decorative border added next will transform it into the scalloped crochet pendant style seen in the finished design.
Creating the Scalloped Border, Curved Details, and Candy Cane Ties
Join your contrasting yarn at the lower outside corner of the straight section. Ch 1 and work sc evenly along the edge. A useful rule is to place approximately one single crochet stitch into the end of each row, adjusting slightly when necessary to prevent puckering. When you reach the curved hook, continue placing stitches evenly around the bend. The first edging round creates a stable foundation for the decorative scallops, so take time to distribute the stitches consistently.
For the second border round, create the scalloped effect. Sl st into the first stitch, skip 1 stitch, then work 5 dc into the next stitch. Skip 1 stitch and sl st into the following stitch. Repeat this sequence around the outside edge: sl st, skip 1, 5 dc, skip 1, sl st. These small shells resemble rounded petals and give the Crochet-Framed Candy Cane Pendants Pattern its distinctive festive appearance. If the border becomes too crowded around the curve, substitute occasional 3-dc shells.
Continue the scalloped pattern carefully around the hook. Curved areas may require slightly different spacing than straight sections. Avoid forcing an exact repeat when it creates ripples. Instead, allow the crochet fabric to guide your stitch placement. A well-shaped ornament should lie reasonably flat when the candy cane is removed. Slight natural curvature is expected because the frame is designed specifically to follow the candy cane shape.
Now create the inner edging if desired. Join white or contrasting yarn near the lower inside edge and work evenly spaced sc stitches upward. For a more decorative look, alternate sl st and ch-3 picots. To make a picot, ch 3 and sl st into the first chain. These tiny pointed details can visually echo the scalloped outer edge without making the center too bulky. Keep the inner border narrow so the striped candy remains easy to see.
To create the securing ties, cut three or four pieces of white yarn approximately 6 to 8 inches (15 to 20 cm) long. Thread each piece through one of the openings in the crochet frame. Position the wrapped candy cane over the center, bring the yarn ends around it, and tie a small bow or secure knot on the front or side. Alternatively, crochet short chains of 10 to 14 stitches directly from the frame and use them as ties. Do not overtighten, as pressure could damage a brittle candy cane.
For the hanging loop, join the border color at the top of the hook. Ch approximately 20 to 28 stitches, depending on the desired loop size. Sl st back into the joining point to form a ring, then fasten off securely. A finished loop of about 2½ to 3½ inches (6.5 to 9 cm) is comfortable for most Christmas tree branches. Weave every yarn end neatly into the reverse side so the front remains clean and professional.
Finishing, Decorating, Customizing, and Displaying the Pendants
After completing the crochet, gently shape the frame with your fingers. Cotton yarn responds especially well to light blocking. If needed, remove the candy cane, dampen the crochet slightly, reshape it on a towel, and allow it to dry completely. Do not wet an edible candy cane or place one into damp crochet. Once the frame is dry, insert the wrapped candy again and adjust each tie until it sits centered.
One appealing feature of this holiday crochet pattern is how easily it can be customized. For a farmhouse-inspired Christmas tree, try cream cotton with forest green or burgundy edging. For a brighter theme, use snow white with vivid red. Metallic crochet thread can be added to the outer scallops for a subtle sparkle. Small yarn bows may also be sewn near the top, although keeping embellishments lightweight helps the ornament hang naturally.
You can also create a striped crochet version that coordinates even more closely with the candy cane. Crochet the main frame in white, then change between red and green every few scallops along the border. Another option is to embroider tiny diagonal lines across the white frame using red yarn. These details are optional and do not change the basic construction of the Crochet-Framed Candy Cane Pendants Pattern.
For gift wrapping, attach one finished pendant to the ribbon of a wrapped package instead of using a conventional gift tag. After the present is opened, the recipient can transfer the ornament to a Christmas tree. A set of three or four matching pendants can also make a thoughtful handmade seasonal gift. Because each project uses relatively little yarn, producing a small collection is practical even when working from leftover materials.
If you are making decorations around edible candy canes, keep the candy in its original sealed wrapper. The crochet itself should not be treated as food-safe packaging, and the candy should be removed completely before eating. Inspect the wrapper before giving the ornament as a gift. For households with very young children or pets, consider using decorative non-food inserts and keeping small loops, yarn ties, and ornaments out of reach.
Store reusable crochet frames flat after the holidays. Remove any edible candy first, gently straighten the fabric, and place the ornaments in a clean dry container. Avoid placing heavy decorations on top of them, as this can crush the scallops. When the next Christmas season arrives, insert fresh candy canes and reshape the frames with your fingers. This makes the project economical as well as decorative.
Frequently Asked Questions About the Crochet-Framed Candy Cane Pendants Pattern
What skill level is needed for this pattern?
The pattern is suitable for adventurous beginners and intermediate crocheters. The straight portion mainly uses single crochet, while the decorative edging uses simple double crochet shells. Shaping the curved hook is the only part that may require a little patience, because the number of increases can vary according to the candy cane.
What yarn works best for candy cane crochet pendants?
Mercerized cotton, lightweight cotton, crochet thread, or a cotton-blend yarn works particularly well because these fibers provide good stitch definition. Acrylic can also be used, especially for larger ornaments. Avoid extremely fluffy yarn because it can hide the scalloped edging and make the frame look bulky.
What hook size should I use?
A hook between 2.25 mm and 3.0 mm is suitable for many lightweight yarns and threads. Always choose a size that produces firm but flexible stitches. The fabric needs enough structure to hold its shape while remaining easy to curve around the candy cane.
Can I make the pendant without using a real candy cane?
Yes. The Crochet-Framed Candy Cane Pendants Pattern can be used with a plastic candy cane ornament, a handmade fabric insert, a felt candy cane, or another lightweight decorative form. This option is especially convenient if you want ornaments that can be stored and reused every year without replacing the center.
How do I adjust the pattern for a larger candy cane?
Simply crochet additional rows in the straight portion and continue the curved section until the frame matches the new size. The most reliable technique is to place your candy cane beside the crochet regularly. Since this design is based on physical fit rather than strict gauge, customizing the size is straightforward.
Why is my crochet frame twisting?
Twisting usually occurs when stitches are added too quickly around the hook or when border stitches are packed too closely together. Try reducing the frequency of increases or placing fewer edging stitches around the curved section. Light blocking can also correct minor twisting once the crochet is complete.
Can I use only single crochet for the entire ornament?
Absolutely. The scallops are decorative rather than structural. If you prefer a minimalist style, work a single crochet border around the entire frame. You could then add a contrasting surface slip stitch around the outside for color without creating shells.
How many ornaments can I make from one skein of yarn?
The exact number depends on yarn weight and skein size, but these pendants use relatively small amounts. A standard skein can often produce many ornaments, making this a useful scrap yarn crochet project. Save small amounts of red, white, and green yarn throughout the year for holiday crafting.
Can the crochet frame be washed?
If the candy cane is removed and the yarn label allows washing, the crochet portion can usually be gently hand-washed. Use cool water, reshape the piece carefully, and dry it flat. Never wash the ornament while an edible candy cane is inside.
How can I make the scallops look more even?
Keep consistent tension and count the spaces between shells. On straight sections, repeating the same number of skipped stitches usually creates a uniform border. Around curves, allow occasional adjustments so the scallops follow the shape naturally rather than forcing the fabric into an unwanted ripple.
Can these pendants be used on gifts instead of a Christmas tree?
Yes. They work beautifully as package toppers, stocking decorations, garland ornaments, table place accents, or small handmade holiday favors. The hanging loop makes it easy for the recipient to reuse the decoration afterward.
How long does one crochet candy cane ornament take to make?
Once you understand the shaping, a small pendant can often be completed in an evening or less. More elaborate borders, color changes, embroidered details, or additional embellishments will increase the finishing time.
Conclusion
The Crochet-Framed Candy Cane Pendants Pattern is a creative way to combine basic crochet techniques with one of the most recognizable symbols of Christmas. Throughout this tutorial, you learned how to choose suitable yarn and hook sizes, measure a candy cane, crochet the straight frame, gradually shape the curved hook, add secure openings and ties, create decorative scalloped edging, and finish the ornament with a practical hanging loop. You also learned how to adjust the pattern for different candy cane sizes, experiment with traditional red, white, and green color combinations, and prepare the crochet frame for reuse during future holiday seasons.
Whether you make one pendant as a quick seasonal project or create an entire collection for your Christmas tree, these crochet candy cane ornaments offer plenty of opportunities for personalization. Try different borders, alternate colors, delicate picots, or reusable decorative inserts and make the design your own. If you make this project, leave your sincere opinion about the pattern and share any suggestions, color combinations, stitch ideas, or improvements you would love to see in future crochet tutorials.