
Overview & Design Inspiration
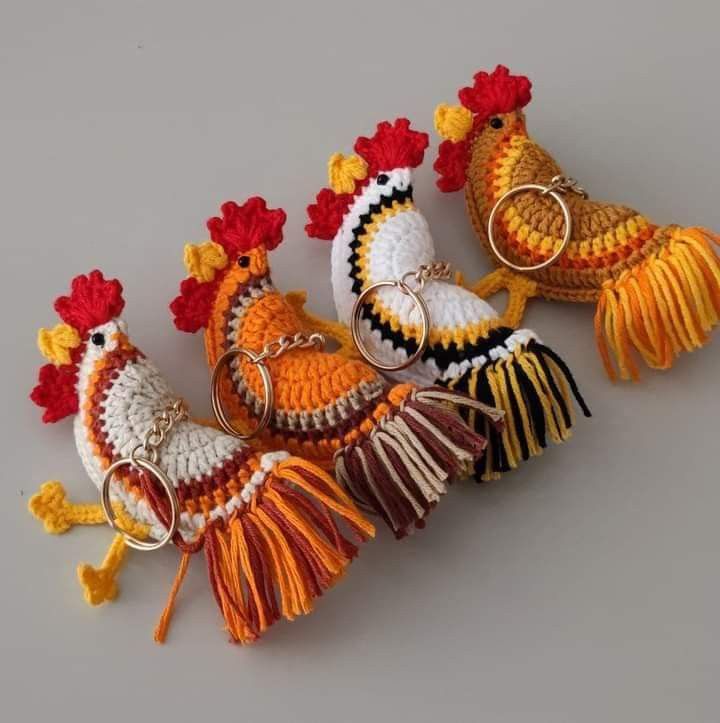
Welcome, fellow yarn lovers, to your next favorite quick-make obsession! The Crochet Cute Rooster Keychain Pattern combines creativity, charm, and everyday practicality into one delightfully addictive amigurumi project.
Whether you are a beginner looking to master small-scale shaping or an experienced maker wanting a fast, satisfying gift idea, this adorable little rooster brings endless joy. Its portable size and vibrant personality make it an absolute must-add to your handmade lineup!
Materials & Recommended Supplies
- Yarn: Lightweight cotton or acrylic yarn in vibrant rooster shades (red, yellow, orange) and contrasting neutrals. Cotton offers crisp stitch definition, while acrylic provides a soft, plush feel.
- Crochet Hook: 2.5mm to 3.5mm hook (US C/2 to E/4), chosen to maintain a tight gauge that prevents stuffing from showing through.
- Notions: Polyester fiberfill stuffing, a yarn needle for seamless weaving, and stitch markers to track your continuous rounds.
- Hardware: A sturdy keychain ring attachment to turn your finished amigurumi into a functional accessory.
Essential Techniques & Stitch Highlights
Mastering this project relies on a few fundamental amigurumi techniques that keep your work clean and professional. Working in continuous rounds—using a spiral technique instead of joined slips—creates a seamless, beautifully rounded body shape without unsightly vertical lines.
You will primarily rely on basic stitches like the magic ring, single crochet, increases, and decreases. Clean color changes are also essential when introducing the bright red comb, sunny beak, and playful tail feathers, ensuring your transitions look sharp and polished.
Construction & Assembly Highlights
The journey begins by crocheting a classic magic ring and building the rounded body with smooth increases and steady, even rows. As you reach the height of your rooster, light and balanced stuffing ensures the body holds its structured yet huggable form before you decrease to close.
Next comes the fun part: bringing your rooster to life with separate, detailed pieces! You’ll craft a curved red comb, a tiny yellow beak, and playful textured wings and tail feathers, then sew everything securely in place before attaching your keyring.
Customization & Styling Ideas
One of the best parts of this project is how easily you can customize it to match your personal style or a specific holiday. Swap out traditional brights for soft pastel shades to create a charming spring-themed accessory, or use warm autumn oranges and browns for a rustic farmhouse vibe.
For added personality, consider using embroidered thread for minimalist eyes to make the keychain completely child-safe, or crochet a tiny removable scarf or bow to give your rooster extra flair!
Pro Tips for Flawless Results
- Maintain Snug Tension: Keep your stitches tight and consistent so your polyester stuffing stays neatly tucked inside without poking through the gaps.
- Secure Your Ends: Because keychains experience daily friction in pockets and bags, weave in all ends securely and double-knot your assembly points.
- Light Up Your Photos: If you plan to gift or sell your creations, photograph them in bright natural light against a clean background to highlight their charming details.
Frequently Asked Questions
What skill level is required for the Crochet Cute Rooster Keychain Pattern?
The pattern is beginner-friendly and relies on basic amigurumi stitches like single crochet, increases, and decreases. With a little patience, even newer crocheters can easily complete it!
How long does it take to complete one keychain?
On average, making one rooster takes between one to two hours, depending on your personal crochet speed and familiarity with amigurumi assembly.
Can I wash the finished rooster keychain?
Yes, as long as you use washable yarn and secure all attachments properly, you can gently hand wash your keychain in cold water and lay it flat to dry.
Watch the Full Step-by-Step Video Tutorial
Prefer visual guidance? Follow along with the complete video tutorial below at your own pace: