
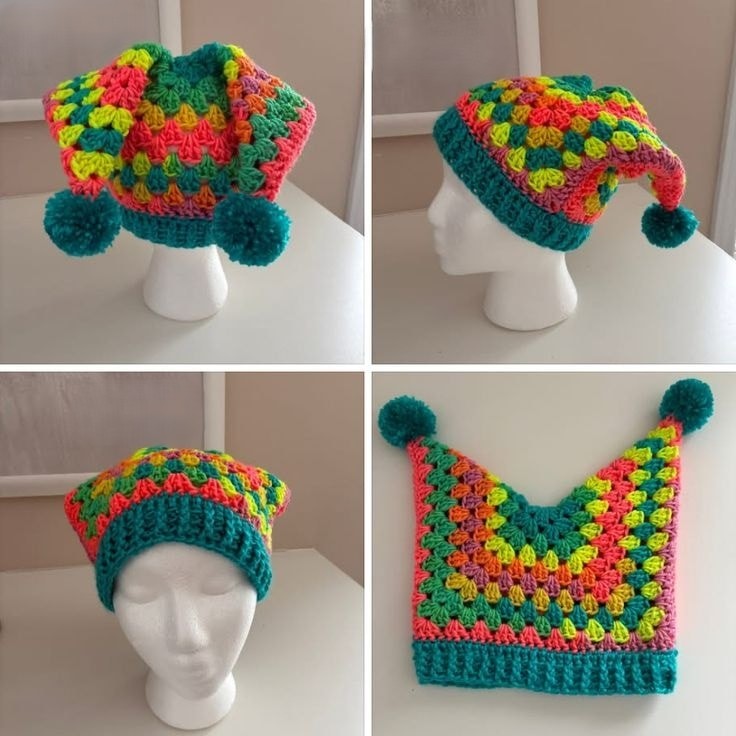
Overview & Inspiration
Welcome, fellow yarn lovers, to one of our most delightfully whimsical and playful projects yet! The Crochet Jester Hats Pattern brings an explosion of color, personality, and handmade charm straight to your hook, making it a stellar addition to any costume collection or bold wardrobe.
Whether you are a confident beginner looking for a fun challenge or an experienced maker craving a unique conversation piece, this design sparks pure joy in every single stitch. Let’s dive right into our materials and bring this masterpiece to life!
Materials & Supplies Needed
- Medium-weight (Worsted Weight / 4) yarn in traditional jester colors (red, yellow, blue, green) or your favorite modern palette
- Acrylic yarn for easy care and durability, or cotton yarn for breathability
- Crochet hook size 5.0 mm (US Size H/8)
- Tapestry needle for weaving in ends and seaming
- Stitch markers to keep track of your rounds
- Sharp scissors
- Optional lightweight polyester fiberfill for stuffing the pointed tips
- Optional small jingle bells or pom-poms for the tips
Stitches & Abbreviations
- ch = chain
- st = stitch
- sts = stitches
- sl st = slip stitch
- sc = single crochet
- hdc = half double crochet
- dc = double crochet
- inc = increase (work 2 sc in the same st)
- dec = decrease (sc 2 stitches together)
- FO = fasten off
Step-by-Step Pattern Instructions
The Hat Base
We begin the Crochet Jester Hats Pattern at the crown, working in continuous rounds to form a snug, comfortable base.
Round 1: Start with a magic ring, work 6 sc into the loop, pull tight to close. [6 sts]
Round 2: Work [inc] in each st around. [12 sts]
Round 3: [Sc in next st, inc in next st] repeat around. [18 sts]
Round 4: [Sc in next 2 sts, inc in next st] repeat around. [24 sts]
Rounds 5-15: Sc in each st around to build the hat body and achieve desired head circumference and depth. [24 sts]
FO and weave in your ends.
The Pointed Extensions (Make 3 to 4)
Each point is crocheted separately and later attached to the main hat body for that signature jester silhouette.
Round 1: Make a magic ring, work 4 sc into the loop. [4 sts]
Round 2: [Inc, sc in next st] repeat around. [6 sts]
Rounds 3-8: Sc in each st around, gradually shaping the taper. [6 sts]
Round 9: [Dec, sc in next st] repeat around. [4 sts]
FO, leaving a long tail for sewing. Lightly stuff the tip with fiberfill if desired.
Assembly & Finishing Touches
Lay your finished hat base flat and evenly space your completed pointed extensions around the top crown.
Using your tapestry needle and the matching yarn tails, whipstitch each point firmly onto the base to ensure structural integrity during active wear.
Securely attach small pom-poms or child-safe jingle bells to the end of each point, and carefully weave in all remaining yarn ends for a polished, professional finish.
Pro Tips for Flawless Results
- Maintain a consistent tension throughout your project to prevent uneven shaping and puckered fabric.
- Always make a quick gauge swatch before committing to your yarn to ensure an accurate, comfortable fit.
- Use invisible seaming techniques when attaching your points to keep the joins looking neat and clean.
- Give your finished hat a light steam blocking if needed to help the acrylic or cotton fibers settle smoothly.
Frequently Asked Questions
What skill level is required for a Crochet Jester Hats Pattern?
Most patterns are wonderfully suited for advanced beginners to intermediate crocheters. If you are comfortable working in rounds and performing basic increases and decreases, you will master this project with ease!
How long does it take to complete a Crochet Jester Hats Pattern?
The time required depends heavily on size and complexity, but a standard adult-sized hat can typically be whipped up in one to two days of focused crafting.
Can I adjust the number of points on the hat?
Absolutely! This pattern is exceptionally customizable, allowing you to create two, three, or even four distinct points depending on your personal design vision.
Watch the Full Step-by-Step Video Tutorial
Prefer visual guidance? Follow along with the complete video tutorial below at your own pace: