
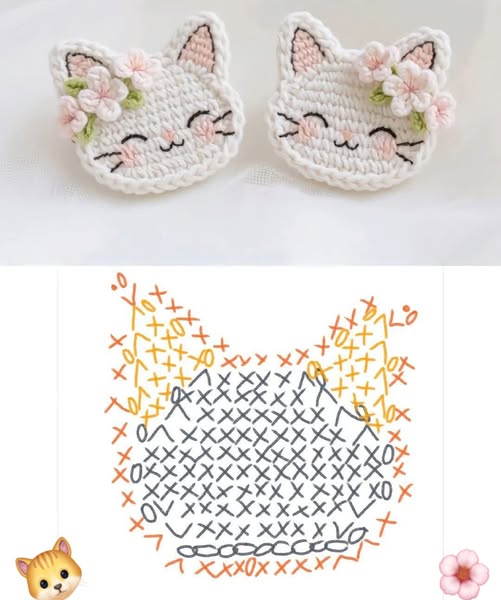
Overview & Inspiration
Welcome, fellow yarn lovers! There is something endlessly charming about creating a sweet feline face with your own two hands, combining creativity, cuteness, and handmade warmth into a single delightful project.
Whether you are crafting home décor, heartfelt gifts, or inventory for your next craft market, this adorable feline design is an absolute favorite. It is expressive, playful, and easily adapted to suit any skill level or creative vision.
Materials & Supplies Needed
- Medium-weight (Worsted Weight / #4) yarn in main face color, pink for the nose, and black for whiskers
- Cotton yarn for crisp stitch definition or acrylic yarn for extra softness
- 4.0 mm (US G/6) crochet hook
- Tapestry needle for weaving ends and embroidering details
- Stitch markers
- Sharp scissors
- Polyester fiberfill stuffing (optional, depending on your final project application)
Stitches & Abbreviations
- ch – Chain
- st/sts – Stitch or stitches
- sl st – Slip stitch
- sc – Single crochet
- hdc – Half double crochet
- dc – Double crochet
- inc – Increase (work 2 sc in the same st)
- dec – Decrease (work 2 sc together)
- FO – Fasten off
Step-by-Step Pattern Instructions
We will begin by creating the circular base of the face, working in continuous rounds unless otherwise stated.
Round 1: Start with a magic ring, ch 1, and work 6 sc into the ring. Pull tight to close. [6 sts]
Round 2: Work 2 sc in each st all the way around. [12 sts]
Round 3: [Work 1 sc in the next st, then 2 sc in the next st] and repeat around. [18 sts]
Round 4: [Work 1 sc in each of the next 2 sts, then 2 sc in the next st] and repeat around. [24 sts]
Round 5: [Work 1 sc in each of the next 3 sts, then 2 sc in the next st] and repeat around. [30 sts]
Round 6: [Work 1 sc in each of the next 4 sts, then 2 sc in the next st] and repeat around. [36 sts]
Ears (Make 2):
Ch 4.
Row 1: Working in the second ch from hook, work 1 sc in each ch across, turn. [3 sts]
Row 2: Ch 1, sc2tog, work 1 sc in the last st, turn. [2 sts]
Row 3: Ch 1, sc2tog. FO, leaving a long tail for sewing. [1 st]
Assembly & Finishing Touches
Position the two triangular ears securely along the top edge of the circular face base, pinning them in place before sewing.
Use your tapestry needle and black yarn to embroider sleepy or curious eyes using satin stitches or French knots near the center of the face.
Stitch a small pink triangular nose right below the eyes, and add delicate straight stitches extending outward to create the whiskers.
Weave in all loose yarn tails securely on the wrong side of your work, and gently block the finished piece if necessary to ensure it lies completely flat.
Pro Tips for Flawless Results
- Maintain consistent stitch tension throughout your rounds so the circular face base stays perfectly flat and symmetrical.
- Use a hook size slightly smaller than recommended for your yarn weight to prevent gaps and create a tighter, more professional finish.
- Always secure your embroidered facial features with tight, double knots on the back to ensure safety and long-lasting durability.
- Keep your dye lots consistent if you plan to make a matching set of items or a larger blanket featuring multiple faces.
Frequently Asked Questions
What skill level is required for this pattern?
This design is wonderfully beginner-friendly for those comfortable with basic stitches, while offering plenty of room for experienced crocheters to customize.
Can this pattern be easily resized?
Yes! You can easily scale the design up or down by adjusting your hook size or switching to a bulkier or lighter weight yarn.
Is this design safe to use in baby items?
Absolutely. Just ensure that all facial features are securely embroidered rather than using plastic components, and choose washable, skin-friendly yarn fibers.
Watch the Full Step-by-Step Video Tutorial
Prefer visual guidance? Follow along with the complete video tutorial below at your own pace: