
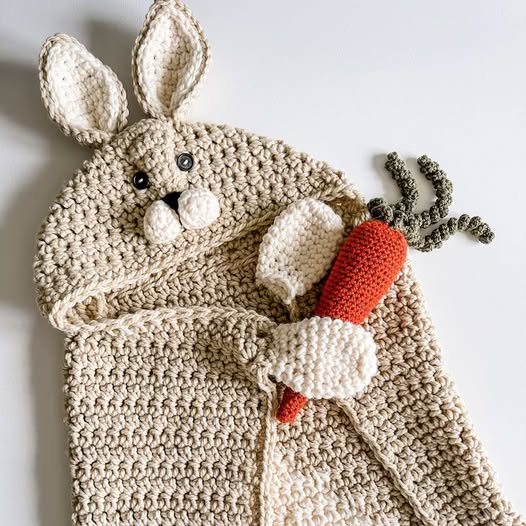
Overview & Inspiration
Welcome, my crafty friends! There is nothing quite like the magic of combining comfort, creativity, and storytelling into a single handmade project that will be treasured for years to come.
The Hooded Woodland Rabbit Blanket Pattern is designed to wrap your little ones in pure warmth while sparking their imagination with its adorable, nature-inspired charm.
Materials & Supplies Needed
- Yarn: Worsted weight (Category 4) soft acrylic or cotton blend yarn. Approximately 1,000–1,200 yards total.
- Main Color (MC): Cream or Soft Oatmeal (approx. 800 yards)
- Contrast Color (CC): Muted Woodland Brown or Sage Green for trim and details (approx. 200 yards)
- Pink accent yarn for nose and inner ears (small scraps)
- Crochet Hook: 5.0 mm (US Size H/8)
- Tapestry Needle for weaving in ends and seaming
- Stitch Markers (4)
- Scissors
- Polyfill stuffing (small amount for rabbit ears)
Stitches & Abbreviations
- ch = chain
- st(s) = stitch(es)
- sl st = slip stitch
- sc = single crochet
- hdc = half double crochet
- dc = double crochet
- blo = back loop only
- inv-dec = invisible single crochet decrease
- RS = right side
- WS = wrong side
Step-by-Step Pattern Instructions
Part 1: The Blanket Base
We begin with the cozy blanket portion, working in a simple, rhythmic stitch pattern to keep your tension even and relaxing.
Row 1 (RS): Ch 102, dc in 4th ch from hook (skipped 3 chs count as first dc), dc in each ch across, turn. [100 sts]
Row 2 (WS): Ch 3 (counts as first dc here and throughout), working in blo, dc in each st across, turn. [100 sts]
Rows 3–60: Repeat Row 2 until blanket measures approximately 36 inches square. Fasten off and weave in ends.
Part 2: The Hood
The hood is worked flat in rows, then seamed at the back to create a snug, comfortable fit.
Row 1: Attach MC along one top edge of the blanket, ch 2 (counts as hdc), hdc in next 60 sts, leaving remaining sts unworked, turn. [61 sts]
Rows 2–24: Ch 2, hdc in each st across, turn. [61 sts]
Fasten off, leaving a long tail. Fold the hood in half with WS facing out and seam the top edge closed. Turn hood right side out.
Part 3: Rabbit Ears (Make 2)
Using MC, work in continuous rounds without joining unless specified.
Round 1: Start with an adjustable magic ring, work 6 sc in ring. [6 sts]
Round 2: 2 sc in each st around. [12 sts]
Round 3: (1 sc, 2 sc in next st) around. [18 sts]
Rounds 4–14: Sc in each st around. [18 sts]
Round 15: (1 sc, inv-dec) around. [12 sts]
Lightly stuff the bottom half of the ear with polyfill. Fasten off, leaving a long tail for sewing.
Assembly & Finishing Touches
Position the rabbit ears securely onto the top of the hood, spacing them evenly apart, and sew them firmly in place using your tapestry needle.
Using the pink accent yarn, embroider a small, gentle nose and sweet sleepy eyes centered on the front edge of the hood.
Carefully weave in all remaining yarn tails and gently steam block your blanket edges so they lay beautifully flat.
Pro Tips for Flawless Results
- Maintain a relaxed grip to ensure your blanket base drapes softly rather than feeling stiff.
- Count your stitches at the end of every few rows to keep your blanket perfectly square.
- Use locking stitch markers to hold the ears in place on the hood before sewing so you can check symmetry.
Frequently Asked Questions
What is the finished size of the blanket?
The blanket base measures approximately 36 by 36 inches, making it ideal for babies, toddlers, and cozy stroller rides.
Can I wash this blanket in the washing machine?
Yes! As long as you choose a machine-washable worsted weight yarn, your finished woodland rabbit blanket will be easy to clean and care for.
Are the rabbit ears difficult to make?
Not at all! They are worked in simple continuous rounds using basic single crochet stitches and minimal shaping.