
Overview & Inspiration
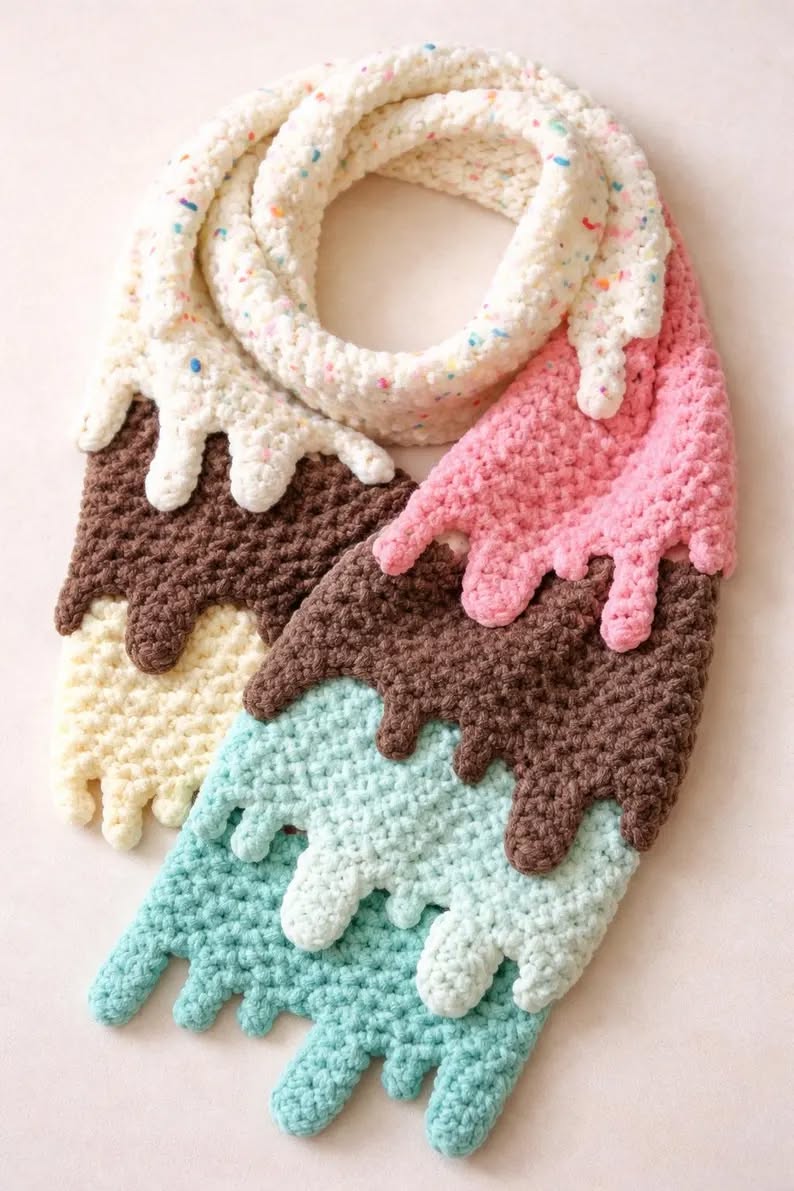
Welcome, fellow yarn lovers! If you are looking for a project that brings pure joy and whimsy to your hook, you are going to fall completely in love with the Dripping Ice Cream Scarf.
This playful pattern blends creative design with cozy, everyday comfort. It is a fantastic conversation starter that lets you experiment with fun textures, vibrant colors, and clever shaping while keeping you wonderfully warm.
Materials & Supplies Needed
- Medium-weight yarn (Worsted weight / #4) in a main body color and contrasting drip colors
- Fiber content: Acrylic or cotton blends for great stitch definition and easy care
- Crochet hook: 5.0 mm (US H/8)
- Tapestry needle for weaving in ends
- Stitch markers (to track your drips and repeats)
- Sharp scissors
- Optional: Small amount of polyester stuffing if you want to add 3D stuffed sprinkles or cherries!
Stitches & Abbreviations
- ch: chain
- st/sts: stitch/stitches
- sl st: slip stitch
- sc: single crochet
- hdc: half double crochet
- dc: double crochet
- tr: treble crochet
- RS: right side
- WS: wrong side
Step-by-Step Pattern Instructions
We will start by creating the main rectangular body of the scarf, followed by attaching our whimsical melting drip edge directly to the foundation and working rows.
Part 1: The Scarf Body
Using your main body color and 5.0 mm hook, ch 26.
Row 1 (RS): Working in the back bumps of the chain, sc in 2nd ch from hook and in each ch across, turn. [25 sts]
Row 2: Ch 1 (does not count as st here and throughout), sc in first st, *hdc in next st, dc in next st; repeat from * across, end with sc in last st, turn. [25 sts]
Row 3: Ch 1, sc in each st across, turn. [25 sts]
Repeat Rows 2 and 3 until your scarf measures approximately 60 inches long, or your desired length, ending on a Row 3 repeat. Fasten off your main body yarn.
Part 2: The Dripping Ice Cream Border
Join your contrasting drip color at the top right corner of the scarf body.
Drip Row 1: Ch 1, work an even row of sc across the long edge of the scarf to create a stable foundation for the melting effect. Fasten off.
Drip Row 2 (Creating the Drips): Join contrasting yarn. *Sc in next 2 sts, hdc in next st, dc in next 2 sts, tr in next st, dc in next 2 sts, hdc in next st, sc in next 2 sts, sl st into next st; repeat from * across the edge to create the organic melting drip shapes. Fasten off and secure all tails.
Assembly & Finishing Touches
Take your tapestry needle and carefully weave in all remaining yarn tails along the wrong side of the scarf.
To really pop those melting drips, lightly block your finished piece by pinning it to your blocking mats, misting it with water, and allowing it to dry completely.
If you made extra embellishments like embroidered sprinkles, attach them securely now!
Pro Tips for Flawless Results
- Maintain a consistent tension throughout the drip row so your melting edges look crisp and uniform.
- Avoid overly fuzzy yarns, as smooth medium-weight acrylic or cotton blends show off the unique stitch heights much better.
- Use stitch markers to count out your drip repeats before you start crocheting the border to ensure perfect symmetry.
Frequently Asked Questions
What skill level is required for this pattern?
This pattern is suitable for confident beginners and intermediate crocheters who are comfortable with basic stitches and eager to try simple shaping techniques.
How long does it take to complete?
Most makers can finish this cozy, creative scarf in just a weekend of relaxed stitching!
How should I care for my finished scarf?
Hand wash your scarf gently in cool water with mild detergent, then lay it flat to dry to preserve the shape of your dripping ice cream edges.