
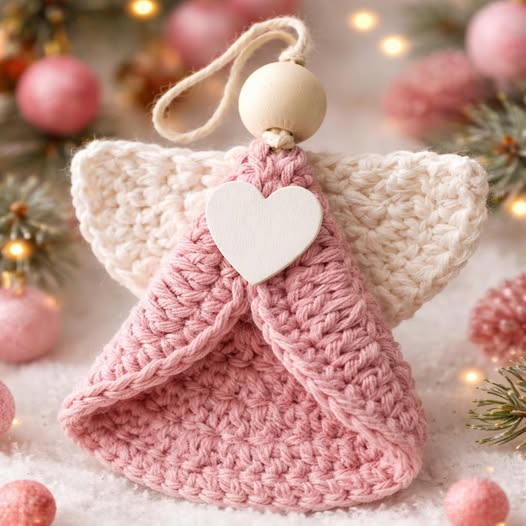
Overview & Inspiration
Welcome, fellow yarn lovers! There is something truly magical about working up a project that fits right in the palm of your hand yet carries so much heartfelt meaning.
Whether you are crafting a thoughtful token for a friend or looking for your next craft fair bestseller, this adorable crochet angel keychain pattern is guaranteed to steal your heart. Let’s grab our hooks and make something special today!
Materials & Supplies Needed
- Sport weight or lightweight DK cotton yarn (white or cream for the body, plus accent colors for hair or wings)
- Matching crochet hook (2.5 mm / US C/2)
- Fiberfill stuffing
- Tapestry needle for weaving ends and sewing
- Stitch markers
- Sharp embroidery scissors
- Key ring, lobster clasp, or swivel keychain hardware
Stitches & Abbreviations
- ch – Chain
- sl st – Slip stitch
- sc – Single crochet
- hdc – Half double crochet
- dc – Double crochet
- inc – Single crochet increase (work 2 sc in the same stitch)
- dec – Single crochet decrease (sc 2 stitches together)
- st(s) – Stitch(es)
- Rnd / Row – Round or Row
Step-by-Step Pattern Instructions
Body (Worked in continuous rounds)
Start with your main body color using a magic ring.
- Rnd 1: Work 6 sc into the magic ring [6 sts]
- Rnd 2: Work [inc] around [12 sts]
- Rnd 3: Work [sc 1, inc] around [18 sts]
- Rnd 4 – Rnd 7: Sc in each st around [18 sts]
- Rnd 8: Work [sc 1, dec] around [12 sts]. Begin stuffing firmly with fiberfill.
- Rnd 9: Work [dec] around [6 sts]. Fasten off, leaving a long tail to weave closed.
Head
Using your skin tone or main yarn, start with a magic ring.
- Rnd 1: Work 6 sc into the magic ring [6 sts]
- Rnd 2: Work [inc] around [12 sts]
- Rnd 3 – Rnd 4: Sc in each st around [12 sts]
- Rnd 5: Work [dec] around [6 sts]. Stuff lightly, then fasten off and leave a tail for sewing.
Wings (Make 2)
Using white yarn, ch 6.
- Row 1: Starting in the 2nd ch from hook, work 1 sl st, 1 sc, 1 hdc, 1 dc, (1 hdc, 1 sc, 1 sl st) all in the last ch. Fasten off, leaving a tail to attach to the back of the body.
Halo
Using metallic or yellow yarn, ch 10 and join with a sl st to form a small ring. Fasten off, leaving a tail to secure it to the top of the head.
Assembly & Finishing Touches
Start by sewing the head securely onto the top center of the body using your yarn tail and tapestry needle.
Next, attach the two wings to the back of the body, positioning them symmetrically on either side.
Place the halo neatly right above the head and anchor it with a few discreet stitches.
Finally, embroider a gentle face with minimal stitches and securely attach your keychain hardware through the top of the head.
Pro Tips for Flawless Results
- Use a crochet hook size slightly smaller than recommended on your yarn label to keep your stitches extra tight and prevent fiberfill from showing through.
- Embroider the facial features before you fully assemble the pieces so you can easily maneuver the fabric.
- Always test the durability of your keychain hardware attachment to ensure it can handle everyday use.
Frequently Asked Questions
What skill level is required for this pattern?
This design is beginner-friendly and perfect for confident novices who are comfortable working in the round and reading basic US crochet terminology.
Can I use acrylic yarn instead of cotton?
Yes, you certainly can! However, cotton yarn offers superior stitch definition and durability, making it the top choice for small keychains that get handled frequently.
How do I attach the keychain hardware securely?
We recommend looping your keychain ring or lobster clasp through a tightly reinforced stitch at the very top of the head or through the secure ring of the halo.
Watch the Full Step-by-Step Video Tutorial
Prefer visual guidance? Follow along with the complete video tutorial below at your own pace: