
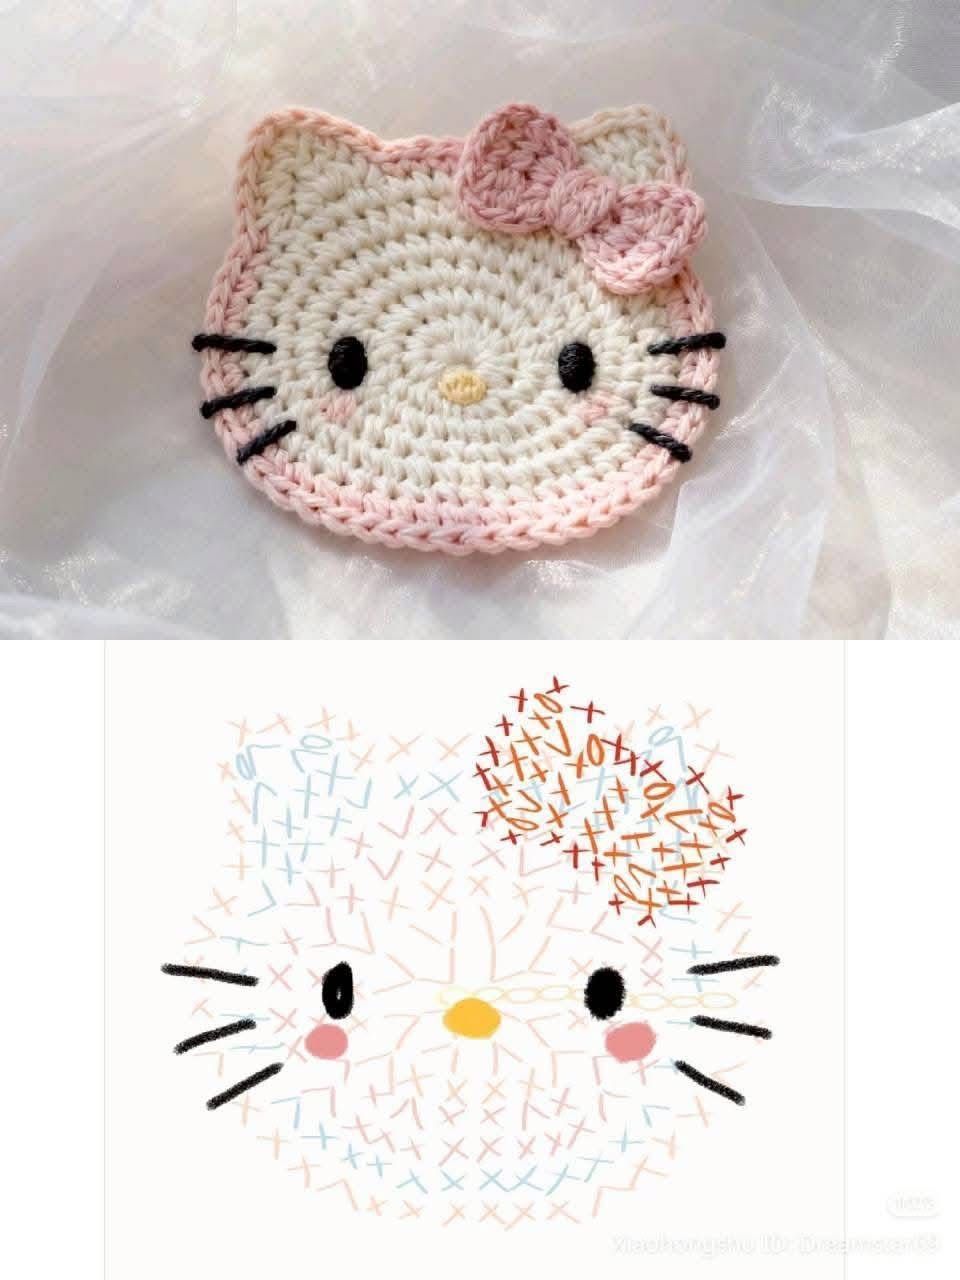
Overview & Inspiration
Hello, fellow yarn enthusiasts! There is something profoundly magical about creating recognizable, beloved characters using nothing more than a hook and a ball of yarn. If you are looking to add an extra dose of sweetness to your next handmade project, you are going to fall completely in love with this iconic motif.
Whether you are embellishing a cozy baby blanket, upgrading a plain canvas tote bag, or creating charming nursery decor, this delightful design offers the ultimate blend of simplicity and charm. Let’s grab our hooks and dive into this joyful project together!
Materials & Supplies Needed
- DK or Sport weight cotton yarn in White (main face), Black (eyes), Yellow (nose), and Red or Pink (bow)
- Crochet hook size 3.0mm (US size D/3) or 3.25mm (US size D/3) to achieve neat, tight stitches
- Tapestry needle (yarn needle) for weaving in ends and embroidering or attaching features
- Stitch markers to keep track of your rounds and progress
- Sharp crafting scissors
- Optional: Small amount of polyester fiberfill stuffing if you prefer a lightly padded applique
Stitches & Abbreviations
- ch: chain
- sl st: slip stitch
- sc: single crochet
- hdc: half double crochet
- dc: double crochet
- inc: increase (work 2 sc into the same stitch)
- dec: decrease (work 2 sc together)
- st(s): stitch(es)
- FO: fasten off
Step-by-Step Pattern Instructions
Head (Main Face Piece)
Using White yarn and working in continuous rounds:
- Round 1: Ch 6, working in the second ch from the hook, work 3 sc in the same st, sc in the next 3 sts, 3 sc in the last ch. Rotate to work along the opposite side of the chain: sc in the next 3 sts. [12 sts]
- Round 2: Inc in the next 3 sts, sc in the next 3 sts, inc in the next 3 sts, sc in the next 3 sts. [18 sts]
- Round 3: (Sc in next st, inc in next st) repeat 3 times, sc in next 3 sts, (sc in next st, inc in next st) repeat 3 times, sc in next 3 sts. [24 sts]
- Round 4 to Round 7: Sc in each st around. [24 sts]
- Round 8: (Sc in next st, dec) repeat 3 times, sc in next 3 sts, (sc in next st, dec) repeat 3 times, sc in next 3 sts. [18 sts]
- Round 9: Dec 6 times, sc in last 6 sts. FO, leaving a long tail for sewing. [12 sts]
The Signature Bow
Using Red or Pink yarn:
- Row 1: Ch 6, sl st into the first ch to form a small ring. Ch 3, work 3 dc into the ring, ch 3, sl st into the ring. Ch 3, work 3 dc into the ring, ch 3, sl st into the ring. FO, leaving a long tail to wrap around the center of the bow and secure it to the head.
Assembly & Finishing Touches
Begin by using your tapestry needle and black yarn to embroider the two oval eyes on the upper middle portion of the face. Place the yellow nose right between and slightly below the level of the eyes.
Position the finished red or pink bow securely on the upper left side of the head, wrapping a strand of yarn around the center to define the bow shape. Use your remaining yarn tails to stitch all the pieces securely onto the main white face piece.
Weave in all remaining yarn ends securely on the back of your applique. Lightly block your finished piece with a steam iron or damp blocking mat to ensure the edges lay perfectly flat and crisp.
Pro Tips for Flawless Results
- Maintain a consistent, slightly firm tension throughout your stitches so that the facial features stay crisp and the applique holds its shape beautifully.
- Take your time pinning the eyes, nose, and bow in place before you stitch them down to guarantee perfect symmetry and facial expression.
- Choose mercerized cotton yarn for the cleanest stitch definition and a professional, polished finish that resists pilling.
Frequently Asked Questions
What skill level is required for this crochet applique?
This pattern is entirely beginner-friendly, relying on basic stitches like chains, single crochets, and slip stitches to create a wonderful, professional result.
How long does it take to make this applique?
Most makers can easily complete this entire applique in about 30 to 45 minutes, making it a fantastic quick-gratification project.
Can I change the size of the finished applique?
Yes, absolutely! You can easily make a larger applique by using bulky yarn and a larger hook, or a smaller one by using crochet thread and a micro hook.
Watch the Full Step-by-Step Video Tutorial
Prefer visual guidance? Follow along with the complete video tutorial below at your own pace: