
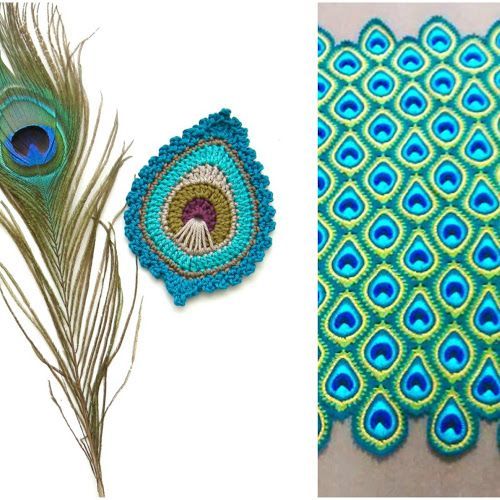
Overview & Inspiration
Welcome back, fiber friends! If you are looking for a project that blends elegance, texture, and pure artistic flair, you are going to fall completely in love with the Crochet Peacock Feather Applique Pattern. There is something truly magical about watching basic yarn and a hook transform into the graceful, curved shapes of nature.
Inspired by the striking beauty and vibrant symbolism of real peacock feathers, this motif is an absolute joy to stitch. Whether you want to embellish a cozy handmade cardigan, elevate your home decor, or simply practice your shaping skills, this versatile applique brings a touch of luxury to everything it touches!
Materials & Supplies Needed
- Yarn Weight: Fingering or DK weight yarn (lightweight yarns highlight stitch definition best).
- Fibers: Smooth mercerized cotton or a cotton-acrylic blend for crisp, clean stitches.
- Colors: Traditional peacock shades (rich teal, royal blue, emerald green, bright gold, and deep purple) or a neutral palette for a modern aesthetic.
- Crochet Hook Size: 3.25 mm (US size D/3) or 3.5 mm (US size E/4) to ensure a firm, neat fabric.
- Tapestry needle for weaving in ends.
- Stitch markers (2-3 recommended for keeping track of curved sections).
- Sharp embroidery scissors.
Stitches & Abbreviations
- ch: chain
- sl st: slip stitch
- sc: single crochet
- hdc: half double crochet
- dc: double crochet
- tr: treble crochet
- st(s): stitch(es)
- rnd(s): round(s)
- rep: repeat
Step-by-Step Pattern Instructions
We will work this gorgeous applique from the base upward, building the iconic central eye and the flowing feather outer layers in structured rows and rounds.
Round 1 (The Eye Base): Using your main eye color (deep blue or teal), ch 6, join with a sl st to the first ch to form a ring. Ch 1, work 12 sc into the ring, join with a sl st to the first sc. [12 sts]
Round 2 (Color Transition): Faston off current color and join your contrasting ring color (green or gold). Ch 2 (does not count as st), work 2 hdc in each st around, join with a sl st to the first hdc. [24 sts]
Row 3 (Feather Spine & Body): Ch 3 (counts as first dc), work 1 dc in same st. Work 1 hdc in next 2 sts, 1 sc in next 4 sts, 1 sl st in next 2 sts. Turn your work to begin shaping the elongated upper feather spine. [9 sts worked]
Row 4 (Outer Feather Shaping): Ch 1, working back down the spine structure, work 1 sc in next 2 sts, 1 hdc in next 2 sts, 1 dc in next 3 sts, 3 dc in the final peak st, then work symmetrically down the opposite side: 1 dc in next 3 sts, 1 hdc in next 2 sts, 1 sc in next 2 sts. Join with a sl st to the base ring. [25 sts]
Row 5 (Lacy Outer Edging): Ch 1, work 1 sc in each st around the outer edge of the feather, adding a small ch-2 picot at the very top pointed tip for extra elegance. Fasten off, leaving a long 10-inch tail for sewing your applique onto your project. [27 sts including picot]
Assembly & Finishing Touches
Before attaching your finished piece, take a moment to weave in all loose yarn ends securely on the wrong side of the work using your tapestry needle.
To get that crisp, professional look, lightly mist your completed feather with water, pin it out to its exact curved measurements on a blocking mat, and allow it to dry completely.
Use your remaining long tail and a whipstitch or mattress stitch to carefully sew the applique onto your target garment, bag, or pillowcase, taking care not to pull the stitches too tight so the fabric lies completely flat.
Pro Tips for Flawless Results
- Maintain consistent tension throughout the curved rows to prevent the edges from unnatural curling or puckering.
- Use stitch markers during the shaping rows to easily identify your peak increase stitches and maintain total symmetry.
- Feel free to experiment with a smaller hook size than recommended for your yarn weight; this creates a denser, more rigid applique that holds its shape wonderfully.
- Don’t be afraid to play with unique color palettes, such as monochromatic silvers and greys, for a sophisticated, modern twist on a classic design.
Frequently Asked Questions
What skill level is required for Crochet Peacock Feather Applique Pattern?
The Crochet Peacock Feather Applique Pattern is best suited for confident beginners and intermediate crocheters. As long as you are comfortable with basic stitches like single and double crochet, you will breeze right through it!
How long does it take to complete a Crochet Peacock Feather Applique Pattern?
Most makers can easily complete a single feather applique in under 45 minutes, making it a fantastic quick-gratification project or weekend stash-buster.
Can the Crochet Peacock Feather Applique Pattern be washed?
Yes, absolutely! If you use washable mercerized cotton yarn, your finished applique can be hand-washed or machine-washed on a gentle cycle, provided it is securely stitched onto your main project.
Watch the Full Step-by-Step Video Tutorial
Prefer visual guidance? Follow along with the complete video tutorial below at your own pace: