
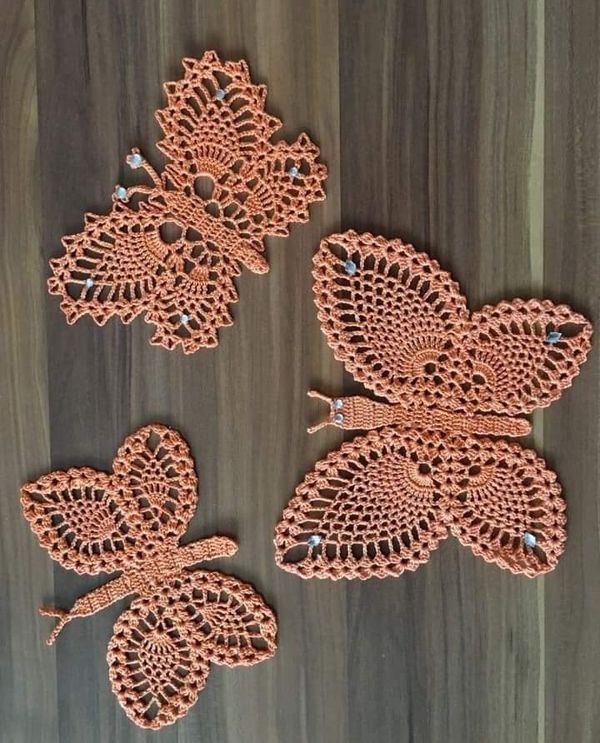
Overview & Inspiration
Welcome, fellow yarn lovers! The Crochet Lace Butterfly Pattern is one of the most charming, delicate motifs you can bring to life in the world of handmade crafts.
This elegant design blends the softness of lace with the timeless beauty of butterflies, giving you an artistic and therapeutic stitching experience that results in an ethereal finished piece.
Materials & Supplies Needed
- Yarn Weight: Fingering weight or lace thread (Size 10 crochet cotton recommended for a classic look)
- Fiber Content: 100% Mercerized Cotton for crisp stitch definition
- Color: White, cream, or any vibrant variegated yarn of your choice
- Hook Size: 1.75 mm (US Steel Hook Size 4) or 2.0 mm
- Tapestry needle for weaving in ends
- Stitch markers (optional, for marking wing arches)
- Precision scissors
- Blocking board and rust-proof pins
Stitches & Abbreviations
- ch = chain
- sl st = slip stitch
- sc = single crochet
- hdc = half double crochet
- dc = double crochet
- tr = treble crochet
- picot = ch 3, sl st in the 3rd ch from hook
- st(s) = stitch(es)
- sp(s) = space(s)
Step-by-Step Pattern Instructions
Round 1: The Central Body
Begin with a magic ring. Ch 1, work 8 sc into the ring. Join with a sl st to the first sc to close the round. [8 sts]
Round 2: Body Shaping
Ch 3 (counts as first dc), work 1 dc in the same st, work 2 hdc in each of the next 2 sts, 2 sc in the next 2 sts, 2 hdc in the next 2 sts, 2 dc in the last st. Join with a sl st to the top of the initial ch-3. Fasten off and secure your yarn tails. [16 sts]
Round 3: Upper Wings Foundation
Attach yarn to the upper side of the body base. Ch 5 (counts as 1 dc + ch 2), [skip next st, 1 dc, ch 2] 3 times. Turn your work. [4 dc, 4 ch-2 sps]
Round 4: Upper Wings Lace Arches
In each ch-2 sp across, work (2 dc, ch 2, 2 dc). Ch 3, sl st back down to the center body to anchor the upper wing securely. Repeat for the second upper wing on the opposite side. [24 sts per wing]
Round 5: Lower Wings Base
Attach yarn to the lower side of the body base. Ch 4 (counts as 1 hdc + ch 2), [skip 1 st, 1 hdc, ch 2] 2 times. Turn your work. [3 hdc, 3 ch-2 sps]
Round 6: Lower Wings Edging
In each ch-2 sp across, work (1 hdc, 1 dc, picot, 1 dc, 1 hdc). Ch 2, sl st down to the center body. Repeat for the second lower wing. Fasten off all remaining yarn. [18 sts per wing]
Assembly & Finishing Touches
Inspect your butterfly motif to ensure all four wings are evenly aligned with the central body.
Thread your tapestry needle and carefully weave all loose yarn tails through the stitches along the back of the body until they are completely hidden.
Pin your finished butterfly flat onto a blocking board, gently stretching and opening up the lace spaces and picot edges.
Lightly mist the pinned butterfly with water or apply light steam, then allow it to dry completely to set its shape.
Pro Tips for Flawless Results
- Keep your tension relaxed and consistent so the lace wing arches maintain an airy, delicate drape.
- Practice your picot stitches on a scrap piece of yarn first to ensure crisp, uniform loops along the wing edges.
- Experiment with fine metallic threads or soft cotton gradients to give your butterflies a unique, modern twist.
Frequently Asked Questions
Can I use heavier yarn for this pattern?
Yes, you can use DK or Worsted weight yarn with an appropriately sized hook to create a larger, chunkier butterfly, though it will have a less traditional lace appearance.
Is this pattern beginner-friendly?
Absolutely! As long as you are comfortable with basic stitches like chains, single crochets, and double crochets, you will find this pattern easy to follow.
How do I stop the lace edges from curling?
Blocking is the secret weapon for lace crochet. Pinning and steaming your finished butterfly will instantly relax the stitches and flatten the design.
Watch the Full Step-by-Step Video Tutorial
Prefer visual guidance? Follow along with the complete video tutorial below at your own pace: