
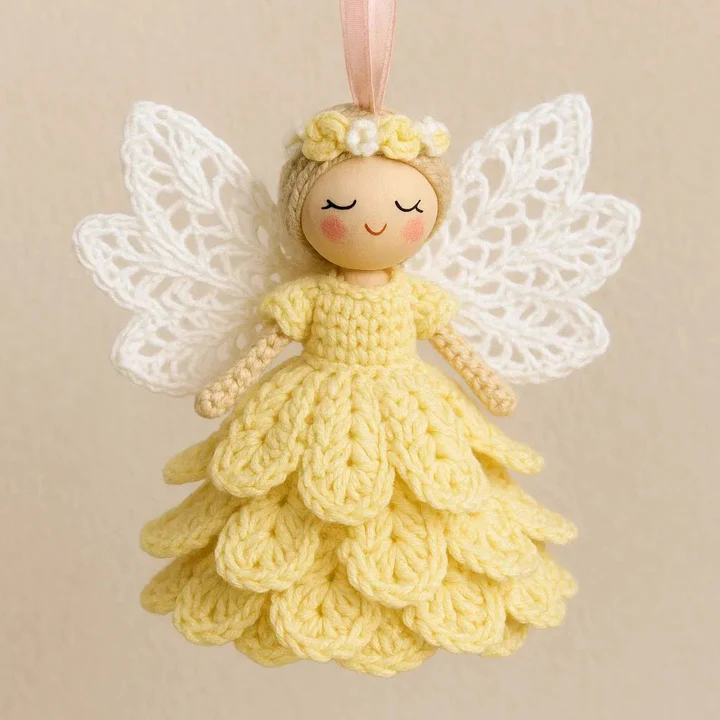
Overview & Inspiration
Welcome, my wonderful crafty friends! The Crochet Little Angel Pattern is one of the most beloved and meaningful designs we can make, carrying beauty, sentiment, and timeless charm into our homes.
Whether you are crafting a holiday ornament, a heartfelt gift, or a keepsake for a special milestone, weaving this delicate angel brings peace and love into every single stitch.
Materials & Supplies Needed
- Size 10 cotton thread (or lightweight / sport-weight yarn) in white, cream, or gold
- Steel crochet hook 1.5 mm or 2.0 mm (for thread) / 3.5 mm or 4.0 mm hook (for lightweight yarn)
- Tapestry needle for weaving ends and sewing
- Stitch markers
- Sharp scissors
- Small amount of fiberfill stuffing
- Starch or fabric stiffener
- Metallic thread, tiny beads, or ribbon for optional embellishments
Stitches & Abbreviations
- ch – chain
- sc – single crochet
- dc – double crochet
- sl st – slip stitch
- inc – increase (work 2 sts in the same st)
- dec – decrease (work 2 sts together)
- st(s) – stitch(es)
Step-by-Step Pattern Instructions
Body and Dress
Make a magic ring. Work a few double crochet stitches into the center to begin the base of your flowing skirt.
Gradually increase each round to form the flared skirt shape. Adjust the number of stitches per round to achieve your desired fullness.
Round 1: Ch 3 (counts as first dc), work 11 dc into magic ring, join with sl st to top of starting ch [12 sts]
Round 2: Ch 3, 1 dc in same st, work 2 dc in each st around, join with sl st [24 sts]
Upper Body and Torso
Transition from the skirt into the upper body using tight single crochet stitches to create a firm, structured torso.
Round 3: Ch 1, work 1 sc in each st around, join with sl st [24 sts]
Round 4: Ch 1, work [2 sc, dec] 6 times around, join with sl st [18 sts]
Head
Create the angel’s head by working a small sphere. Start in a magic ring and fill lightly with fiberfill before closing.
Round 1: Make a magic ring, work 6 sc in ring, join [6 sts]
Round 2: Inc in each st around, join [12 sts]
Rounds 3-4: Work 1 sc in each st around, join [12 sts]
Round 5: Dec 6 times around, stuff lightly, fasten off leaving a long tail [6 sts]
Halo
Using metallic or gold thread, chain a short length and join into a small loop to form the heavenly halo.
Row 1: Using metallic thread, ch 10, join with a sl st to form a ring, secure and leave a tail for attaching.
Wings
Create the wings separately using a lacy shell or fan stitch pattern to achieve a graceful look.
Row 1: Ch 8, work fan stitches (multiple dc into a single ch space) across to form the winged silhouette, fasten off.
Assembly & Finishing Touches
Carefully attach the stuffed head to the top of the torso using your tapestry needle and yarn tail, ensuring it sits balanced and centered.
Sew or glue the finished wings and metallic halo securely onto the back and top of the angel, spreading them evenly for a symmetrical presentation.
Apply starch or fabric stiffener thoroughly to your finished angel, then shape it and let it dry completely so it stands upright and maintains its structure.
Pro Tips for Flawless Results
- Maintain consistent tension throughout your stitches so the angel’s body and skirt hold a firm, clean shape.
- Use stitch markers at the start of your rounds to easily track your stitch counts, especially when working on the torso decreases.
- Experiment with size 10 cotton thread for a traditional lace look, or switch to sport-weight yarn if you prefer a softer, textured decoration.
Frequently Asked Questions
What kind of yarn should I use for the Crochet Little Angel Pattern?
Lightweight cotton thread or size 10 crochet thread works best for delicate and detailed angels. However, you can also use soft acrylic yarn for a slightly larger, cozier version.
Can beginners make this pattern?
Yes, absolutely! The pattern relies on basic stitches like single crochet, double crochet, and slip stitches, making it very approachable for confident beginners.
How do I make the angel stand on its own?
Applying starch or fabric stiffener to the finished piece and letting it dry completely gives your angel the necessary structure and stability to stand upright.
Watch the Full Step-by-Step Video Tutorial
Prefer visual guidance? Follow along with the complete video tutorial below at your own pace: