
Overview & Design Inspiration
There is a magical shift in the air when autumn arrives, and nothing captures that cozy, rustic charm quite like handmade harvest decor. Our latest project brings all the warmth of the season right into your living room with a delightful, textured design that is as joyful to stitch as it is to display.
Crafters adore this project because it transforms simple stitches into a stunning, three-dimensional masterpiece without any complicated amigurumi shaping. Whether you are prepping your home for a festive Thanksgiving gathering or simply craving a relaxing evening of mindful crafting, this charming piece will instantly fill your space with heart and handmade beauty.
Materials & Recommended Supplies
- Yarn: Medium-weight worsted yarn (Category 4) in traditional autumn orange (approx. 50–80 yards), plus a small amount of brown for the stem. Acrylic, cotton, or wool blends all offer wonderful stitch definition.
- Crochet Hook: 4.0 mm or 4.5 mm crochet hook to ensure a sturdy, gap-free fabric that holds its stuffing securely.
- Notions: Tapestry needle with a large eye for sewing and gathering, sharp scissors, and a measuring tape.
- Filling: Polyester fiberfill stuffing for that wonderfully soft, squishable pumpkin feel.
Essential Techniques & Stitch Highlights
The secret to this project’s realistic, high-end look lies in a remarkably simple yet clever technique: working entirely in the back loop only (BLO). Instead of diving under both loops at the top of each stitch, you anchor your hook into just the back loop. This builds an elastic, beautifully ridged fabric.
As the rows pile up, these horizontal ridges naturally transition into vertical ribs once the project is assembled. It gives the finished piece incredible depth and texture, proving that you do not need advanced or intricate stitches to create something truly breathtaking.
Construction & Assembly Highlights
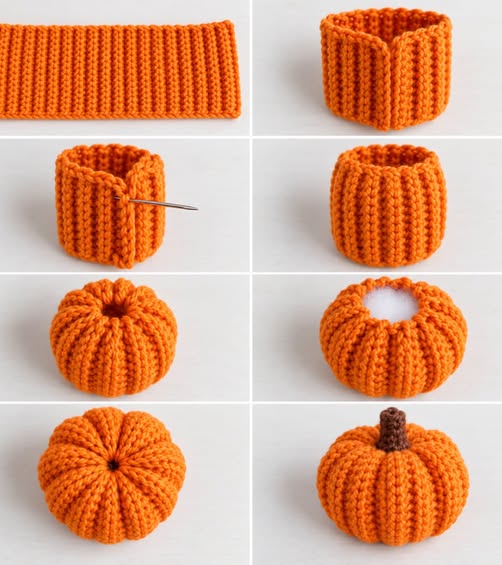
One of the best things about this pattern is its ingenious, stress-free construction sequence. You begin by crocheting a simple, flat rectangular fabric rather than working in continuous rounds. Once your rectangle reaches the desired length, you fold and seam the short edges together to form a cozy cylinder.
Next comes the fun part: gathering the bottom opening closed, filling the shape with plush polyester fiberfill, and cinching the top shut. A few clever passes with your yarn needle sculpts those signature pumpkin indentations, and a cute little crocheted stem completes the look!
Customization & Styling Ideas
Get creative with your color palette! While classic orange is always a winner, try styling your pumpkins in cream, mustard yellow, sage green, or rustic brown to match your modern farmhouse aesthetic.
You can easily play with yarn weights and hook sizes to create a whole patch of varied gourds. Arrange them in decorative baskets on your entryway table, scatter them across your Thanksgiving dining centerpiece, or gift a miniature version to a dear friend.
Pro Tips for Flawless Results
- Watch Your Tension: Keep your stitches consistent and firm enough that the polyester stuffing won’t peek through the gaps, but avoid pulling so tight that your fabric loses its stretch.
- Measure as You Go: Use your measuring tape frequently to check your rectangle’s dimensions against the pattern guide to ensure a well-proportioned finished size.
- Secure Your Gathers: When cinching the top and bottom closed, pull the yarn securely and anchor your stitches multiple times so your pumpkin keeps its plump shape over time.
Frequently Asked Questions
Is this project suitable for absolute beginners?
Absolutely! Because it relies on straightforward rows of basic single crochet stitches rather than complex amigurumi increases and decreases, adventurous beginners can easily master this project.
How do I make my pumpkin taller or wider?
To change the dimensions, simply adjust your foundation chain to make a taller or shorter starting row, and add or subtract rows of back-loop single crochet to change the overall circumference.
Can I use a different yarn weight?
Yes, bulky or velvet yarns make wonderfully plush, oversized pumpkins! Just make sure to pair your yarn with an appropriately sized hook to keep the fabric dense enough for stuffing.
Watch the Full Step-by-Step Video Tutorial
Prefer visual guidance? Follow along with the complete video tutorial below at your own pace: