
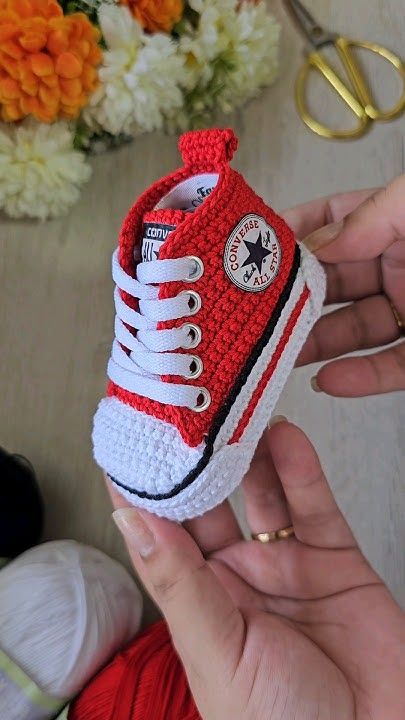
Overview & Design Inspiration
There is practically nothing sweeter in the entire handmade world than a pair of tiny, perfectly crafted baby shoes. When you combine the timeless aesthetic of classic high-top sneakers with the cozy comfort of handcrafted yarn, you get a project that instantly melts hearts and steals the show at any baby shower.
These adorable crochet high-tops capture every charming detail of a retro sneaker—complete with a structured sole, defined toe cap, ankle-high collar, and faux laces. Whether you are stitching them as a precious keepsake for a new arrival or gifting them to a lucky parent-to-be, this rewarding project delivers an incredible amount of joy from the very first stitch to the final woven end.
Materials & Recommended Supplies
Choosing the right ingredients is the secret to making your tiny sneakers look crisp, professional, and durable enough for curious little feet. Softness and structure must go hand in hand to keep the shoes comfortable while helping them maintain their iconic high-top shape.
- Yarn: Worsted weight (#4) 100% cotton yarn. Cotton provides gorgeous stitch definition and is delightfully gentle on sensitive baby skin. You will need a main color for the sneaker body, crisp white for the soles and toe caps, and an accent color if you love the look of classic side stripes.
- Crochet Hook: 3.5 mm (E-4) crochet hook to ensure a firm, supportive fabric with minimal gaping between stitches.
- Notions: Tapestry needle for weaving in ends, stitch markers to keep track of your rounds, small sharp scissors, and a flexible measuring tape.
- Extras: Optional small amount of soft polyester fiberfill to lightly shape the toe, plus a long crochet chain or flat cord to serve as laces.
Essential Techniques & Stitch Highlights
Bringing a tiny three-dimensional sneaker to life requires a clever combination of basic crochet stitches and subtle shaping techniques. You do not need to be an advanced crafter to master this project, but getting comfortable with a few structural tricks will elevate your finished shoes from “homemade” to absolute boutique quality.
The magic begins at the foundation sole, where alternating single crochets and increases build a smooth, symmetrical oval. One of the most satisfying moments in the pattern is working a single round entirely in the back loops only (BLO). This clever technique creates a sharp ninety-degree angle, instantly transforming a flat sole into the vertical sidewalls of a shoe.
As you build the upper portion, simple single crochet decreases gently taper the front of the sneaker to mimic a real toe cap. Working back and forth in rows creates the tongue opening, while the ankle collar is worked seamlessly in the round to frame the foot. By relying on familiar stitches like single crochet, half double crochet, and slip stitches, the pattern flows intuitively from start to finish.
Construction & Assembly Highlights
The construction of these high-top sneakers is a masterclass in clever shaping, building naturally from the ground up. You begin by crocheting a sturdy, symmetrical sole that provides a solid foundation for the entire little shoe.
Once the sole is established, you transition upward to form the sidewalls and the body of the sneaker. The design flows smoothly into shaping the toe section through gradual, perfectly placed decreases that give the shoe its characteristic rounded profile. Leaving the front opening unworked allows you to crochet the signature tongue and build up the high-top ankle collar.
Assembly is remarkably straightforward because most of the sneaker is crocheted as one continuous piece. The final touches—such as threading the laces through the eyelets, securing the fold-over tongue, and adding any decorative stripes—turn a simple bootie into a miniature work of art.
Customization & Styling Ideas
One of the absolute best parts of making handmade baby accessories is how easy it is to customize every single detail to match your creative vision. You can easily adapt these sneakers to fit any nursery theme, favorite sports team, or seasonal wardrobe.
Try swapping the classic black-and-white color scheme for pastel pinks and mint greens, or go bold with bright primary colors for a sporty look. You can embroider tiny initials onto the ankle patch, add a contrasting star appliqué for an authentic retro feel, or lengthen the foundation chain slightly if you are gifting to a chunkier baby foot. They also look darling styled as a decorative keepsake hung in a nursery long after the baby has outgrown them.
Pro Tips for Flawless Results
- Maintain Even Tension: Keep your stitches snug and consistent. A tighter tension ensures the shoe holds its shape upright without needing heavy internal stiffeners.
- Count Your Stitches Constantly: Because the soles and curves rely on symmetry, taking a few seconds to count your stitches at the end of each round prevents asymmetrical shoes.
- Check the Gauge Early: Crochet a quick swatch before diving in. If your style tends to be loose, dropping down a hook size will keep the sneaker crisp and supportive.
- Weave As You Go: Secure and snip your yarn tails securely on the inside of the shoe as you finish each color section to keep your workspace tidy and prevent tangles.
Frequently Asked Questions
What size do these crochet baby sneakers fit?
The standard pattern creates a newborn size measuring approximately 9 cm (3.5 inches) in sole length. By adding a few extra stitches and rows to the sole foundation, you can easily scale the pattern up to fit babies between 3 and 6 months (about 10 cm or 4 inches).
Are these sneakers suitable for a confident beginner?
Absolutely! If you are comfortable working in the round, basic increases and decreases, and changing yarn colors, you will find this project wonderfully approachable and deeply satisfying.
Can the baby actually wear these, or are they purely decorative?
These sneakers are designed to be both functional and adorable! Crafted with soft cotton yarn and a flexible sole, they are wonderfully cozy for non-walking babies to wear during outings, photo shoots, or special family gatherings.
Watch the Full Step-by-Step Video Tutorial
Prefer visual guidance? Follow along with the complete video tutorial below at your own pace: