
Overview & Design Inspiration
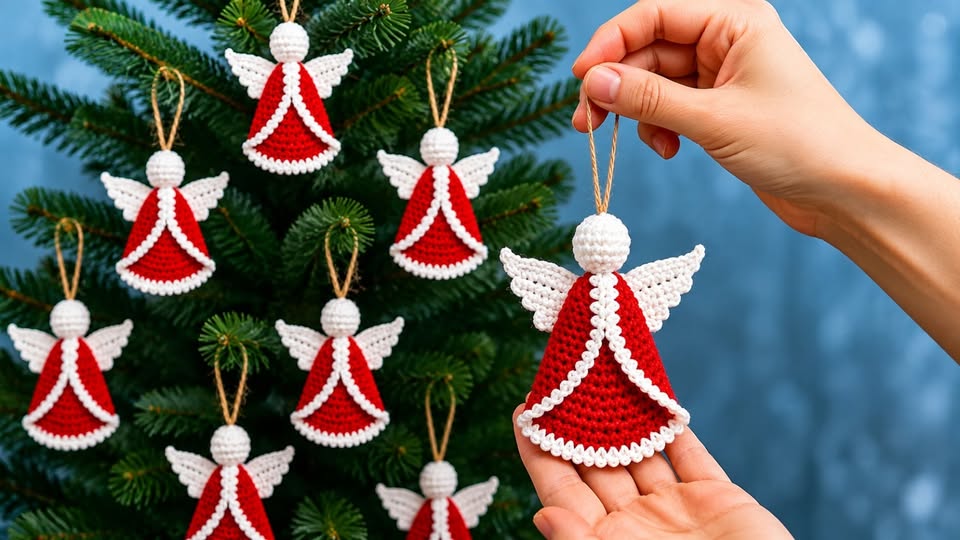
Welcome back, fellow yarn lovers! There is nothing quite like decking out your Christmas tree with handmade treasures that carry the warmth and love of a crocheter’s touch. Today, we are diving into a truly charming holiday project: the Crochet Christmas Fairy Angel Ornament. This delightful little project combines traditional festive colors, simple three-dimensional shaping, and delicate decorative details into a single breathtaking keepsake.
Inspired by classic holiday motifs, this little angel features a vibrant red bell-shaped dress, crisp white contrasting trim, textured wings, and a sweet rounded head. Whether you are trimming your own evergreen tree, crafting heartfelt holiday gifts, or stringing together a festive garland, this versatile design brings an instant touch of handmade magic to your seasonal decor.
Materials & Recommended Supplies
Gathering your supplies is half the fun of starting a new project. Here is everything you need to bring your crochet Christmas fairy angel to life:
- Yarn: Lightweight or DK-weight yarn in red and white. Cotton yarn provides crisp stitch definition, while acrylic offers a softer, cozier drape.
- Crochet Hook: 2.5 mm to 3.5 mm (US C/2 to E/4), depending on your yarn choice and personal tension.
- Notions: Yarn needle, scissors, and a stitch marker for working in the round.
- Stuffing: A small amount of polyester fiberfill for the head.
- Hanging Loop: A thin piece of natural cord, metallic ribbon, or a simple handmade crocheted chain.
Essential Techniques & Stitch Highlights
Most of this project relies on familiar, approachable U.S. crochet terminology, making it wonderfully accessible for adventurous beginners. You will practice working in the round starting from a magic ring, which creates a seamless, polished base for both the angel’s dress and her head.
The construction utilizes a mix of single crochet for a dense, gap-free fabric, alongside taller stitches like half double crochet and double crochet to shape the delicate tapered wings. Strategic increases and decreases form the flared bell silhouette, while clever surface stitching or contrasting yarn joins create the classic overlapping robe details.
Construction & Assembly Highlights
Instead of relying on overly complicated patterns, this charming ornament comes together by assembling several simple, manageable components. You begin by crocheting the red bell-shaped body, gradually expanding the stitch count until it reaches a lovely, flared lower hem. Once the body is formed, you add vibrant white decorative edging and contrasting trim lines to frame the front opening.
Next, you craft the rounded head in continuous white rounds, lightly stuffing it with fiberfill before closing it up securely. The wings are worked outward from a short chain using progressively taller stitches to mimic soft feathers. Finally, everything is firmly sewn together, and a hanging loop is attached so your little fairy is ready to take flight onto your holiday boughs.
Customization & Styling Ideas
One of the best things about this pattern is how easily you can customize it to match your personal holiday decor aesthetic. While traditional red and white scream classic Christmas, you can easily swap the palette for burgundy and cream for a vintage vibe, or crisp white and metallic gold for an elegant, angelic look.
Beyond hanging on the tree, these sweet little angels can be adapted for all sorts of festive displays. String a whole flock of them together to create a whimsical holiday garland, attach them to wrapped gifts as an extra handmade bonus, or nestle them into a tabletop evergreen wreath.
Pro Tips for Flawless Results
- Check Your Tension: Keep your stitches nice and compact—especially on the body and head—to prevent the polyester stuffing from peeking through the gaps.
- Embrace Stitch Markers: Always use a stitch marker when working the head in continuous rounds so you never lose your place.
- Secure Your Seams: Since ornaments are frequently handled and stored, double-knot and weave in all yarn tails securely during assembly.
Frequently Asked Questions
Is this project suitable for confident beginners?
Yes, absolutely! As long as you are comfortable with basic stitches like single crochet, increases, and decreases, you will find this project a delightful and manageable adventure.
Can I use worsted weight yarn instead of DK?
You certainly can, but keep in mind that a heavier yarn will result in a larger, bulkier angel ornament. Just be sure to size up your crochet hook accordingly!
How do I make the wings keep their shape?
Working with cotton yarn gives the wings natural stiffness, but you can also use a tiny dab of fabric stiffener or block them lightly with steam to ensure they stay perky all season long.
Watch the Full Step-by-Step Video Tutorial
Prefer visual guidance? Follow along with the complete video tutorial below at your own pace: