
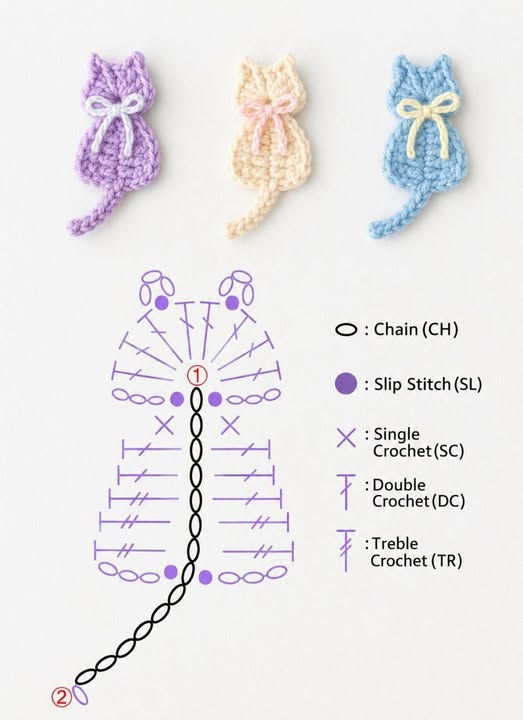
Overview & Design Inspiration
Welcome back, fiber friends! If you are looking for a quick, charming, and endlessly versatile project to spark your creativity, you are going to adore the Crochet Easy Cat Pattern. This delightful motif combines a rounded body, a shaped head with perky ears, a long curved tail, and a sweet little contrasting bow.
Whether you want to use up your favorite scrap yarn or create a collection of handmade treasures in an afternoon, this design hits the sweet spot. It is approachable enough for adventurous beginners yet deeply satisfying for seasoned crocheters who love instant-gratification motifs.
Materials & Recommended Supplies
- Yarn: Smooth medium-weight (worsted) or light worsted yarn for the cat body, plus a tiny scrap of a contrasting color for the decorative bow.
- Crochet Hook: Match your yarn weight; a standard US size hook (such as G/6 or H/8, roughly 4.0mm to 5.0mm) works wonderfully to create a firm, structured fabric.
- Yarn Needle: Essential for weaving in your ends and giving your tail and bow that final polished look.
- Scissors: A sharp, reliable pair for clean snips.
Essential Techniques & Stitch Highlights
This charming cat motif comes to life through a clever combination of familiar U.S. crochet stitches. By shifting between chain stitches, slip stitches, single crochet, double crochet, and tall treble crochet, the design achieves its iconic silhouette without requiring complicated shaping.
Shorter stitches like slip stitches and single crochet create controlled transitions and a narrow neck, while taller double and treble crochets expand the fabric to form the rounded body and head. Understanding how stitch height controls shape makes reading the pattern chart an absolute breeze!
Construction & Assembly Highlights
The magic begins with a central foundation chain that acts as the spine of the entire motif. Stitches are worked outward symmetrically from this central line, gradually building the broad lower body before narrowing naturally at the neck.
Next, the construction flows upward into the head, where taller stitches fan out to create a full face framed by charming, pointed ears. Finally, a separate tiny bow is crafted in a contrasting color and attached at the neck to give your kitty its ultimate personality.
Customization & Styling Ideas
One of the best things about this project is how easily you can customize it to fit your personal style. Play with cheerful color pairings like royal purple with a crisp white bow, or a soft cream body accented by a blush pink necktie.
Because these finished cats are lightweight and flat, they make incredible appliques, garment embellishments, festive ornaments, or bag charms. You can even string a whole clowder of them together into a whimsical nursery garland!
Pro Tips for Flawless Results
- Keep Your Tension Even: Maintain a consistent, moderate tension—especially through the chain and taller treble stitches—to ensure a balanced and clean silhouette.
- Form Crisp Ears: Keep your chain-based ear loops slightly controlled; overly loose chains can look floppy, while tight ones will pull the head inward.
- Block for Perfection: A light steam blocking will relax the fibers and make your cat’s curves lay wonderfully flat and professional.
- Secure Your Ends: Use your yarn needle to weave in all tails securely so your finished applique holds up beautifully to daily use.
Frequently Asked Questions
Is this pattern beginner-friendly?
Yes, absolutely! While it uses a mix of stitch heights ranging from basic chains to treble crochets, the construction is straightforward and relies on familiar foundational techniques.
What can I do with the finished cat motif?
The possibilities are endless! You can sew them onto tote bags, use them as cute handmade gift tags, turn them into holiday ornaments, or stitch them onto baby blankets.
Can I use thinner or thicker yarn?
Of course! Using a lightweight or fingering yarn will yield a delicate, miniature cat, while a bulky yarn will give you a plush, oversized statement piece.
Watch the Full Step-by-Step Video Tutorial
Prefer visual guidance? Follow along with the complete video tutorial below at your own pace: