
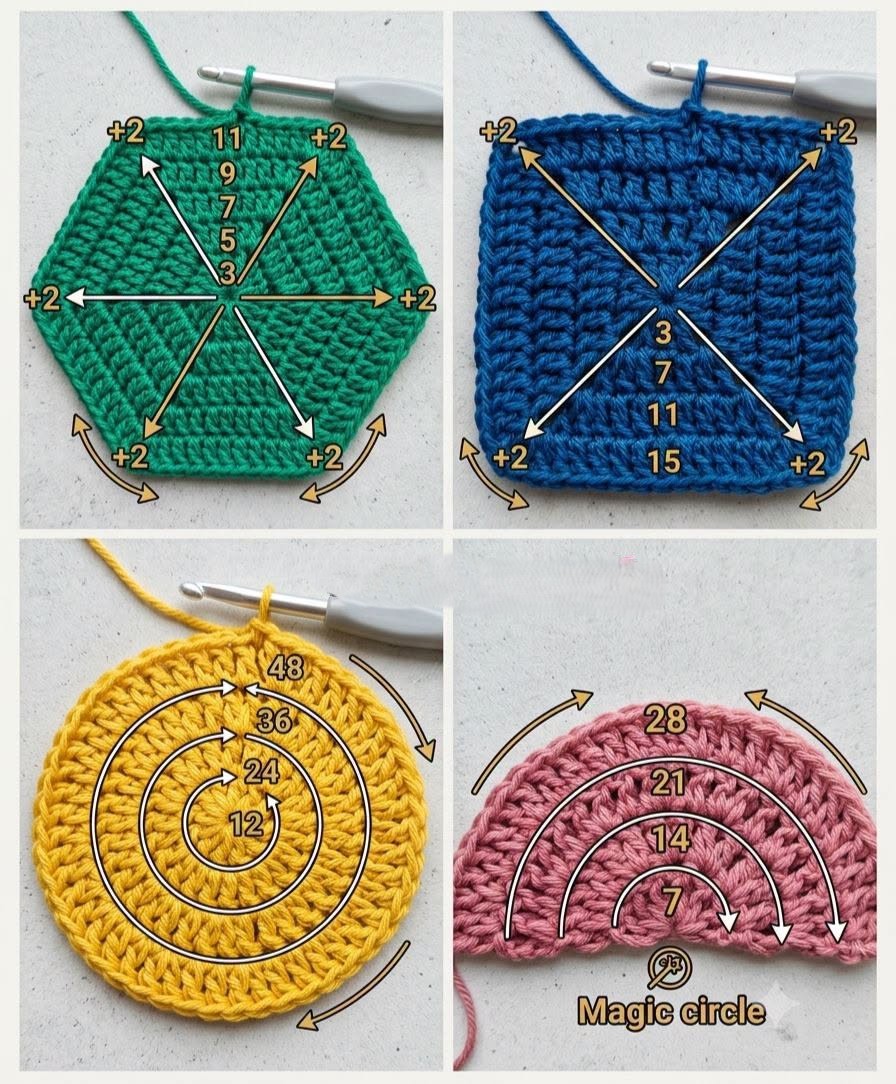
Overview & Design Inspiration
Welcome, fiber friends! There is something endlessly satisfying about watching a simple strand of yarn transform into crisp, structured forms right on your hook. The Crochet Geometric Shapes Pattern is one of those timeless projects that continually sparks creativity, inviting us to play with balance, symmetry, and color.
Whether you are dreaming of a vibrant patchwork blanket, modern home decor cushions, or playful educational toys, mastering foundational shapes opens up a whole new world of crochet design. Let’s grab our hooks and dive into the wonderful world of geometry!
Materials & Recommended Supplies
- Yarn: Smooth worsted-weight cotton yarn is an absolute dream for this project, offering crisp stitch definition and structured edges. Acrylic yarn also works wonderfully for extra softness and vibrant color choices.
- Crochet Hook: Match your yarn weight with a recommended hook size, typically a 4.0 mm (G/6) to 5.0 mm (H/8) medium-weight hook.
- Notions: Essential tools include a tapestry needle for weaving in ends and stitch markers to keep your rounds perfectly aligned.
Essential Techniques & Stitch Highlights
Every gorgeous geometric motif relies on a few fundamental skills, starting with the trusty Magic Ring. This clever technique gives your shapes a seamless, professional center without leaving an awkward opening behind.
Working with standard US crochet terminology—such as single crochet, half double crochet, and double crochet—keeps the patterns accessible and fun. Understanding how increases are evenly distributed across rounds is the true secret to keeping your circles round, your squares flat, and your hexagons sharply angled.
Construction & Assembly Highlights
Each shape follows a logical, intuitive sequence of stitches that naturally guides its growth. Circles expand through evenly spaced increases per round, while squares and hexagons build their distinct corners by grouping stitches into dedicated chain-space corners.
Semicircles offer a delightful twist, growing outward from a flat baseline into a gorgeous, curved canopy. Once your individual motifs are completed, they can be easily joined using whip stitching, mattress stitching, or creative join-as-you-go methods to build larger, stunning masterpieces.
Customization & Styling Ideas
The beauty of geometric crochet lies in its incredible versatility. Mix and match circles, squares, and hexagons into a show-stopping bohemian blanket, or use sturdy cotton squares to craft durable, eco-friendly tote bags and chic table runners.
Play with dynamic color-blocking to create a modern aesthetic, or use soft pastel gradients for a delicate nursery accent. Semicircles make fabulous decorative borders for shawls and throws, adding a polished, professional finish to your handmade treasures.
Pro Tips for Flawless Results
- Maintain Even Tension: Relax your hands to keep your stitches consistent, preventing your flat motifs from curling or ruffling.
- Count Your Stitches: Geometric patterns rely on precise increase counts; double-checking your work at the end of each round saves time later.
- Block Your Motifs: Lightly dampening and pinning your finished shapes into place before assembly yields crisp, professional edges every single time.
Frequently Asked Questions
Are these geometric shapes suitable for absolute beginners?
Yes, absolutely! By mastering basic stitches like chains and double crochets while keeping an eye on your stitch counts, beginners can easily build confidence and success with every round.
Why is my crochet circle starting to curl or ripple?
Curling usually means your stitches are too tight or you need more increases, while rippling happens when you have worked too many increases into a single round. Matching your tension and following the sequence carefully will keep your work flat.
Can I use these motifs to make blankets?
Without a doubt! Squares, hexagons, circles, and semicircles are the ultimate building blocks for cozy afghans, modern throws, and vibrant patchwork blankets.
Watch the Full Step-by-Step Video Tutorial
Prefer visual guidance? Follow along with the complete video tutorial below at your own pace: