
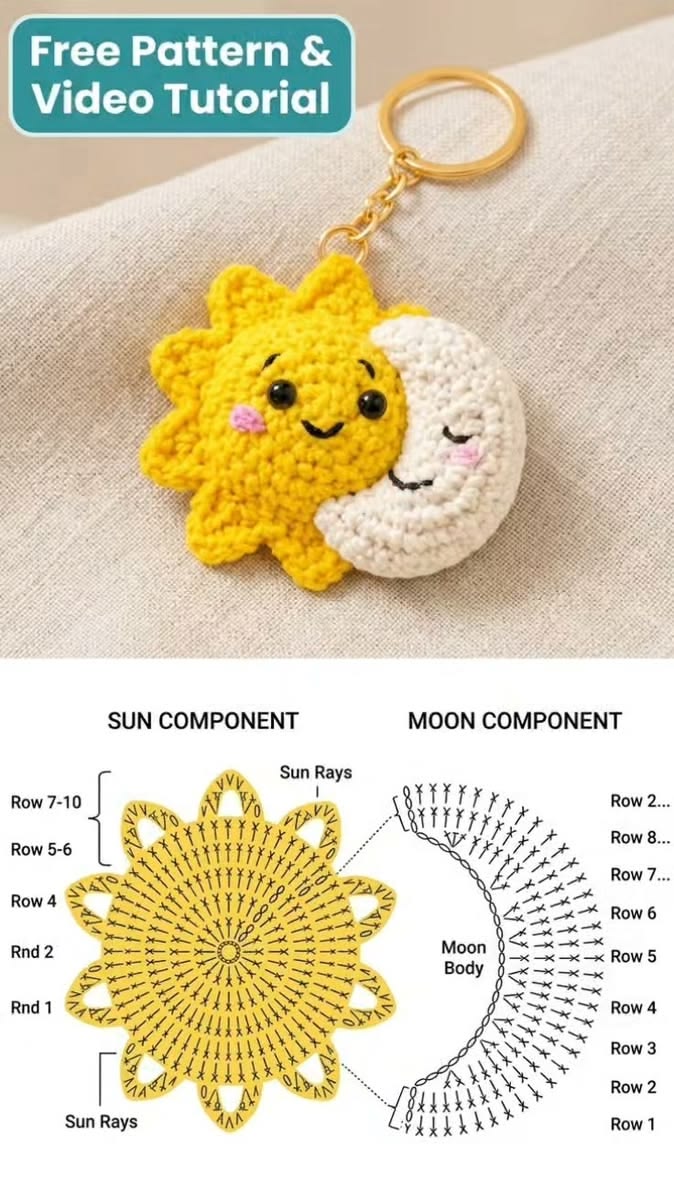
Overview & Design Inspiration
Welcome, fiber artists and crochet dreamers! There is something utterly magical about bringing celestial motifs to life with yarn and a hook, and this charming project captures that wonder in a petite, pocket-sized design. Combining a cheerful sun with a softly curved moon creates a balanced, harmonious silhouette that instantly brightens up any space.
Whether you want to stitch a sweet nursery mobile, craft a thoughtful handmade gift, or fashion an everyday bag charm, this little duo delivers maximum delight. It is an approachable, amigurumi-inspired project that lets you play with shaping, texture, and friendly embroidery while using up your favorite yarn scraps.
Materials & Recommended Supplies
- Yarn: Smooth cotton or acrylic yarn in yellow (for the sun), white or cream (for the moon), plus small amounts of black and pink for the face. Cotton yarn is ideal for keeping facial details crisp and stitch definition sharp.
- Crochet Hook: A small hook (such as a 2.5mm to 3.5mm or US size C to E) that creates a dense, firm fabric to prevent fiberfill from showing through.
- Notions: Yarn needle, embroidery needle, scissors, and stitch markers.
- Finishing: A small handful of polyester fiberfill for optional padding, plus a key ring and short chain if you are crafting a keychain.
Essential Techniques & Stitch Highlights
This project is a wonderful mini-masterclass in shaping, combining foundational U.S. crochet terms to create complex, organic forms without complicated mathematics. You will practice working in the round with controlled increases to build a smooth, flat circular sun center before transitioning into textured, built-in rays using a clever blend of stitch heights.
Moving from single crochets to half double and double crochets allows you to effortlessly sculpt the pointed sun tips and the graceful curve of the crescent moon. By working varied stitch heights within the same row or round, you gain a deeper intuition for how yarn stretches and bends, making this an incredible skill-building project for adventurous beginners.
Construction & Assembly Highlights
The magic of this design lies in how intuitive the construction feels once you get into the rhythm. The sun begins with an adjustable starting ring, expanding outward in even rounds before transitioning directly into decorative, rounded rays crocheted right along the perimeter. For a dimensional finish, you simply create two matching layers and join them with a light dusting of stuffing.
The crescent moon is formed by building a foundation chain and working a clever swell of stitches that taper at the tips while flaring outward on the convex side. Once both celestial bodies are complete, they are nestled together in a sweet, hugging embrace and securely whip-stitched from the back. Adding a sweet embroidered face gives your sun and moon an instant, heartwarming personality!
Customization & Styling Ideas
One of the best parts of this pattern is how easily you can adapt it to fit your personal aesthetic or specific crafting needs. Swap out traditional bright yellow and white for a dreamy pastel palette of mint and lavender, or go moody and modern with deep charcoal and shimmering metallic gold yarn.
Functionally, this piece transitions seamlessly from a cheerful bag charm to a rearview mirror hanger, a zipper pull, or a standalone ornament. You can even hook up a whole constellation of them to string together into a whimsical baby mobile for a handmade nursery gift that parents will treasure forever.
Pro Tips for Flawless Results
- Maintain Consistent Tension: Choose a hook slightly smaller than typically recommended for your yarn weight to ensure a firm, clean fabric that keeps your stuffing securely tucked inside.
- Embrace the Stitch Marker: Always use a stitch marker at the start of your rounds when working on the sun center to keep your increases symmetrical and your edges tidy.
- Less is More with Stuffing: Add just enough fiberfill to give your pieces a gentle, puffy pillow effect without stretching the stitches or distorting the curves of the moon.
- Hide Your Joins: When stitching the moon to the sun, anchor your yarn through the back loops only to keep your attachment points completely invisible from the front.
Frequently Asked Questions
Can I make this project flat instead of stuffed?
Absolutely! If you prefer an appliqué-style piece for sewing onto blankets, garments, or pouches, simply crochet single-layer versions of the sun and moon and skip the stuffing and backing pieces entirely.
What is the best way to embroider the facial features?
Using lightweight embroidery floss or split strands of black yarn works best for delicate French knots and sweet smiling mouths. Take your time sketching the placement with pins before stitching so you can achieve that perfectly cheerful expression.
Is this pattern friendly for absolute beginners?
Yes, provided you are already comfortable with basic stitches like single crochet and slip stitch. The project moves quickly, allowing beginners to practice shaping, changing stitch heights, and assembly on a small, manageable scale.
Watch the Full Step-by-Step Video Tutorial
Prefer visual guidance? Follow along with the complete video tutorial below at your own pace: