
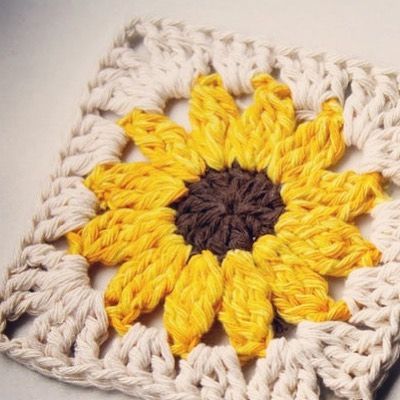
Hello, Crafters! Get Ready to Crochet Some Sunshine!
There’s nothing quite like the vibrant cheer of a sunflower, and now you can capture that joy in crochet form! These delightful sunflower squares are perfect for adding a pop of warmth and happiness to any project.
Whether you’re a seasoned hooker or just starting your crochet journey, this guide will walk you through creating your own stunning sunflower squares. We’ll make it easy, fun, and oh-so-rewarding!
Gather Your Sunny Supplies: Materials & Yarn Suggestions
Before we dive into the stitches, let’s make sure you have everything you need. Choosing the right materials makes all the difference for a beautiful, long-lasting project.
- Worsted-Weight Yarn: Grab yellow, brown, green, and a background color like white or blue.
- Crochet Hook: A 4.5mm hook is a great starting point, or use one that suits your tension.
- Scissors: For snipping those yarn ends.
- Yarn Needle: Essential for weaving in ends neatly.
Picking Your Perfect Yarn & Colors
Acrylic or cotton yarns are fantastic choices for these squares; they hold their shape wonderfully and are easy to care for. For that classic sunflower look, go for bright yellows and rich browns.
But don’t be afraid to experiment! Imagine a deep red sunflower or a pastel palette – your creativity is the only limit here!
You’ll use basic crochet stitches like the chain, single crochet, double crochet, and slip stitch. These foundational stitches are all you need to bring your sunflower to life.
Technique Breakdown: Your Step-by-Step Sunflower Square Guide
Let’s start building your sunflower, piece by beautiful piece!
Crafting the Heart of the Sunflower: The Brown Center
Begin by forming a magic ring with your rich brown yarn. This creates a tight, neat center without a hole.
Work single crochet stitches into this ring until you have a dense little circle, typically around ten stitches. Gently pull the magic ring closed, then secure with a slip stitch.
For the next layer, expand your circle by working two single crochets into each stitch from the previous round. This creates a wider, more dimensional base of about twenty stitches, preparing it for the glorious petals.
Complete this round with a slip stitch, and you’ll have a sturdy, perfect brown core ready for its sunny frame.
Blooming Petals: Adding That Golden Glow
Now, it’s time for the signature sunflower look! Attach your vibrant yellow yarn to the brown center with a slip stitch.
Create a foundation for your petals by chaining a few stitches (usually five), then skipping one stitch on the brown center and slip stitching into the next. Repeat this around the circle to form about eight evenly spaced loops.
These loops are where your petals will blossom! Once all loops are in place, double-check they’re spaced nicely for a balanced bloom.
Filling in the Petals for a Lush Look
Move onto filling each of those yellow chain loops. Work a generous number of double crochet stitches into each loop – about seven per loop is ideal for creating a full, fan-like petal shape.
After completing each petal, secure its shape with a slip stitch into the space between petals. Continue this process all around the circle until every loop is brimming with sunny petals.
Take a moment to admire your work! Each petal should be consistent in size and shape, creating that gorgeous, layered sunflower effect.
Framing Your Flower: Forming the Square
It’s time to transform your beautiful sunflower into a versatile square! Join your chosen background color yarn (green, white, blue) into any gap between two petals with a slip stitch.
Begin forming the square by creating clusters of double crochet stitches in these gaps. In the corners, you’ll place multiple double crochets, chain stitches, and more double crochets into the same space to build a defined angle.
For the sides, you’ll work smaller clusters of double crochets in the petal gaps. Continue around, building those clear corners for a neat square frame around your sunflower.
For the next round, continue with your background color, working double crochets along each side and reinforcing your corners with the same cluster of stitches. Fill any chain-1 gaps from the previous row with double crochets.
This solidifies the square’s edges and creates a strong, even foundation. By the end of this round, your sunflower will be perfectly enclosed in a sturdy, functional square.
Finishing Touches, Assembly & Styling Ideas
Once your final row is complete, snip your yarn and use a yarn needle to weave in all those loose ends. This is a small step, but it makes a huge difference in the professional look and longevity of your square!
Consider blocking your square. A gentle dampen and shaping while drying helps your square maintain a perfect, flat shape, which is especially helpful when joining multiple squares.
Creative Uses for Your Blooming Squares
- Cozy Blankets & Throws: Join several squares for a cheerful, sun-kissed throw. Alternate with solid squares or other floral patterns for a truly unique heirloom!
- Charming Cushions & Pillows: Stitch a few squares together to create an adorable cover for a throw pillow. Add a simple fabric backing or more sunflower squares for a double-sided delight!
- Boho Wall Hangings: Join a few squares side-by-side, add a dowel rod, and maybe some tassels for an eye-catching piece of art for any room.
Pro Crafter Tips for Your Best Sunflower Square
Tension is Key: Try to keep your stitches consistent. This ensures your square lays flat and looks uniform, especially if you’re making several to join together.
Color Play: Don’t limit yourself to traditional colors! Imagine a denim blue background, or a deep purple for a sunset-inspired sunflower.
Blocking Magic: Seriously, don’t skip blocking! It evens out any irregularities and makes your squares perfectly symmetrical for joining.
Frequently Asked Questions
Q: Can I use a different yarn weight?
A: Absolutely! Just remember to adjust your hook size accordingly. A thicker yarn will result in a larger square, and a thinner yarn will make a smaller one.
Q: How do I join multiple squares for a blanket?
A: Common joining methods include slip stitch, single crochet seam, or the “join-as-you-go” technique. Experiment to see which finish you prefer!
Watch the Full Step-by-Step Video Tutorial
Prefer visual guidance? Follow along with the complete video tutorial below at your own pace: