
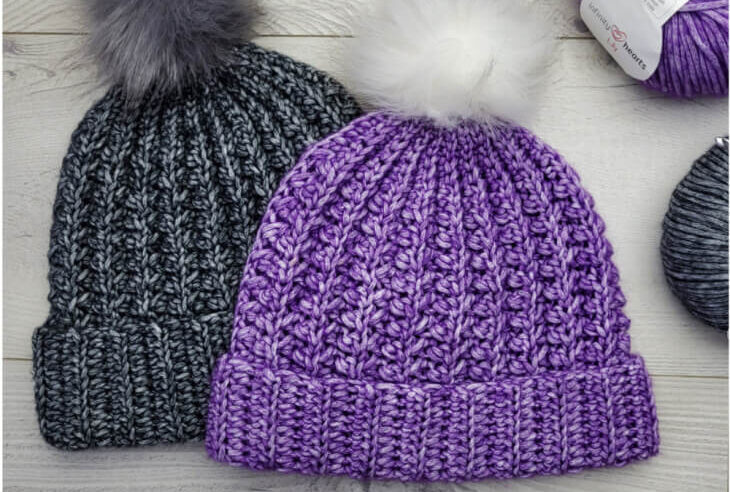
Welcome, fellow crafters! Ready to add a touch of handmade warmth and style to your winter wardrobe? Today, we’re diving into the delightful world of the Crossed Over Rib Hat – a project that promises both comfort and a stunning textured finish.
This hat isn’t just a cozy accessory; it’s a fantastic opportunity to master a beautiful stitch pattern that looks far more intricate than it is. Whether you’re a seasoned pro or just starting your crochet journey, you’ll love creating this versatile piece.
Introduction & Project Overview
The Crossed Over Rib Hat stands out with its unique, deeply ribbed texture, perfect for keeping you snug on chilly days. It combines style and practicality, making it an essential addition to any winter ensemble.
We’ll guide you through every step, from the stretchy brim to the perfectly shaped crown. You’ll learn the elegant crossed-over rib stitch, which provides both excellent stretch and fantastic warmth.
Materials & Yarn Suggestions
Before we begin our cozy creation, let’s gather our crafting essentials. Having everything ready ensures a smooth and enjoyable crocheting experience.
- Yarn: Worsted-weight yarn (Category 4). This weight offers the ideal balance of warmth and structure for our ribbed design. Choose a color that sparks joy!
- Crochet Hook: Size H/8 (5 mm). This size typically creates balanced stitches for a hat that’s structured yet flexible.
- Notions: Yarn needle (for weaving in ends and seaming), scissors.
Selecting a high-quality worsted-weight yarn is key, as it truly enhances the hat’s ribbing and ensures it holds its shape beautifully. Don’t be afraid to explore different fiber blends for varying textures and warmth levels!
Technique Breakdown & Step-by-Step Guide
Let’s unlock the magic of the Crossed Over Rib Hat! We’ll construct this hat in three main sections: the ribbed band, the body, and finally, the crown shaping.
Crafting the Ribbed Band
Begin your hat with a foundation chain, selecting a length that comfortably fits around your head (typically 50-60 stitches for an adult). You’ll then work a row of single crochets, followed by several rows of slip stitches into the back loops only. This creates a beautifully stretchy band, perfect for the hat’s brim.
Once your band reaches the desired width and elasticity, join the ends with a slip stitch to form a seamless loop. Take a moment to ensure your band isn’t twisted before securing the join.
Building the Hat Body with Crossed Stitches
With your band formed, it’s time to build the body of your hat. Begin by working a round of double crochet stitches evenly around the top edge of your band. This provides a solid foundation for the main texture.
The magic truly begins in the next round as you introduce the iconic crossed stitch pattern. You’ll achieve this by alternating front post double crochets (FPDC) with regular double crochets (DC) across each round. This technique pulls the stitches forward, creating that deep, eye-catching ribbing.
Continue this captivating pattern, stacking your rounds until your hat reaches a comfortable height, usually around 7-8 inches from the brim. The combination of FPDC and DC creates a wonderfully thick and warm fabric.
Shaping the Crown of the Hat
As you near the top, you’ll gently shape the crown with strategic decreases. Continue working your established FPDC and DC pattern, but begin to skip stitches at regular intervals across your rounds. This starts the gradual tapering effect.
Gradually increase the frequency of these decreases in subsequent rounds, ensuring a smooth taper. This will gather the top of the hat beautifully, leaving just a small opening that will be cinched closed in the final step.
Finishing, Assembly & Styling Ideas
You’re almost done! To complete your hat, cut your yarn, leaving a generous tail. Thread this tail onto your yarn needle and weave it through the remaining stitches at the top of the crown.
Pull the tail tightly to cinch the opening closed, then secure it with a sturdy knot. Take extra care to weave in all loose ends neatly on the inside of your hat for a polished, professional finish that will stand the test of time.
For a fun, personalized touch, consider adding a fluffy pom-pom to the top! You can use a handmade yarn pom-pom or a store-bought faux fur one. This little embellishment can truly elevate your hat’s overall charm.
Pro Crafter Tips
Achieving a beautiful, professional-looking hat often comes down to a few key techniques:
- Consistent Tension: Aim for even tension throughout your project. This ensures your ribbing looks uniform and prevents your hat from being too tight or too loose. Practice makes perfect!
- Count Your Stitches: Regularly counting your stitches, especially when starting new rounds or decreasing, can prevent errors and ensure a consistent shape.
- Embrace Patience: If the crossed stitch is new to you, take your time. It’s a rewarding technique, and with a little practice, you’ll master its rhythm and achieve that beautiful, distinctive texture.
Frequently Asked Questions
Q: My hat seems too big/small. What should I do?
A: The initial chain for the ribbed band determines the hat’s circumference. If it’s too big, try a smaller hook or fewer starting chains. If too small, use a larger hook or more chains. Always check your gauge!
Q: Can I use a different yarn weight?
A: Yes, but be mindful of your gauge. You’ll likely need to adjust your hook size to achieve a similar fabric and fit. A bulkier yarn will result in a larger, warmer hat, while a lighter weight might create a more slouchy, airy feel.
Creating the Crossed Over Rib Hat is such a gratifying project, resulting in a stylish and practical accessory that you’ll adore wearing or gifting. So grab your hook, choose your favorite yarn, and let’s get crafting!
Happy crocheting!
Watch the Full Step-by-Step Video Tutorial
Prefer visual guidance? Follow along with the complete video tutorial below at your own pace: