
Introduction & Project Overview
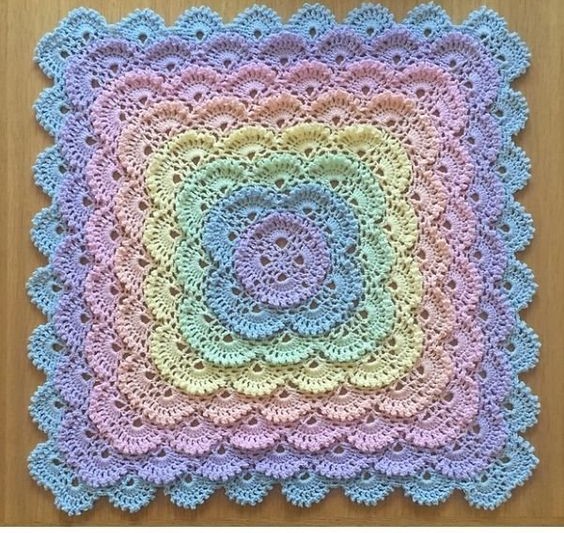
Crocheting a beautiful blanket is one of life’s simple, rewarding pleasures. There’s nothing quite like wrapping yourself in something you’ve created with your own hands. Today, we’re diving into a truly special project: the Fluffy Meringue Stitch Blanket.
This design offers an irresistible combination of luxurious texture, cloud-like softness, and incredible warmth. It’s perfectly suited for those chilly evenings, adding a touch of handmade comfort to any space. Get ready to create a masterpiece that feels as good as it looks!
Materials & Yarn Suggestions
Gathering the right supplies is the first step to a successful and enjoyable crochet journey. The key to that signature fluffy meringue texture lies in your yarn and hook choices. Here’s what you’ll need:
- Yarn: Approximately 1500-2000 yards of high-quality bulky or super bulky yarn (weight 5 or 6). Merino wool, alpaca blends, or soft acrylic are fantastic choices for their drape and fluffiness.
- Crochet Hook: A larger hook, typically 6mm (J) to 8mm (L), will create lovely loose stitches and enhance the meringue puff.
- Notions: Sharp scissors, a tapestry needle for weaving in ends, and a few stitch markers are essential.
- Workspace: A comfortable, well-lit spot will make your crocheting sessions a joy.
Technique Breakdown & Step-by-Step Guide
The Fluffy Meringue Stitch creates a gorgeously puffed-up fabric, reminiscent of delicate baked meringues. While it looks intricate, it’s surprisingly simple once you get the hang of the repeating pattern. We’ll build our blanket using a foundation chain, a base row, and then alternating rows of puff and shell stitches.
First, begin by creating a foundation chain that is a multiple of 6, plus 2 extra chains. This ensures your stitch pattern will repeat perfectly across the width of your blanket. Next, work a row of single crochet stitches across your entire foundation chain, starting in the second chain from the hook. This creates a sturdy base for your fluffy stitches to stand on.
Now, for the magic of the meringue stitch! The main component is the puff stitch. To create it, you’ll yarn over, insert your hook into the designated stitch, yarn over, and pull up a loop (repeat this a total of 5 times in the same stitch). You’ll then have five yarn overs and five loops pulled up, resulting in 11 loops on your hook. Yarn over one last time and pull through all 11 loops to close the puff stitch. After each puff stitch, you’ll chain two stitches to create a space for the next row.
The next row brings in the shell stitch. You’ll work five double crochet stitches all into the chain-2 space created between the puff stitches in the previous row. This creates a beautiful, scalloped shell that adds more texture and volume. You’ll then continue by alternating between rows of puff stitches (separated by chain-2 spaces) and rows of shell stitches, building the stunning meringue texture as you go.
Finishing, Assembly & Styling Ideas
Once your blanket reaches the desired length, it’s time for those all-important finishing touches. A simple border instantly elevates your project from homemade to handmade heirloom. Try working a single row of single crochet stitches evenly around the entire edge of your blanket. Remember to place three single crochet stitches in each corner to keep the edges flat and prevent curling.
Finally, use your tapestry needle to carefully weave in all loose ends. Thread each tail through the needle and weave it back and forth through your stitches, ensuring it’s secure and won’t unravel. Voila! Your Fluffy Meringue Stitch Blanket is complete! It makes a stunning addition to your living room sofa, a cozy nursery accent, or an unforgettable handmade gift for someone special.
Pro Crafter Tips
Maintain Consistent Tension
Even tension is crucial for a beautiful, uniform fabric. Practice your puff and shell stitches until they feel natural, helping your blanket look professionally made.
Use Stitch Markers Wisely
Place a stitch marker at the beginning and end of rows, especially when learning. This helps you keep track of your stitch count and ensures perfectly straight edges.
Experiment with Color Palettes
While a solid color highlights the incredible texture, consider using a gradient yarn or alternating colors every few rows for a unique look. Imagine an ombre meringue blanket!
Frequently Asked Questions
How long does this blanket take to crochet?
The time it takes will vary depending on the blanket size and your personal crocheting speed. However, with its repetitive stitch pattern, many find it a relaxing, meditative project that progresses steadily.
Can I adjust the size of the blanket?
Absolutely! This pattern is incredibly versatile. Simply adjust your starting foundation chain (remember it needs to be a multiple of 6 + 2) and continue repeating the stitch pattern until your blanket reaches your desired dimensions for a baby blanket, throw, or even a full-size bedspread.
The Fluffy Meringue Blanket Crochet Pattern: Your New Favorite Cozy DIY! – Printable PDF Pattern
Download the clean, printer-friendly PDF to follow along with this pattern offline anywhere.