
Overview & Design Inspiration
Welcome, my fellow yarn lovers, to one of the most empowering techniques every crochet enthusiast can master! Whether you are picking up a hook for the very first time or looking to refine your technique, learning how to create a smooth, even flat circle will completely transform your handmade projects. From cozy floor rugs and modern coasters to stylish hats, bags, and blankets, this fundamental shape serves as the versatile foundation for countless creative designs.
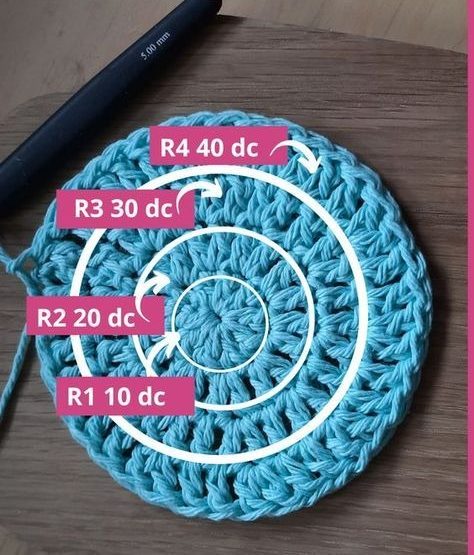
We have all experienced the frustration of a circle that suddenly curls up like a soup bowl or ripples into a wavy ruffle at the edges. But do not worry—these common quirks are easily conquered once you understand the magic increase formula! Grab your favorite yarn, settle into your coziest crafting chair, and let’s dive into the wonderful world of crochet circles together.
Materials & Recommended Supplies
Choosing the right tools sets you up for absolute success right from your very first stitch. Here are the essential supplies you will need to bring your flat circle to life:
- Yarn: Medium-weight (Worsted / Aran weight, Category 4) smooth yarn is ideal for practice, as it allows your stitches to stand out clearly. Cotton yarn is also a fantastic choice for home décor pieces due to its durability and crisp stitch definition.
- Crochet Hook: Always match your hook size to the recommendation on your yarn label. An ergonomic crochet hook (typically sized 5.0mm / US H-8 for worsted weight) will keep your hands comfortable and tension consistent.
- Stitch Markers: Colorful locking stitch markers are invaluable for keeping track of your rounds and marking the beginning of your working rows.
- Notions: A sharp pair of embroidery scissors and a blunt yarn needle for weaving in ends cleanly and securely.
Essential Techniques & Stitch Highlights
At the heart of every great crochet circle is the magic ring—an adjustable starting loop that eliminates annoying center gaps and gives your project a professional finish. Starting with single crochet stitches is usually the easiest route for beginners because they create a dense, manageable fabric with easy-to-count stitch heights.
As your confidence grows, you can easily transition to half-double or double crochet stitches for faster-growing, softer textures. The true secret of the technique lies in evenly distributing your increases across every round. By mathematically spacing these extra stitches, your work expands outward smoothly without ever buckling under pressure or stretching out of shape.
Construction & Assembly Highlights
The journey of a crochet circle always starts from the center out, expanding in concentric rounds like ripples in a calm pond. You begin by anchoring your stitches securely into the magic ring, creating a firm foundational base. From there, you gently double your stitch count in the second round and systematically space out your increases in each subsequent round.
Because you are working in continuous spirals or joined rounds, paying attention to your overall shape is key. There is no complicated sewing or assembly required at the end—just a few well-placed stitches, neat color transitions if you are feeling adventurous, and a final sweep of your yarn needle to weave away any remaining tails.
Customization & Styling Ideas
The beauty of mastering the flat circle is that it opens the door to endless creative possibilities! You can easily scale your circle up into a magnificent mandorla rug, a set of vibrant kitchen placemats, a trendy market bag, or even a cozy cushion cover.
Play with gradient yarns for a gorgeous ombre effect, or switch colors every few rounds to create bold geometric mandalas. If you want to add an extra touch of luxury, try incorporating textured elements like front-post stitches or delicate bobbles near the outer border to make your handmade creation truly unique.
Pro Tips for Flawless Results
- Mind Your Tension: Keep your hand tension relaxed and even. Excessively tight stitches cause the circle to cup upward, while loose loops lead to unwanted ruffles.
- Count Religiously: Always count your stitches at the end of every single round. Catching a missed increase early saves you from having to frog half your project later!
- Embrace Stitch Markers: Never guess where your round begins. Snapping a marker into your first stitch keeps your growth perfectly symmetrical.
- Don’t Skip Blocking: Give your finished circle a gentle steam or wet block to smooth out any minor imperfections and give your stitches a crisp, professional drape.
Frequently Asked Questions
Why does my crochet circle keep curling up like a bowl?
If your circle is curling upward, it usually means you do not have enough increases in your rounds. The outer edge needs more stitches to accommodate the expanding diameter, so try adding a few extra increase stitches evenly spaced around the circle.
Should I work in continuous spirals or joined rounds?
Both methods work wonderfully! Continuous spirals are great for solid-color projects because they leave no visible seam line, while joined rounds are much better for colorwork projects to ensure your color changes line up cleanly.
Can I use any stitch I want for a flat circle?
Absolutely! While single crochet, half-double crochet, and double crochet are the most popular choices, you can adapt the increase formula to almost any stitch height as long as you adjust the number of starting stitches in your magic ring accordingly.
Watch the Full Step-by-Step Video Tutorial
Prefer visual guidance? Follow along with the complete video tutorial below at your own pace: