
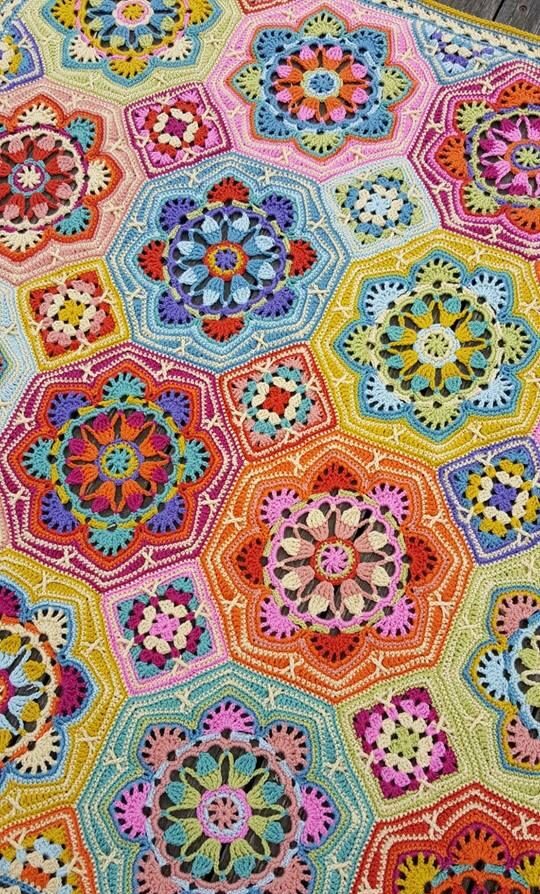
Welcome, fellow crafters! Have you ever dreamt of creating a crochet project that truly takes your breath away? Something that feels like a work of art, a heirloom in the making? Then you are absolutely going to adore the Persian Tiles Blanket pattern.
Known for its mesmerizing colors and intricate geometric designs, this blanket is a stunning homage to the magnificent architecture of ancient Persian palaces and mosques. It’s more than just a blanket; it’s a journey of creativity and a show-stopping piece for any home.
Whether you’re ready for an exciting new challenge or an experienced crocheter looking for your next masterpiece, this tutorial will guide you through the magic of creating your very own Persian Tiles Blanket. Get ready to fall in love with every stitch!
Materials & Yarn Suggestions
Before we embark on this delightful journey, let’s gather our treasure trove of supplies. Choosing the right materials sets the stage for a truly exquisite blanket.
- Yarn: Approximately 2000-2500 yards of lightweight (DK) or medium (Worsted/Aran) yarn. The key is to select at least five vibrant colors to capture that iconic Persian vibrancy! Think rich jewel tones like sapphire blues, emerald greens, ruby reds, and shimmering golds for an authentic feel, but truly, any palette you love will sing.
- Crochet Hook: A 4mm (G/6) or 4.5mm (7) crochet hook. Your yarn weight will help determine the perfect size, ensuring your stitches are beautifully defined.
- Stitch Markers: Essential for keeping track of your rounds and specific stitch placements.
- Yarn Needle: For seamlessly weaving in all those lovely ends.
- Sharp Scissors: For clean cuts and fastening off.
Pro Crafter Tips
Choosing your colors is half the fun! Lay out your selected yarns to see how they play together. Don’t be afraid to experiment with a main background color and several accent shades to make those intricate motifs truly pop.
Technique Breakdown & Step-by-Step Guide
The magic of the Persian Tiles Blanket lies in its construction: individual hexagonal motifs, joined together to form a breathtaking mosaic. These motifs are built using a delightful array of stitches, from foundational chains and single crochets to the luxurious puff stitch.
Crafting Your Magnificent Motifs
Each motif begins from the center, blossoming outwards in layers of color and texture. You’ll start with a tightly worked core, forming a sturdy foundation for the intricate design.
Next, you’ll begin to build the hexagonal shape, incorporating increases and strategic color changes. This is where the tile truly starts to take form, with layers of double crochets and half-double crochets adding depth.
As you progress, you’ll continue alternating colors every few rounds, ensuring that multi-dimensional look Persian tiles are famous for. The final rounds often feature decorative stitches like puff stitches or treble crochets, adding a beautiful, carved-like embellishment.
Understanding the Layout
The blanket comes to life as these gorgeous hexagonal motifs are surrounded by smaller filler squares. These fillers are crucial for evening out the edges, transforming your collection of hexagons into a perfectly rectangular or square blanket.
Finishing, Assembly & Styling Ideas
Once your individual motifs are complete, it’s time to bring your masterpiece together! There are a couple of popular methods for joining.
The “join-as-you-go” (JAYG) method is a favorite for its seamless finish, allowing you to connect motifs as you crochet the final round of each. Alternatively, you can crochet a border around each motif and then meticulously sew them together using your yarn needle. Whichever you choose, select a joining yarn color that beautifully complements your overall design.
After joining your main motifs, create and add those essential filler squares to complete the blanket’s shape. Then, add a stunning border around the entire piece. A simple single crochet border or an elegant shell stitch border will not only give your blanket a polished look but also help to secure all those lovely stitches and prevent curling.
Finally, for that professional finish, don’t forget to block your blanket! Gently dampen it, pin it to shape on a flat surface, and allow it to dry completely. This step ensures all your motifs lie flat, and your stitches are beautifully even.
Care Instructions
To keep your Persian Tiles Blanket looking exquisite for years to come, always follow your yarn manufacturer’s washing instructions. Typically, a gentle hand wash in cold water and laying flat to dry is recommended. Avoid machine washing or drying to preserve its shape and intricate beauty.
Frequently Asked Questions
Is the Persian Tiles Blanket suitable for beginners?
While it uses basic stitches, the color changes and joining of motifs make it a more intermediate project. However, an adventurous beginner with patience can absolutely tackle it!
How long does it typically take to complete this blanket?
This is a labor of love! Depending on your speed and the size you choose, it can take anywhere from a few weeks to several months. Enjoy the process!
There you have it, a journey into creating the magnificent Persian Tiles Blanket. This project is a rewarding blend of intricate techniques and vibrant colorwork, transforming simple yarn into a truly artistic statement piece.
So grab your hook, choose your dreamiest colors, and start crafting a Persian-inspired masterpiece today!
Watch the Full Step-by-Step Video Tutorial
Prefer visual guidance? Follow along with the complete video tutorial below at your own pace: