
Welcome, Crafty Friends! Let’s Crochet Something Beautiful!
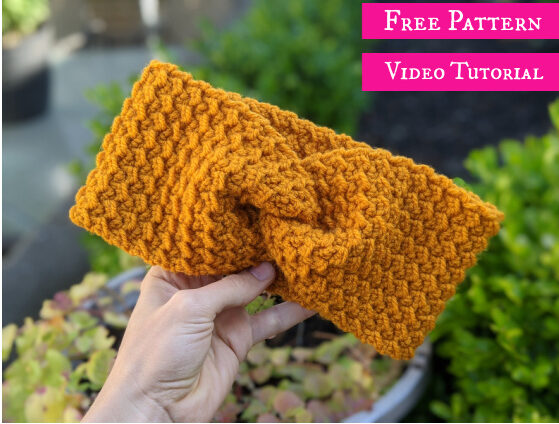
There’s nothing quite like the cozy embrace of a handmade accessory, especially when it’s as stylish and unique as our Phoenix Crochet Ear Warmer!
This delightful project is more than just a way to stay warm; it’s a statement piece that channels the legendary fire and beauty of its namesake.
Meet Your New Favorite Accessory: The Phoenix Ear Warmer
Imagine keeping your ears toasty on a chilly morning, wrapped in a creation that boasts a mesmerizing, textured stitch pattern.
That’s the magic of the Phoenix Ear Warmer! Its distinctive stitches beautifully mimic the vibrant, fiery plumes of the mythical phoenix.
It’s designed for both snug comfort and effortless style, ensuring you never have to choose between warmth and looking fabulous.
Gather Your Sparkly Supplies!
Ready to embark on this creative journey? Here’s what you’ll need to bring your Phoenix Ear Warmer to life:
- Yarn: Approximately 150 yards of medium-weight (worsted weight) yarn. Choose a super soft acrylic or a cozy wool blend for the best warmth and drape!
- Crochet Hook: A 5.5mm (I-9) crochet hook. This size creates the perfect balance of stretch and a snug fit.
- Tapestry Needle: Essential for neatly weaving in those pesky yarn tails and seamlessly joining your work.
- Scissors: Keep a sharp pair handy for clean cuts.
Don’t be afraid to let your personality shine through with your yarn choice! A solid color highlights the stitch definition, while a variegated yarn adds a playful, unique touch.
Unlocking the Phoenix Stitch: Techniques & Step-by-Step Guide
The beauty of this ear warmer lies in a few foundational stitches that come together to create that incredible texture.
If you’re new to some of these, don’t worry—a little practice goes a long way!
The Essential Stitches
- Chain Stitch (ch): Your starting point for almost every crochet adventure.
- Half Double Crochet (hdc): A lovely, versatile stitch that builds up fabric quickly.
- Front Post Double Crochet (fpdc): This is the star of the show! Working around the post of a stitch creates that beautiful, raised, phoenix-like texture.
- Slip Stitch (sl st): Perfect for joining rounds and finishing off your project seamlessly.
Let’s Get Crocheting! Your Ear Warmer Awaits!
Now, let’s dive into creating your very own Phoenix Ear Warmer. You’ve got this!
Building Your Foundation
Begin by making a foundation chain of 60 stitches. This chain will form the circumference of your ear warmer, so ensure it’s not twisted before you proceed.
Creating Your Base Layer
For your very first row, work one half double crochet (hdc) into each chain stitch across. Once you reach the end, join with a slip stitch (sl st) to your first hdc to form a neat circle.
Unveiling the Fiery Texture
This is where the magic happens! For the body of your ear warmer, you’ll alternate between rows of texture.
Work two full rows using the front post double crochet (fpdc) technique. Then, follow with two full rows of half double crochet (hdc).
Repeat this pattern – 2 rows fpdc, 2 rows hdc – until your ear warmer measures approximately 7 to 8 inches, or reaches your desired length.
Bringing It All Together
Once your ear warmer is the perfect length, it’s time to fasten off your yarn.
Use your tapestry needle to carefully weave in all remaining yarn ends for a super neat and professional finish.
Finishing Touches & Styling Inspiration
The best part about handmade items? You can make them uniquely yours!
Consider adding a statement button, a small fabric label, or even a cute crocheted flower to the seam.
Experiment with color blocking or stripes on your next one for a totally different vibe!
Pro Crafter Tips for Perfection!
A few expert tricks can make all the difference in your finished project:
- Check Your Gauge: Gauge isn’t just for garments! It affects the size and fit of your ear warmer. If your work is too loose, go down a hook size; if it’s too tight, go up.
- Tension is Key: Try to maintain an even tension throughout your crocheting. This ensures uniform stitches and a beautiful, consistent fabric.
- Yarn Substitutions: If you use a different yarn weight, you may need to adjust your starting chain and the number of rows. Don’t be afraid to swatch and experiment!
Frequently Asked Questions
Is this pattern suitable for beginners?
Absolutely! If you’re comfortable with basic stitches like chain and half double crochet, this pattern is a fantastic way to learn the Front Post Double Crochet stitch, which is a bit more intermediate but very rewarding.
How can I adjust the size of my ear warmer?
You can easily adjust the circumference by chaining more or fewer stitches in your foundation row. Make sure your chain is long enough to comfortably wrap around your head. To adjust the width, simply crochet more or fewer texture rows until you reach your desired measurement!
Creating your Phoenix Crochet Ear Warmer is such a rewarding experience, whether it’s for yourself or a heartfelt gift.
Embrace the process, enjoy the rhythm of your hook, and revel in the joy of creating something truly special.
Happy crocheting, and may your Phoenix Ear Warmer keep you warm and wonderfully stylish all season long!
Watch the Full Step-by-Step Video Tutorial
Prefer visual guidance? Follow along with the complete video tutorial below at your own pace: