
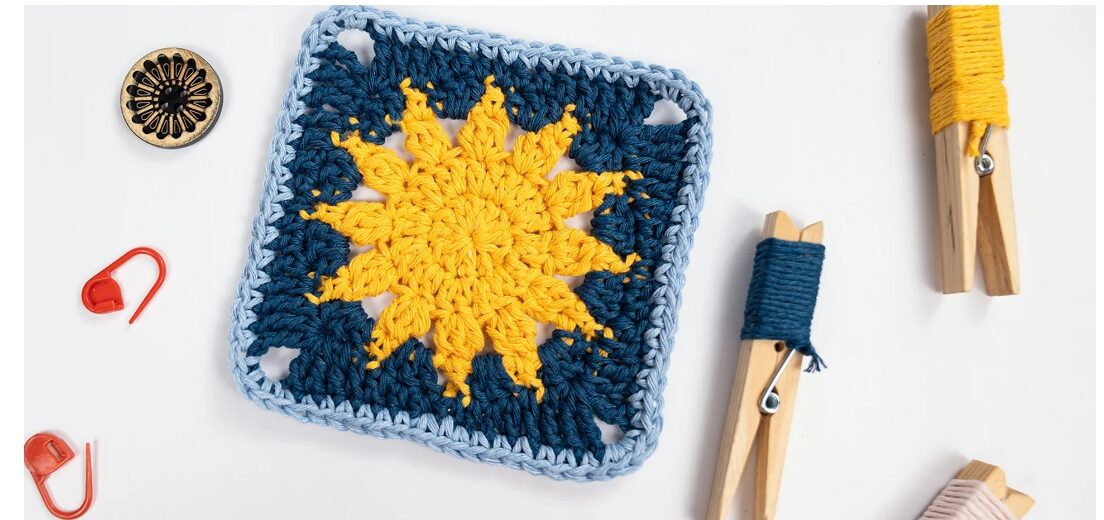
Hello, fellow makers! Let’s Crochet a Burst of Sunshine!
There’s nothing quite like the feeling of a bright, sunny day, and what if you could capture that warmth in a crochet project? Today, we’re diving into the delightful world of the Sun Granny Square, a vibrant and cheerful design that’s absolutely perfect for adding a pop of joy to any creation.
Granny squares are truly a timeless classic, a fundamental building block for countless crochet projects. From cozy blankets and stylish cushions to chic bags and whimsical wall hangings, their versatility is unmatched. The Sun Granny Square, with its radiant design, is especially wonderful for infusing your makes with positive energy and a touch of golden glow.
Whether you’re new to the hook or a seasoned pro, this pattern is surprisingly simple to follow. Plus, it’s a fantastic way to use up those lovely scrap yarns you’ve been hoarding! Let’s gather our supplies and get ready to create some sunshine, one stitch at a time.
Gather Your Sunshine: Materials & Yarn Suggestions
Before we embark on our sunny crochet adventure, let’s make sure we have all our crafting essentials handy. Choosing the right materials sets the stage for a beautiful finished piece!
- Yarn: For that classic sunny look, think bright yellows, fiery oranges, and warm reds, perhaps with a touch of crisp white. Of course, feel free to let your imagination run wild with any color palette that speaks to your heart! Medium-weight (worsted weight) cotton yarns are fantastic for defined stitches, but any medium-weight yarn will work beautifully.
- Crochet Hook: A 4.0 mm or 4.5 mm hook is generally a great starting point, but always adjust to match your chosen yarn weight and your personal tension.
- Tapestry Needle: Essential for neatly weaving in those pesky loose ends, giving your square a polished, professional finish.
- Scissors: For snipping yarn with ease.
A quick tip: different yarn textures can add unique character to your square, so don’t shy away from experimenting!
Technique Breakdown: Your Step-by-Step Guide to a Sun Granny Square
Ready to bring your sun square to life? Here’s how we’ll build this cheerful design, section by section, keeping it simple and fun!
Starting with the Heart: The Center of Your Sun
To begin, we need to create the radiant core of our sun. You can start with a magic ring – this creates a wonderfully neat, tight center. If magic rings aren’t your jam yet, a simple chain of 4, joined with a slip stitch, works perfectly too (you’ll just have a slightly larger hole, which can also be charming!).
Into your chosen ring, you’ll then make your first set of stitches. Chain 3 (this counts as your very first double crochet!), and then work 15 more double crochets into the ring. Once done, simply slip stitch into the top of that initial chain-3 to close up this first round beautifully.
Crafting the Sun’s Rays: Round Two
Now, let’s give our sun its iconic rays! Begin this round with a chain 3 (again, counting as a double crochet), and then place a double crochet into the next stitch. To form those distinct ray-like spaces, you’ll then chain 2 and skip the next stitch, followed by a double crochet into the stitch after that.
Repeat this pattern – chain 2, skip a stitch, double crochet into the next – all the way around your circle. Finish by slip stitching into the top of the initial chain-3. These chain spaces are key; they’re where your square’s corners will eventually emerge!
Shaping the Corners: Transforming Circle to Square
This is where the magic happens and your sun-circle beautifully transforms into a square! Locate each of those chain-2 spaces from the previous round.
Into every other chain-2 space, you’ll create a corner cluster: work 3 double crochets, chain 2, and then 3 more double crochets. These clusters really define your corners.
In the chain-2 spaces *between* those corners, you’ll simply work 3 double crochets without any chains in between. Repeat this pattern around the entire square until all sides are formed, and then slip stitch to close the round. Your square is now truly taking shape!
Finishing Touches, Assembly & Styling Ideas
You’ve crocheted a gorgeous Sun Granny Square! Now for the final steps that make all the difference.
Blocking: For beautifully defined stitches and perfectly even edges, I highly recommend blocking your square. Wet blocking is wonderful for this: gently dampen your square, carefully shape it to your desired dimensions, and pin it flat to dry. It makes a huge difference!
Joining: If you’re making a multi-square project, you have options! You can sew your squares together with a neat whip stitch or slip stitch, or for a seamless look, try the popular join-as-you-go method as you crochet your final rounds.
Weaving in Ends: Don’t forget your tapestry needle! Weave in all those loose ends for a clean, professional finish. It truly elevates your work.
Styling Inspiration: Imagine your Sun Granny Squares transformed into a cheerful throw blanket, a vibrant cushion cover, a cute market bag, or even a stunning wall hanging! Their positive energy makes them perfect for brightening any space.
Pro Crafter Tips for Your Sunny Squares
Want to make your Sun Granny Squares truly shine? Here are a few extra tips from my crafting toolkit:
- Check Your Gauge: Before you dive deep, crochet a small swatch. This ensures your squares are the size you expect, especially if you’re joining multiple together. Tension can vary wildly between crocheters!
- Play with Color Palettes: While traditional yellows and oranges are lovely, don’t be afraid to experiment! Try subtle variations of one color for an elegant ombre effect, or bold contrasting colors (like teal and mustard!) for a modern twist.
- Add Texture: For extra dimension, consider incorporating textured stitches like bobble or puff stitches into your “rays” or outer rounds. It adds a delightful tactile element!
- Adjusting Size: Easily make your squares larger by simply adding more rounds. Continue the pattern of creating corners (like the 3dc, ch2, 3dc) and filling in the sides with groups of 3 double crochets, working into the chain spaces or between the previous rounds’ stitch clusters.
Frequently Asked Questions About Your Sun Granny Square
Here are a couple of common questions new granny square makers often ask:
Q: My center hole seems a bit large. Is that okay?
A: Absolutely! If you used the chain-4 method to start, a slightly larger center is natural. Many crafters love this look! If you prefer a tighter center next time, practicing the magic ring technique is a great option.
Q: How can I make my Sun Granny Square bigger?
A: It’s super easy! Just continue adding rounds using the same basic granny square principle. You’ll keep working groups of three double crochets into the spaces between the previous round’s clusters, and creating new corners with (3dc, ch2, 3dc) in the corner chain spaces.
Happy Crocheting, Sunshine!
The Sun Granny Square is more than just a pattern; it’s an invitation to bring warmth, color, and cheer into your home and projects. With this guide, you’re now equipped to create a whole collection of these adorable, versatile squares.
Remember, crochet is all about creativity and finding joy in every loop and stitch. Don’t hesitate to make this pattern your own by experimenting with colors, yarns, and textures. Each square you make tells its own story, and your Sun Granny Square is just the beginning of endless possibilities!
Happy hooking, friends!
Watch the Full Step-by-Step Video Tutorial
Prefer visual guidance? Follow along with the complete video tutorial below at your own pace: