
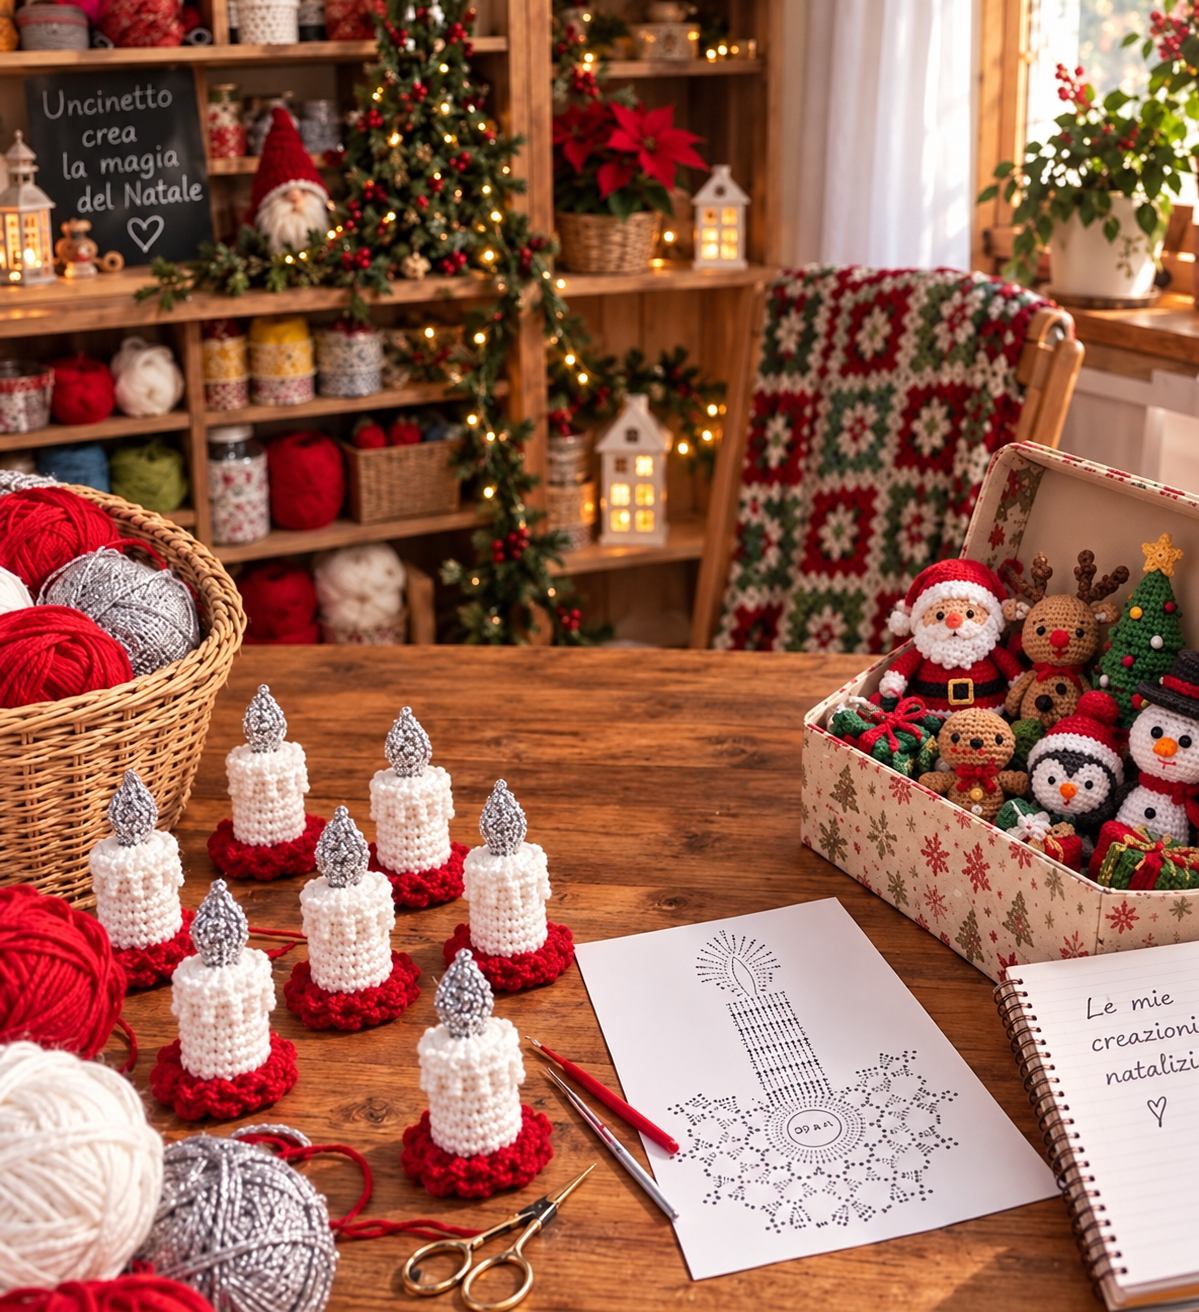
Crochet Advent Candle Pattern is a charming holiday project that combines the warmth of handmade crochet with the traditional beauty of Christmas candle decorations. This small decorative candle can be made with soft white yarn, a festive red base, and a shimmering silver or golden flame, creating a beautiful ornament for an Advent display, Christmas table, mantel, shelf, or handmade holiday centerpiece. The project shown in the inspiration image has a cozy three-dimensional appearance, with a cylindrical candle body, a textured ruffled base, and a pointed crochet flame. Because the finished piece is made entirely from yarn and stuffing rather than wax and fire, it can be displayed as a decorative item throughout the holiday season. This Crochet Advent Candle Pattern is also a wonderful way to use leftover yarn from other Christmas crochet projects while practicing basic shaping techniques.
One of the most enjoyable things about this crochet candle pattern is that it looks detailed without requiring extremely complicated construction. Most of the candle body is created with basic stitches worked in continuous rounds, while simple increases and decreases shape the flame and decorative base. Beginners who already understand the magic ring, single crochet, slip stitch, chain stitch, increases, and decreases should be able to follow the project comfortably. More experienced crocheters can customize the pattern with different textures, metallic yarn, embroidery, beads, or alternative color combinations. A finished candle approximately 5 to 6 inches (13 to 15 cm) tall creates a convenient size for Christmas displays, although the measurements can easily be adjusted.
For this tutorial, U.S. crochet terminology is used throughout. A single crochet (sc) is worked by inserting the hook into the stitch, yarn over, pulling up a loop, yarn over again, and pulling through both loops. An increase (inc) means working two single crochet stitches into the same stitch, while an invisible decrease (dec) combines two stitches to reduce the circumference. A slip stitch (sl st) joins or moves across stitches without adding significant height, and a chain (ch) forms the foundation for several decorative sections. For a candle similar to the project shown, medium or light worsted yarn works well with approximately a 3.5 mm to 4 mm crochet hook. White, cream, bright red, and metallic silver yarn create a traditional Advent appearance, but the pattern can easily be personalized.
Materials, Measurements, and Crochet Stitches for the Advent Candle
For one Crochet Advent Candle Pattern, prepare a small amount of white or ivory yarn for the candle, red yarn for the decorative base, and metallic silver, gold, yellow, or orange yarn for the flame. You will also need polyester fiberfill, a crochet hook suitable for the selected yarn, a yarn needle, scissors, and a removable stitch marker. Approximately 40 to 60 yards of the main candle color is usually sufficient for a small ornament, with much smaller quantities required for the base and flame.
The finished candle can measure approximately 3 inches (7.5 cm) across the decorative base and approximately 5½ inches (14 cm) from the bottom of the base to the top of the flame. The candle cylinder itself can be around 2 inches (5 cm) in diameter and about 3½ inches (9 cm) tall. These measurements are flexible because yarn thickness, hook size, crochet tension, and stuffing density will influence the final dimensions of the crochet Christmas candle.
Gauge is not as critical for this decorative project as it would be for a sweater or fitted garment, but consistent tension is still important. The stitches should be tight enough that the polyester stuffing cannot be seen between them. If noticeable gaps appear in the fabric, try using a crochet hook approximately 0.5 mm smaller. Tight, even stitches will create the firm cylindrical structure that helps the Advent candle decoration stand upright.
The principal stitch for the candle body is single crochet because it creates a dense, neat fabric. The candle is preferably worked in continuous rounds rather than joining each round. Place a stitch marker into the first stitch of every round and move it upward as you work. This simple technique prevents losing track of the beginning of the round and keeps the sides of the candle smooth.
The red decorative section is created using increases that produce extra fabric around the outside edge. When several stitches are worked into individual stitches, the crochet naturally begins to ripple and form a ruffle. This makes it possible to recreate the flower-like or scalloped red base visible around the bottom of the candle without needing complicated crochet techniques.
The flame requires slightly more shaping because it must gradually become narrower toward the top. It can be worked separately with metallic yarn and sewn onto the candle afterward. Using metallic yarn gives the crochet candle flame a sparkling Christmas appearance, but regular yellow, cream, orange, or gold yarn can also produce a beautiful result if metallic yarn is difficult to crochet.
How to Crochet the White Candle Body Step by Step
Begin the Crochet Advent Candle Pattern with the bottom of the candle. Using white or cream yarn, make a magic ring and work 6 single crochet stitches into the ring. Pull the ring closed gently. For Round 2, work 2 single crochet stitches into every stitch around, producing 12 stitches. For Round 3, repeat 1 sc, inc around to reach 18 stitches. For Round 4, repeat 2 sc, inc around for a total of 24 stitches.
If you want a slightly wider candle, add one more increase round by repeating 3 sc, inc around, which produces 30 stitches. However, 24 stitches usually create a nicely proportioned miniature candle when using medium-weight yarn. Once the desired diameter is reached, work one round through the back loops only. This creates a subtle turning edge between the flat bottom and the vertical wall of the candle.
Continue working one single crochet into every stitch around without increasing. This section forms the straight body of the crochet Advent candle. Depending on your yarn and tension, approximately 16 to 22 rounds will usually produce a candle body around 3 to 3½ inches (7.5 to 9 cm) tall. Stop occasionally and place the piece on a flat surface to check the proportions.
As the cylinder becomes taller, begin adding small amounts of polyester fiberfill. Do not wait until the final round to stuff the entire candle because it can become difficult to distribute the filling evenly. Add small pieces at a time and gently press them into the bottom and sides. The candle should feel firm enough to stand upright but should not be stuffed so tightly that the crochet stitches become stretched.
When the candle reaches the desired height, begin closing the top. If you are working with 24 stitches, crochet 2 sc, dec around to reduce the round to 18 stitches. On the following round, repeat 1 sc, dec around to reach 12 stitches. Add a final small amount of stuffing and shape the top so the candle remains cylindrical rather than becoming rounded like a ball.
Finish the top by working decreases around until only a small opening remains. Cut the yarn, leaving a tail approximately 8 inches (20 cm) long. Thread the yarn through a needle and pass it through the remaining front loops. Pull gently to close the opening and secure the yarn. Do not worry if the exact center is slightly visible because the crochet flame will later be sewn over this area.
Creating the Red Ruffled Base and Metallic Crochet Flame
To create the red base, begin with red yarn and make a magic ring. Work 6 single crochet stitches into the ring, then increase evenly until the circle is slightly larger than the diameter of the candle. You can follow the same progression used for the candle bottom: 6 stitches, 12 stitches, 18 stitches, 24 stitches, and, when needed, 30 stitches. Keep the circle flat during these first rounds.
Once the base is large enough, create the decorative ruffle. Work approximately 3 double crochet stitches into each stitch around, depending on how dramatic you want the edge to appear. Adding multiple stitches into each base stitch creates the characteristic rippled effect. If the ruffle becomes excessively crowded, alternate between 2 and 3 double crochet stitches per stitch instead.
Finish the red base with a slip stitch and leave a long tail for sewing. Position the white candle directly in the center. Using the yarn needle, stitch the candle securely to the base from underneath so the attachment stitches remain as inconspicuous as possible. The ruffles should extend beyond the candle body and create a decorative holiday border resembling flower petals.
For the flame, use silver, gold, yellow, or orange yarn. Make a magic ring and work 5 or 6 single crochet stitches into it. Work one round evenly and then begin shaping the flame by making gradual decreases. Another simple method is to crochet a small oval shape and taper the upper portion over several rounds. Keep the bottom slightly wider so it can be attached securely to the top of the candle.
Stuff the lower half of the flame very lightly. Too much stuffing can make the flame appear round instead of pointed. As the opening becomes smaller, stop adding filling and continue decreasing until approximately 3 stitches remain. Cut the yarn and pull it through the remaining stitches. Use the yarn needle to shape the point gently with a few hidden stitches if necessary.
Position the finished flame in the exact center of the candle top. Stitch around the lower edge several times, making sure the flame is straight from every direction. The completed Crochet Advent Candle Pattern should now have three clearly defined sections: the soft white candle body, the festive red ruffled base, and the sparkling flame at the top.
Finishing, Customizing, and Displaying Your Crochet Advent Candle
After assembling the candle, gently shape it with your hands. Roll the white cylinder lightly between your palms to distribute the stuffing evenly. Press the bottom against a flat table to help the project stand securely. If the candle leans slightly, redistribute the stuffing before adding additional decorative details.
You can create an entire crochet Advent candle set by making several candles in different heights. For example, one candle can measure approximately 4½ inches (11.5 cm), another 5 inches (12.5 cm), another 5½ inches (14 cm), and another 6 inches (15 cm). Keeping the same base and flame design will make the collection look coordinated while the varying heights create visual interest.
Color is another easy way to customize the pattern. Traditional combinations include white candles with red bases, but cream with burgundy can create a more vintage appearance. White with forest green produces a classic Christmas style, while white with gold looks elegant and sophisticated. Metallic silver flames work beautifully with cool color palettes, while gold or warm yellow flames complement traditional red and green decorations.
The pattern can also be turned into a hanging ornament. Before completely closing the flame, attach a strong loop of matching yarn or thin decorative cord through the top. Make certain the loop is secured inside the crochet structure rather than attached only to one external stitch. A smaller version of the crochet Christmas candle pattern can then be hung on a Christmas tree, wreath, garland, or decorative branch.
When creating several candles, crochet all the candle bodies first, then all the bases, and finally all the flames. Working in batches makes it easier to maintain consistent tension and measurements. You can also prepare small containers for each yarn color and keep the finished components organized before assembly. This is especially helpful when creating handmade decorations for family, holiday parties, craft displays, or seasonal gifts.
The completed candle should be treated as a decorative crochet item rather than a functional candle. Keep the yarn decoration away from real flames, burning candles, fireplaces, and other direct heat sources. The handmade candle creates the visual feeling of a Christmas candle without requiring an actual flame, making it perfect for adding soft handmade character to a holiday craft arrangement.
Frequently Asked Questions About the Crochet Advent Candle Pattern
Is the Crochet Advent Candle Pattern suitable for beginners? Yes. A beginner who understands single crochet, increases, decreases, slip stitches, and the magic ring can complete this project. The main candle body is particularly simple because most rounds contain the same number of stitches.
What yarn is best for a crochet Advent candle? Cotton and acrylic yarn both work well. Cotton provides excellent stitch definition and creates a firm structure, while acrylic is soft, affordable, and available in many Christmas colors. Medium or light worsted yarn is particularly convenient for this project.
What crochet hook size should I use? A hook between approximately 3.5 mm and 4 mm is suitable for many medium-weight yarns. The goal is to produce tight stitches with minimal gaps. Always adjust the hook size according to the yarn and your personal crochet tension.
How can I make the candle taller? Simply continue working additional rounds of single crochet before beginning the decreases at the top. Because the main section is a straight cylinder, adding height does not require changing the stitch count.
How do I make a smaller candle? Use lighter yarn and a smaller hook, or stop increasing the bottom circle earlier. For a very small ornament, approximately 18 stitches around the candle body may be enough. Keep the stuffing light so the smaller stitches remain neat.
Why is my crochet candle leaning? Uneven stuffing is usually the main cause. Remove some filling if possible and redistribute it gradually. Also check that the bottom circle is flat and that the candle has been sewn evenly onto the red base.
Can I use gold yarn instead of silver for the flame? Absolutely. Gold, yellow, cream, orange, and metallic combinations can all create beautiful flames. Using two strands of thin yarn together can also create an interesting blended effect.
How can I make the ruffled base fuller? Add more stitches around the final round. Working three or even four double crochet stitches into each stitch creates stronger ruffles, while using two stitches produces a softer wave.
Can I make several candles for an Advent display? Yes. One of the advantages of this Crochet Advent Candle Pattern is that the size can be changed easily. Making several candles in coordinating colors creates a beautiful handmade centerpiece for seasonal decorating.
Do I need to use safety eyes, wire, or plastic pieces? No. The basic project can be made entirely from yarn and polyester stuffing. This keeps the construction simple and maintains the soft handmade appearance of the candle.
Conclusion
The Crochet Advent Candle Pattern combines simple crochet techniques with a beautiful Christmas-inspired design. Throughout this tutorial, you learned how to crochet the flat base of the candle, build a straight cylindrical body using single crochet, stuff and close the candle, create a decorative red ruffle, shape a metallic flame, and assemble all the components into a finished holiday decoration. You also learned how changes in yarn, hook size, height, color, and ruffle density can transform the same basic pattern into many different Advent candle designs.
This project is an excellent opportunity to practice crochet in the round, controlled increases, decreases, shaping, stuffing, and simple assembly while creating something festive for the Christmas season. Try making one candle first and then experiment with a coordinated set in different heights or colors. If you make this Crochet Advent Candle Pattern, leave your sincere opinion about the project and share your suggestions for colors, sizes, decorative details, or other Christmas crochet ideas you would enjoy creating next.