
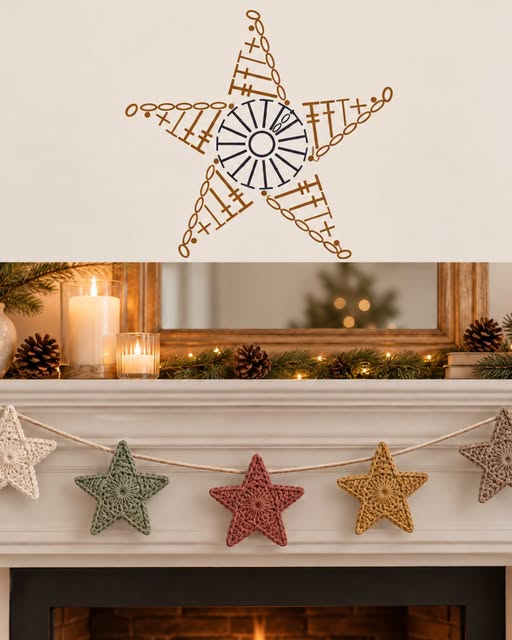
Crochet Star Pattern is a beautiful and versatile project for anyone who enjoys creating handmade decorations with yarn. A five-point crochet star can be used as a Christmas ornament, a garland motif, a gift topper, a table decoration, or even as an appliqué for bags, blankets, and pillows. The design shown in the reference image combines a circular crochet center with five clearly shaped points, creating a light and slightly lacy appearance that works especially well with cotton yarn. Because the project is small, it is also a practical way to use leftover yarn from other projects. Once you understand how the center and the points are constructed, you can make several stars in different colors and sizes without needing a large amount of material.
This Crochet Star Pattern uses standard US crochet terms and is suitable for confident beginners as well as experienced crocheters who want a quick decorative project. The basic construction begins with a small round center, followed by evenly spaced stitch groups that create the foundation for the five star points. Each point is then shaped by gradually reducing the number of stitches toward the tip. The most important part of the project is keeping the five sections evenly distributed around the center. If the spacing is consistent, the finished crochet star will look balanced and symmetrical. Blocking at the end helps define the points and gives the motif the crisp shape seen in decorative crochet garlands.
One of the best features of this design is how easily it can be customized. A small hook and fine cotton can create a delicate crochet Christmas ornament, while thicker yarn can produce a larger star suitable for wall décor or festive bunting. Neutral shades such as cream, beige, and soft gray create a rustic look, while red, gold, green, and white work beautifully for traditional holiday decorations. You can also make a colorful set for year-round decorating. In this tutorial, you will learn the materials, crochet abbreviations, center construction, point shaping, finishing method, and useful adjustments needed to complete the Crochet Star Pattern successfully.
Materials, Measurements, and Crochet Stitches
For this Crochet Star Pattern, choose a smooth yarn that makes the stitches easy to see. Cotton yarn is particularly useful because it provides structure and helps the star points remain defined after blocking. A DK or light worsted cotton works well for a medium-sized ornament. You will need approximately 15 to 25 yards of yarn for one star, depending on yarn thickness and the finished size. Small leftover balls from previous projects are usually more than enough.
Use a crochet hook that matches your yarn but is slightly smaller than you might normally choose for a soft garment. A 3.0 mm to 3.5 mm hook works well with DK cotton, while a 4.0 mm hook can be used with light worsted yarn. A slightly firm tension is helpful because it prevents the center from becoming floppy. You will also need scissors, a yarn needle, and a few blocking pins. If you plan to turn the star into an ornament, keep a small amount of yarn or thin cord for the hanging loop.
The approximate finished measurement of the star will be 4 to 5 inches (10 to 13 cm) from point to point when made with DK yarn and a 3.5 mm hook. The exact measurement is not critical because this is a decorative motif rather than a fitted project. If you want a smaller crochet star, use thinner yarn and a smaller hook. For a larger star, use heavier yarn and a larger hook while keeping the same stitch sequence.
The main stitches used are chain (ch), slip stitch (sl st), single crochet (sc), and double crochet (dc). You will also use a simple double crochet decrease when shaping the points. To make a double crochet decrease, yarn over, insert the hook into the next stitch, yarn over and pull up a loop, yarn over and pull through two loops. Repeat into the following stitch, then yarn over and pull through all remaining loops. This joins two stitches into one and creates a gradual narrowing effect.
The project begins with either a magic ring or a small chain ring. A magic ring produces a very neat center because the opening can be pulled tightly closed. If you prefer not to use a magic ring, chain 4 and join with a slip stitch to form a ring. Both methods work well. The important goal is to create a firm circular foundation that can support five evenly spaced star points.
Gauge is not essential for this Crochet Star Pattern, but consistent tension is important. If your stitches are very loose, the star may stretch and the points may lose definition. If your stitches are extremely tight, the center may curl. Aim for a comfortable but controlled tension. Before beginning several stars for a crochet garland, make one complete sample, block it, measure it, and then decide whether you want to change the hook size.
Crochet Star Pattern Step-by-Step: Creating the Center
Begin by making a magic ring. Chain 3; these chains will count as the first double crochet. Work 14 more double crochets into the ring, giving you a total equivalent of 15 double crochet stitches around the center. Pull the magic ring closed carefully so that there is no large opening in the middle. Join to the top of the beginning chain 3 with a slip stitch. You should now have a neat circular center.
The reason for using 15 stitches is that the circle can be divided into five equal groups of three stitches. Each group will support one point of the star. When working the Crochet Star Pattern, always think of the center as five equal sections rather than one continuous round. This makes it easier to understand where each point begins and ends. If you accidentally add or skip a stitch here, the finished star may become uneven.
For the next round, chain 1 and work 1 single crochet in the same stitch. Work 1 single crochet in each stitch around, joining with a slip stitch to the first single crochet. This stabilizing round is optional when using very firm cotton, but it creates a clean foundation and makes the following point placement easier. Keep the stitches relaxed enough that the circle remains flat.
Now prepare the five point foundations. Chain 1, then work 1 single crochet in the next stitch. Chain 1, skip one stitch, and work 1 single crochet into the next stitch. Continue the same spacing around the circle until you have five evenly positioned chain spaces. Adjust the placement only if necessary so the five spaces are distributed symmetrically. These spaces act as the starting locations for the five star sections.
In each chain space, you will begin building a point outward rather than continuing in ordinary circular rounds. The construction resembles five small triangular crochet sections attached to one center. This method gives the crochet star motif a more defined appearance than simply increasing and decreasing around a large outer round. It also makes it easy to modify the length of the points.
Before continuing, lay the center flat and check that all five point foundations are evenly spaced. If one section looks noticeably wider than another, it is better to correct the placement now rather than after completing the points. A few seconds of checking can prevent the finished star from becoming distorted. Once the five sections appear balanced, you are ready to shape the characteristic pointed arms of the Crochet Star Pattern.
Shaping the Five Crochet Star Points
To create the first point, join your working yarn at the first chain space if necessary. Chain 3, which counts as a double crochet, then work 3 more double crochets into the same chain space. You will have a group of four tall stitches. Turn your work. Chain 3 and work one double crochet in each stitch across. This creates the first short row of the triangular point.
Turn again and chain 3. Work a double crochet decrease over the next two stitches, then work 1 double crochet in the final stitch. This begins narrowing the point. Turn, chain 2, and make another decrease over the remaining stitches. Fasten off when only one working stitch remains. The first point should now taper gradually from the circular center to a narrow tip.
For a slightly longer star point like the decorative style in the reference image, add an extra shaping row before making the final decrease. After the first four-stitch row, work another row of four double crochets, then begin decreasing. The additional row creates a more elongated shape. This variation can make the Crochet Star Pattern look especially attractive when used in a hanging garland.
Repeat the same sequence for each of the four remaining point foundations. Try to maintain identical tension on every section. Count your stitches carefully rather than relying only on appearance. Even one additional stitch can make one point wider than the others. After completing each point, lay the star flat and compare it with the previous point. Consistent row height is just as important as consistent stitch count.
If you prefer a more decorative openwork look, you can replace some double crochets with combinations of chains and double crochets. For example, work a double crochet, chain 1, skip one stitch, and work another double crochet. Small chain spaces give the points a lighter appearance similar to traditional lace crochet. However, beginners may find the solid version easier because the structure is more predictable and easier to block.
After all five points are completed, do not worry if the star looks slightly curled or uneven. Crochet fabric often changes considerably after blocking. The circular center may lift slightly, and the point tips may curl toward the front or back. As long as the stitch counts are correct, the crochet star can usually be shaped beautifully during the finishing process.
Finishing, Blocking, Decorating, and Using the Crochet Star
Weave in every yarn tail using a yarn needle. Thread each tail through several stitches on the wrong side of the star, changing direction at least once so the yarn remains secure. Trim the excess carefully. Avoid cutting too close to the fabric because the tail could work loose later. Neat finishing is especially important if you plan to use the stars in a garland where both sides may remain visible.
Blocking is the step that transforms this simple motif into a crisp, professional-looking Crochet Star Pattern. Lightly dampen the star with water, gently press out the excess moisture, and place it on a blocking surface. Position one pin at the tip of each point. Stretch the points outward evenly without pulling the center out of shape. Allow the star to dry completely before removing the pins.
For an even firmer ornament, the star can be lightly stiffened after blocking. This is optional and depends on how you plan to use the project. Cotton stars usually hold their shape reasonably well without additional treatment. If the star will hang vertically on a Christmas tree or door decoration, a little extra firmness can help the points stay straight.
To make a hanging loop, attach yarn to the tip of one point and chain approximately 15 to 25 stitches. Slip stitch back into the same point and fasten off securely. Adjust the chain length depending on how you want the ornament to hang. A shorter loop works well for tree ornaments, while a longer loop may be more suitable for hooks, handles, or seasonal displays.
You can also create a crochet star garland by making several stars and connecting them with a long crochet chain or decorative cord. Arrange the stars approximately 4 to 8 inches (10 to 20 cm) apart depending on the look you prefer. Alternating colors creates a playful design, while using one color throughout gives the garland a more minimal and coordinated appearance. Cream, sage, rust, mustard, and taupe create a warm rustic palette similar to handmade farmhouse décor.
Once you understand this Crochet Star Pattern, experimenting with size and texture becomes very easy. Try mercerized cotton for a smooth and elegant finish, soft acrylic for colorful decorations, or a fine yarn for small gift embellishments. You can also sew the stars onto blankets, baskets, stockings, fabric ornaments, or handmade cards. The basic construction remains the same: a firm circular center, five evenly divided sections, carefully shaped points, and proper blocking.
Frequently Asked Questions About the Crochet Star Pattern
Is the Crochet Star Pattern suitable for beginners?
Yes. A beginner who already understands chains, slip stitches, single crochet, and double crochet should be able to complete this project. The most important skills are accurate counting and keeping consistent tension. Making the first star slowly will help you understand how the five-point construction works.
What yarn is best for a crochet star?
Cotton is one of the best choices because it provides excellent stitch definition and holds its shape after blocking. Acrylic can also be used, particularly for soft decorations or colorful garlands. The yarn weight can be changed depending on how large you want the finished star to be.
How can I make the Crochet Star Pattern larger?
The easiest method is to use thicker yarn and a larger hook. You can also add another row to each point before beginning the decreases. If you add rows, repeat the adjustment consistently on all five points so the star remains symmetrical.
How can I make a smaller crochet star?
Use lightweight cotton thread or fingering-weight yarn with a smaller crochet hook. The same stitch structure can be maintained. Fine yarn makes delicate stars that are especially suitable for tree ornaments, gift wrapping, and small decorative projects.
Why are my crochet star points curling?
Curling can result from tight tension, uneven decreases, or simply the natural behavior of newly crocheted fabric. Blocking usually solves minor curling. Wet or steam blocking, depending on the fiber, helps the stitches relax and allows you to shape each point precisely.
Why does my star look uneven?
Uneven stars usually happen when the center has an incorrect stitch count or when the point foundations are not equally spaced. Check that the center is divided into five consistent sections and that each point contains the same number of rows and stitches.
Can I use this pattern to make a Christmas garland?
Yes. The Crochet Star Pattern is ideal for seasonal garlands. Make several stars in coordinating colors, block each piece, and attach them to a long chain or cord. You can create traditional Christmas colors or choose neutral yarns for a modern decorative style.
Do I have to block the finished crochet star?
Blocking is strongly recommended because it defines the five points and helps the center remain flat. Without blocking, the star may still be usable, but the finished shape is usually cleaner and more attractive after the stitches have been carefully arranged and dried.
Can I add beads or other decorations?
Yes. Small beads, embroidery, decorative buttons, or metallic thread can be added after the crochet work is finished. Keep embellishments lightweight so they do not pull the points downward. Simple decorations often work best because they allow the crochet texture to remain visible.
How many stars do I need for a garland?
The number depends on the garland length and spacing. For a short mantel decoration, five to seven stars may be enough. A longer garland can use ten or more. Make one finished star first, measure it after blocking, and then plan your preferred spacing.
Conclusion
The Crochet Star Pattern is a simple but highly adaptable crochet project that combines basic stitches with careful shaping. In this tutorial, you learned how to select the yarn and hook, create a circular center, divide the center evenly into five sections, crochet and decrease each star point, weave in the yarn ends, block the finished motif, and turn the completed stars into ornaments or garlands. The project can be customized with different yarn weights, colors, point lengths, and decorative details, making it useful for many handmade projects throughout the year.
Once you have made the first star, try creating several versions with different color combinations and yarn textures. Small changes can make the same Crochet Star Pattern look rustic, elegant, festive, modern, or playful. Most importantly, keep your stitch counts consistent and take time to block each finished star carefully. If you make this pattern, leave your sincere opinion about the tutorial and share any suggestions you have. Your ideas about colors, sizes, finishes, or future crochet projects can inspire even more creative versions of this handmade star.