
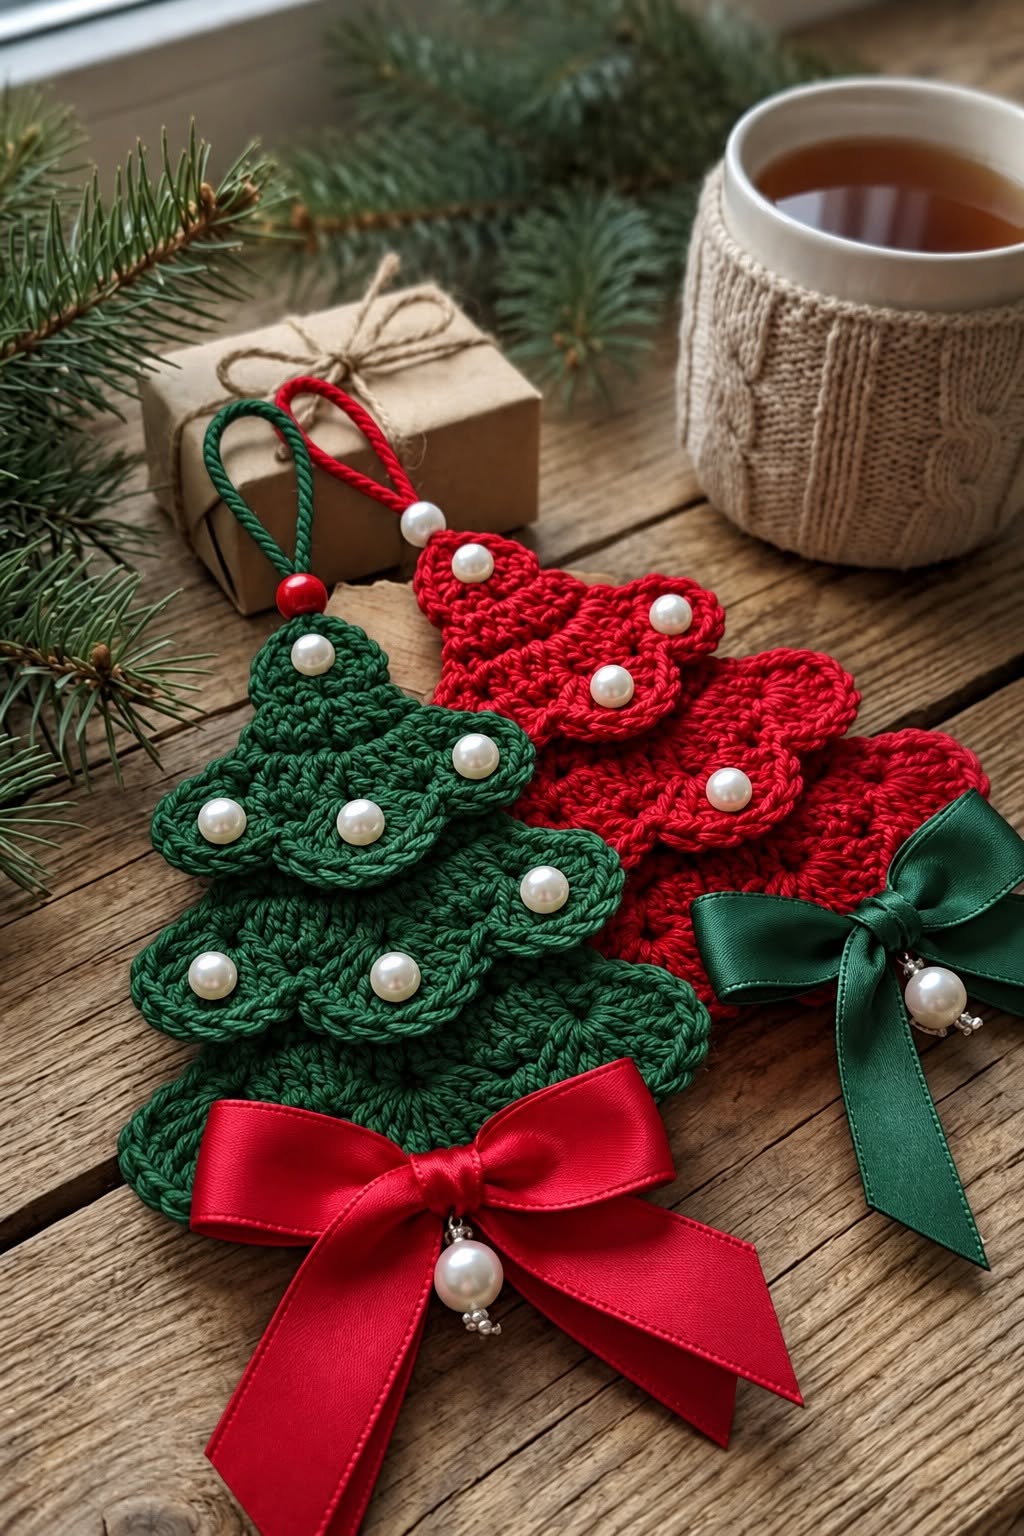
Crochet Christmas Tree Ornaments Pattern is a festive handmade project that turns simple crochet stitches into charming Christmas tree decorations with texture, color, and personality. Inspired by the layered red and green trees shown in the photo, this design combines rounded crochet sections, decorative pearl-style beads, hanging loops, and an elegant satin bow. The finished ornament can be placed on a Christmas tree, attached to a wrapped gift, used as a holiday door decoration, or added to handmade Christmas displays. Because the construction is based on small pieces and repetitive stitches, the project is also an enjoyable way to use leftover yarn while practicing basic crochet stitches, shaping, layering, and finishing techniques.
One of the most attractive features of this Crochet Christmas Tree Ornaments Pattern is how easily it can be customized. Traditional green yarn creates the familiar evergreen appearance, while deep Christmas red produces a dramatic ornament that stands out beautifully among lights and greenery. You can also experiment with cream, burgundy, forest green, gold, silver, dusty rose, or combinations that coordinate with your holiday décor. Small pearl beads imitate delicate Christmas baubles, while the ribbon bow gives the bottom of the ornament a polished finish. The hanging cord can be crocheted directly into the project, so there is no need for special hardware unless you prefer it.
This tutorial uses U.S. crochet terminology and is designed to be understandable even if you have never made a layered crochet ornament before. The tree is constructed from several graduated scalloped sections, starting with the smallest section at the top and progressing toward wider sections at the bottom. The pieces are then overlapped slightly to create the dimensional appearance seen in the finished design. A crocheted loop is added at the top, decorative beads are sewn across the front, and a ribbon bow completes the base. Once you understand the basic method, it becomes easy to make several ornaments in different sizes and colors for gifts, craft fairs, Christmas packages, or your own seasonal decorating.
Materials, Measurements, and Crochet Stitches
For one Crochet Christmas Tree Ornament, you will need a small amount of medium-weight cotton or acrylic yarn. A yarn in the worsted weight #4 range works especially well because it produces a firm ornament while still showing the stitch texture clearly. Approximately 25 to 40 yards of yarn should be enough for a medium ornament, depending on your tension and the number of layers you decide to make. Forest green and Christmas red are classic choices, but almost any color can be used.
A crochet hook between 3.5 mm and 4.5 mm is suitable for most medium-weight yarns. Using a slightly smaller hook than you would normally use for the yarn helps create a denser fabric that holds its shape. You will also need scissors, a yarn needle, sewing thread or strong embroidery thread for attaching beads, several small pearl-style beads, and approximately 10 to 14 inches of satin ribbon for the decorative bow.
The finished ornament can measure approximately 6 to 8 inches (15 to 20 cm) from the top of the hanging loop to the bottom of the ribbon, although the size is completely adjustable. The crocheted tree itself can be around 4½ to 6 inches (11.5 to 15 cm) tall and approximately 4 to 5 inches (10 to 13 cm) wide at the base. Smaller hooks and thinner yarn will create miniature ornaments, while thicker yarn can create larger wall or door decorations.
The basic stitches used in this Crochet Christmas Tree Ornaments Pattern are beginner-friendly. Chain (ch) forms the starting foundation and hanging loop. Slip stitch (sl st) is used for joining and moving between stitches without adding much height. Single crochet (sc) produces firm sections and helps stabilize the edges. Half double crochet (hdc) provides moderate height, while double crochet (dc) creates the taller stitches required for the rounded scallops.
The characteristic layered appearance comes from combining stitches of different heights within the same group. A typical scallop may begin with a single crochet, continue with half double crochet and double crochet stitches, and then return through half double crochet and single crochet. This gradual change in height creates the soft curved edges that resemble branches on a stylized Christmas tree.
Before beginning the ornament, make a small sample using your selected yarn and hook. The project does not require exact garment-style gauge, but consistent tension is important because the layers should sit flat rather than curling. If the crochet feels too stiff, increase your hook size slightly. If the sections are floppy or lose their shape, reduce the hook size by approximately 0.5 mm.
Step-by-Step Crochet Christmas Tree Construction
Begin the Crochet Christmas Tree Ornaments Pattern at the top. Chain 4 and join with a slip stitch to form a small ring. Chain 1 and work 8 single crochet stitches into the ring. Join with a slip stitch. This small center provides a stable point for the first tree section and also makes it easy to attach the hanging loop later.
For the first rounded section, chain 2 and work a combination such as 1 half double crochet, 3 double crochet, 1 half double crochet, and 1 single crochet into a suitable stitch or space. Repeat the curved sequence on the opposite side so that the top resembles a small double-lobed branch section. Do not worry if the shape looks compact at this stage; the visual tree shape becomes clearer as the larger sections are added.
Create the second section slightly wider than the first. Chain approximately 8 to 10 stitches or begin from a small foundation ring, depending on your preferred construction method. Work single crochet toward the outer edge, followed by half double crochet and several double crochet stitches through the center area. Gradually reduce the stitch heights again toward the opposite edge. This creates an elongated oval or scalloped branch shape.
Make a third layer using the same technique but increase the foundation and the number of tall stitches. For example, if the second section contains 3 double crochet stitches in each rounded area, the next section can contain 4 or 5. The important principle is gradual enlargement. Each layer of the crochet Christmas tree ornament should extend approximately ½ to ¾ inch beyond the layer above it on each side.
The bottom section should be the widest and fullest part of the tree. Make a foundation approximately 25 to 35 percent wider than the previous section and work several curved stitch groups across it. Use a combination of sc, hdc, dc, hdc, and sc to build soft branch-shaped scallops. If you want additional texture, work some stitches through the back loops only. This creates subtle ridges that resemble the raised crochet texture visible in decorative holiday ornaments.
Once all sections are completed, weave in the yarn ends on the wrong side. Arrange the pieces from smallest to largest, overlapping each layer by approximately ½ inch (1.25 cm). The overlap should hide the upper edge of each lower piece while still allowing the rounded ends to remain visible. Thread a yarn needle and securely sew the layers together through the center area. Keep the outer scallops free so they can lift slightly and create dimension.
Adding the Hanging Loop, Pearls, and Decorative Bow
The hanging loop is an important part of the Crochet Christmas Tree Ornaments Pattern because it allows the finished piece to hang neatly without pulling the top section out of shape. Join yarn to the upper center of the tree, chain approximately 25 to 35 stitches, and slip stitch back into the same joining point. Adjust the number of chains depending on how long you want the ornament hanger to be.
For a stronger loop, slip stitch back across the chain before fastening off. This creates a rounded crocheted cord that is more substantial than a simple chain. Another option is to crochet the loop using two strands of yarn held together. A 3½ to 4½ inch finished loop generally provides enough space to hang the ornament comfortably from a Christmas tree branch.
The small pearl decorations provide beautiful contrast against deep green or red yarn. Arrange approximately five to eight pearls across the front of the tree before sewing them in place. Avoid positioning them directly along the outer edge because this can distort the scallops. Instead, place one bead near the upper portion and distribute the remaining pearls across the middle and lower branches.
Use strong thread to sew each pearl individually. Pass the needle through the crocheted fabric several times and knot the thread securely on the back. If the ornament will be used in a home with very young children or pets, consider replacing loose beads with embroidered French knots or small crocheted circles. This provides a similar decorative effect without removable embellishments.
To create the bow, cut a length of satin ribbon approximately 10 to 14 inches (25 to 35 cm) long. Tie it into a balanced bow and trim the tails diagonally. A ribbon approximately 1 inch to 1½ inches wide creates the full decorative appearance shown in this style of ornament. Red ribbon looks especially striking on a green crochet tree, while green ribbon creates a beautiful contrast against a red tree.
Position the bow at the bottom center of the tree and sew it securely through the knot. You can add one larger pearl or decorative bead underneath the bow for additional detail. Once the embellishments are attached, gently shape the crochet layers with your fingers. The finished Crochet Christmas Tree Ornaments Pattern should have a clear triangular silhouette, visible scalloped branches, dimensional overlapping layers, and a decorative Christmas finish.
Finishing Tips, Variations, and Christmas Decorating Ideas
Blocking can dramatically improve the appearance of a finished crochet ornament. Lightly dampen the crocheted tree, position it on a blocking surface, and gently arrange the branches into a symmetrical triangular shape. Pin only where necessary, particularly around the outer scallops. Allow the ornament to dry completely before attaching the ribbon if your ribbon material is sensitive to moisture.
If the ornament needs additional stiffness, use a light fabric stiffening method appropriate for your yarn. Cotton yarn generally responds especially well because it maintains crisp stitch definition after blocking. Avoid making the ornament excessively rigid. The goal is simply to help the tree maintain its shape while preserving the soft handmade appearance of crochet.
The pattern can easily become a matching Christmas set. Make several Crochet Christmas Tree Ornaments in forest green with red ribbons, then reverse the color combination and make red trees with green ribbons. Cream trees decorated with gold beads can create an elegant neutral collection, while white yarn with silver accents works beautifully for winter-inspired décor.
You can also transform this project into gift decorations. Instead of attaching the finished ornament directly to the Christmas tree, tie it around a wrapped package. The recipient receives both a decorated gift and a reusable handmade ornament. Smaller versions can also be attached to Christmas cards, gift bags, stockings, or holiday baskets.
For a rustic variation, replace the satin ribbon with gingham, linen-style ribbon, or natural jute. Wooden beads can replace pearls, and muted green yarn can give the ornament a farmhouse appearance. For a more glamorous version, combine deep emerald yarn with pearl or metallic embellishments. Small amounts of sparkling yarn can also be incorporated along the scalloped edges.
After completing the first tree, keep notes about your hook size, number of stitches, number of layers, and finished measurements. These notes make it much easier to reproduce matching ornaments. Because this Crochet Christmas Tree Ornaments Pattern is highly adaptable, the same construction method can produce miniature gift toppers, standard tree ornaments, larger window decorations, or even a garland made from several crocheted trees.
FAQ – Crochet Christmas Tree Ornaments Pattern
What yarn is best for Crochet Christmas Tree Ornaments?
Medium-weight cotton yarn is an excellent choice because it provides clear stitch definition and helps the ornament maintain its shape. Acrylic yarn also works well and is often available in a wider range of Christmas colors.
Can beginners make this Crochet Christmas Tree Ornaments Pattern?
Yes. The project primarily uses chains, slip stitches, single crochet, half double crochet, and double crochet. Beginners may want to practice the scalloped stitch sequence once before beginning the full ornament.
How large should the finished crochet Christmas tree be?
A practical tree ornament size is approximately 4½ to 6 inches tall before adding the hanging loop and bow. However, there is no required finished size because the pattern can easily be scaled.
How can I make a smaller ornament?
Use thinner yarn, a smaller crochet hook, and fewer stitches in each branch section. You can also make only three graduated layers instead of four.
How can I make the crochet tree larger?
Use thicker yarn and a larger hook or add additional branch layers. Continue increasing each layer gradually so the triangular Christmas tree shape remains balanced.
Why is my crochet ornament curling?
Curling usually happens when the tension is too tight or when there are not enough stitches around curved sections. Try using a slightly larger hook or adding one additional stitch to the widest area of each scallop.
Do I have to use pearls?
No. Pearls are decorative only. Buttons, embroidered knots, tiny crocheted circles, sequins, small pom-poms, or no embellishments at all can be used depending on the desired style.
Can I make the ornament without sewing separate layers?
Yes, an experienced crocheter can modify the design and crochet several tiers as one continuous piece. However, separate overlapping sections make it easier to achieve the strong dimensional appearance and are more forgiving for beginners.
Can these ornaments be washed?
If washable yarn and washable embellishments are used, gentle hand washing may be possible. Because ribbons and decorative beads can react differently to water, spot cleaning is usually the easiest method for maintaining a finished decorative ornament.
How many Crochet Christmas Tree Ornaments can I make from one skein of yarn?
Because each tree requires only a small amount of yarn, one standard skein can usually produce several ornaments. The exact number depends on yarn weight, ornament dimensions, hook size, and how many layers you include.
How do I keep the layers from becoming floppy?
Use a slightly smaller crochet hook, maintain firm tension, and secure the overlapping sections through the center. Gentle blocking can also help stabilize the finished shape.
What colors work well besides red and green?
Cream and gold, white and silver, burgundy and champagne, emerald and ivory, blush pink and white, navy and silver, or even multicolored scrap yarn can create beautiful variations of the Crochet Christmas Tree Ornaments Pattern.
Conclusion
The Crochet Christmas Tree Ornaments Pattern is a creative way to combine traditional Christmas colors with simple crochet techniques and elegant handmade details. Throughout this tutorial, you learned how to choose the appropriate yarn and hook, create graduated scalloped sections, build the layered Christmas tree silhouette, assemble the pieces, crochet a hanging loop, attach decorative pearls, and finish the ornament with a satin ribbon bow.
The most important part of the project is maintaining gradual increases between the tree layers. Starting with a small upper section and progressing toward wider lower sections produces the recognizable triangular tree shape. Combining single crochet, half double crochet, and double crochet stitches creates the rounded branch effect, while overlapping the pieces adds depth and gives the decoration its attractive three-dimensional appearance.
Once you understand the construction method, you can customize this pattern almost endlessly. Make traditional green and red ornaments, elegant neutral versions, miniature gift toppers, colorful scrap-yarn trees, or an entire handmade Christmas garland. Small changes in yarn thickness, hook size, bead placement, and ribbon style can make every tree unique while keeping the same basic Crochet Christmas Tree Ornaments Pattern.