
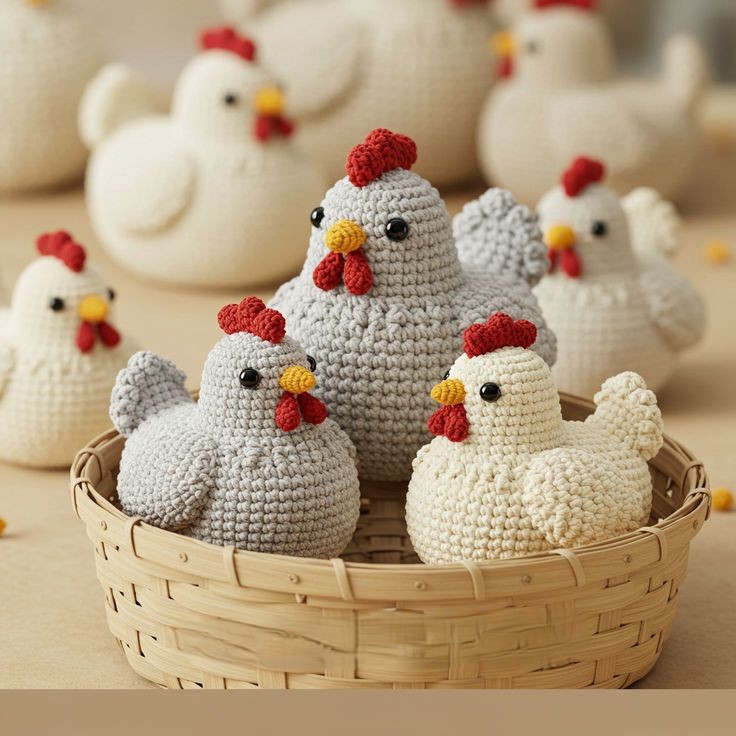
Overview & Inspiration
Welcome, fellow yarn enthusiasts! There is nothing quite like the pure joy of bringing a ball of yarn to life through the magical art of amigurumi.
Whether you are a beginner taking your first steps into toy-making or an experienced artisan looking for a quick and rewarding project, this charming little chicken is guaranteed to bring a smile to your face.
Materials & Supplies Needed
- Yarn: Lightweight or medium weight cotton yarn (or premium acrylic blends) in light yellow, white, orange, and red.
- Hook Size: 2.5 mm to 3.5 mm crochet hook (typically one size smaller than recommended on the yarn label for tight, neat stitches).
- Stuffing: Polyester fiberfill (hypoallergenic and lightweight).
- Safety Eyes: 6 mm to 10 mm plastic safety eyes (or black embroidery floss for an embroidered alternative).
- Tools: Tapestry/yarn needle for sewing pieces together, stitch markers for tracking continuous rounds, and small embroidery scissors.
Stitches & Abbreviations
- sc: Single crochet
- inc: Single crochet increase (work 2 sc in the same stitch)
- dec: Single crochet invisible decrease (join two stitches into one invisibly)
- sl st: Slip stitch
- st/sts: Stitch or stitches
- MR: Magic ring (adjustable loop)
Step-by-Step Pattern Instructions
Body (Working in Continuous Rounds)
Begin with your main body color (yellow or white).
- Round 1: Start 6 sc in a magic ring [6 sts]
- Round 2: Work 2 sc in each st around [12 sts]
- Round 3: (1 sc, inc) repeat 6 times [18 sts]
- Round 4: (2 sc, inc) repeat 6 times [24 sts]
- Round 5: (3 sc, inc) repeat 6 times [30 sts]
- Rounds 6-12: sc in each st around [30 sts]
- Round 13: (3 sc, dec) repeat 6 times [24 sts]
- Round 14: (2 sc, dec) repeat 6 times [18 sts]. Begin adding polyester fiberfill firmly, shaping as you go.
- Round 15: (1 sc, dec) repeat 6 times [12 sts]
- Round 16: Dec 6 times [6 sts]. Fasten off, leaving a tail to close the remaining hole.
Wings (Make 2)
Using your main body color:
- Round 1: Start 6 sc in a magic ring [6 sts]
- Round 2: (1 sc, inc) repeat 3 times [9 sts]
- Rounds 3-4: sc in each st around [9 sts]
- Fasten off, leaving a long tail for sewing. Leave wings flat or lightly stuff.
Beak
Using orange yarn:
- Round 1: 4 sc in a magic ring [4 sts]
- Round 2: (1 sc, inc) repeat 2 times [6 sts]
- Fasten off, leaving a tail for attaching to the face.
Comb
Using red yarn:
- Chain 6. Starting in the second chain from the hook, work (sl st, hdc, dc) in the first st, skip 1 st, and repeat across to create small scallops.
- Fasten off and leave a tail for sewing to the top of the head.
Assembly & Finishing Touches
Position the safety eyes securely between Rounds 8 and 9 of the body, leaving about 5 stitches between them. If making this for a baby, embroider sleepy or bright eyes using black embroidery floss instead.
Sew the orange beak right centered between the eyes. Attach the red comb firmly to the top crown of the head using whip stitches.
Pin the wings symmetrically to the left and right sides of the body before sewing them down securely with your yarn needle. Weave in all remaining yarn tails neatly inside the body.
Pro Tips for Flawless Results
- Maintain a firm and consistent tension throughout your project to prevent the polyester stuffing from peeking through your stitches.
- Always use a stitch marker at the start of your continuous rounds so you never lose track of your progress.
- Add your polyester fiberfill in small, gradual pinches to ensure smooth, lump-free shaping.
- Choose 100% cotton yarn for crisp stitch definition and long-lasting durability.
Frequently Asked Questions
Can I use acrylic yarn instead of cotton?
Yes, absolutely! Premium acrylic yarn works wonderfully and gives your amigurumi chicken a softer, fuzzier texture.
What is the easiest way to prevent gaps when decreasing?
We recommend using the invisible decrease (inv-dec) method, which works by only picking up the front loops of the next two stitches.
Are these chickens safe for young babies?
To make this toy completely baby-safe, omit the plastic safety eyes and embroider the facial features by hand using durable cotton floss.
Watch the Full Step-by-Step Video Tutorial
Prefer visual guidance? Follow along with the complete video tutorial below at your own pace: