
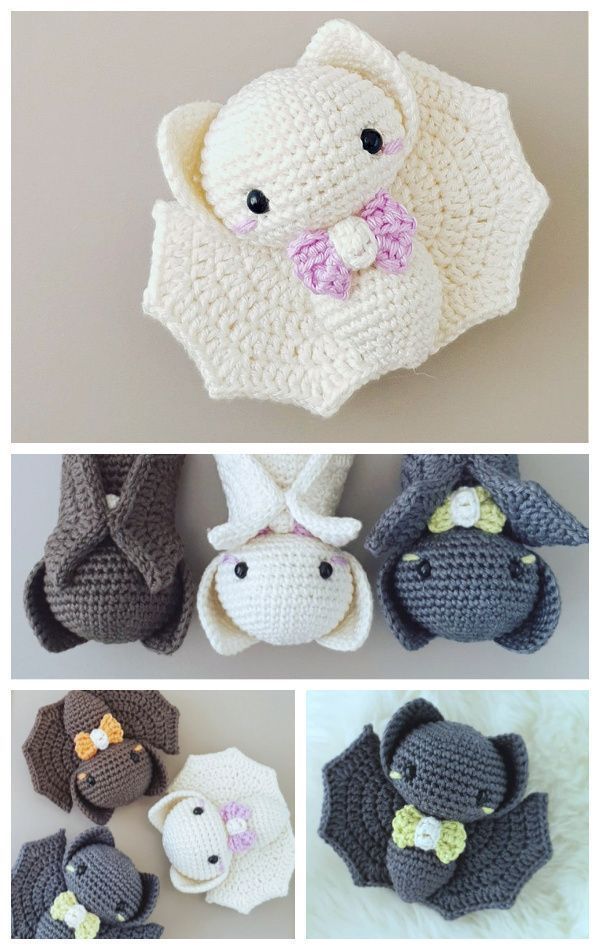
Overview & Inspiration
Welcome, fellow yarn lovers! There is something truly magical about transforming a simple ball of yarn into a sweet, cuddly little creature, and our newest design is no exception.
This beginner-friendly baby bat combines adorable amigurumi shaping with timeless crochet fundamentals, making it a wonderful quick-make for baby showers, seasonal nursery decor, or handmade gifts.
Materials & Supplies Needed
- Yarn: Sport weight or DK yarn in main bat color (approx. 50g) and accent color for inner wings (approx. 10g)
- Fiber content: 100% Cotton or soft acrylic blend for a durable, washable finish
- Crochet Hook: 2.5mm (US C/2 or B/1) to ensure tight stitches with no stuffing gaps
- Notions: Tapestry needle for weaving ends, stitch markers to track rounds, and sharp embroidery scissors
- Stuffing: Lightweight polyester fiberfill for gentle, even shaping
- Embroidery floss: Black and white for safe, baby-friendly facial features
Stitches & Abbreviations
- MR: Magic Ring
- ch: Chain
- sc: Single Crochet
- inc: Single Crochet Increase (work 2 sc in the same stitch)
- dec: Invisible Decrease (sc 2 stitches together in the front loops)
- sl st: Slip Stitch
- st(s): Stitch(es)
- FO: Fasten Off
Step-by-Step Pattern Instructions
Head & Body (Worked in Continuous Rounds)
Begin with your main yarn color to create the adorable rounded head and seamless body structure.
- Rnd 1: Start 6 sc in a MR [6 sts]
- Rnd 2: [inc] around [12 sts]
- Rnd 3: [sc 1, inc] around [18 sts]
- Rnd 4: [sc 2, inc] around [24 sts]
- Rnds 5-8: sc in each st around [24 sts]
- Rnd 9: [sc 2, dec] around [18 sts]
- Rnd 10: [sc 1, dec] around [12 sts]. Stuff the head firmly here.
- Rnd 11: [inc] around to transition into the body [24 sts]
- Rnds 12-15: sc in each st around [24 sts]
- Rnd 16: [sc 2, dec] around [18 sts]
- Rnd 17: [sc 1, dec] around [12 sts]. Stuff the body firmly and evenly.
- Rnd 18: [dec] around [6 sts]. FO, leaving a long tail to close the gap.
Ears (Make 2)
Using your main yarn color, let’s craft the bat’s iconic pointed ears.
- Rnd 1: Start 4 sc in a MR [4 sts]
- Rnd 2: [sc 1, inc] around [6 sts]
- Rnd 3: [sc 2, inc] around [8 sts]
- Rnd 4: sc in each st around [8 sts]. FO, leaving a tail for sewing.
Wings (Make 2)
Create the cute, simplified bat wings to give your little creation personality.
- ch 9
- Row 1: sc in 2nd ch from hook, sc across, turn [8 sts]
- Row 2: ch 1, sc in first 6 sts, leave remaining sts unworked, turn [6 sts]
- Row 3: ch 1, sc across [6 sts]
- Row 4: ch 1, sc in first 4 sts, turn [4 sts]
- Row 5: ch 1, sc across [4 sts]. FO, leaving a long tail to attach to the body.
Assembly & Finishing Touches
Thread your tapestry needle with the remaining tail from the body closure hole and weave through the front loops of Rnd 18, pulling tightly to seal the base completely.
Position the ears securely at the top of the head across Rnds 2 through 5, pinning them in place before whipstitching them down neatly.
Attach the wings to the back of the body, making sure they are symmetrical, and embroider sweet sleepy eyes and a tiny nose using your black embroidery floss.
Pro Tips for Flawless Results
- Maintain a firm and even tension throughout your rounds so that the fiberfill stuffing never peeks through your stitches.
- Always use a stitch marker at the start of every continuous round to keep your stitch counts accurate without second-guessing.
- Embroider all facial features rather than using plastic safety eyes if this precious bat is intended for an infant or toddler.
Frequently Asked Questions
What skill level is required for this tutorial?
This project is wonderfully suited for adventurous beginners who are comfortable working in continuous rounds and basic amigurumi increases and decreases.
What type of yarn works best for amigurumi bats?
Smooth 100% cotton or a soft cotton-acrylic blend yields the cleanest stitch definition and holds its shape beautifully over time.
Can I sell the finished bats I make from this pattern?
Yes, absolutely! You are welcome to sell finished items made from this tutorial, provided you credit the designer and use your own original photos.
Watch the Full Step-by-Step Video Tutorial
Prefer visual guidance? Follow along with the complete video tutorial below at your own pace: