
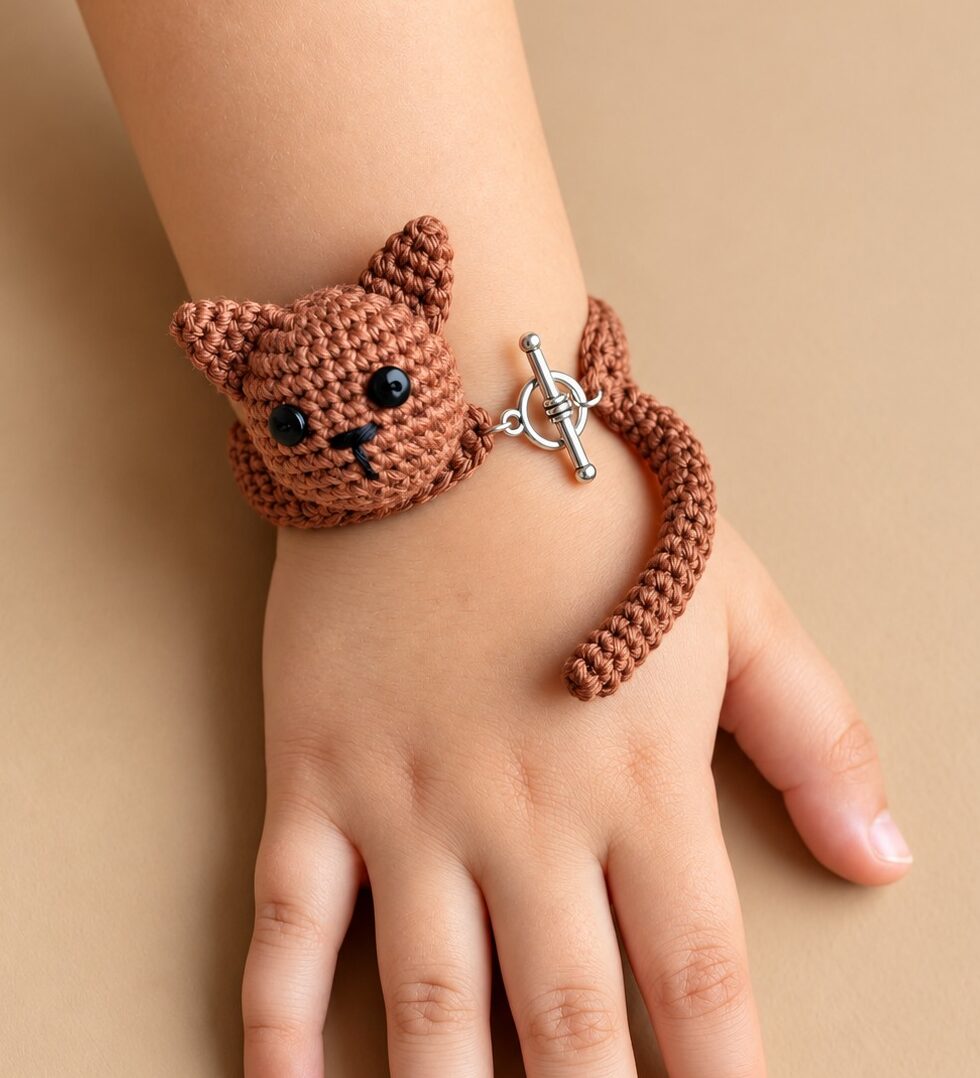
Hello, my dearest crochet family! I’m absolutely purr-leased to share a project today that’s sure to capture your heart and ignite your hooks. We’re diving into the enchanting world of miniature amigurumi with our latest delight: the “Crochet Cat Bracelet Amigurumi Pattern.” Prepare to fall in love with a tiny feline friend that wants to adorn your wrist!
This charming design isn’t just another pretty face; it’s a delightful handmade accessory that beautifully merges the charm of a miniature crocheted kitten with the practicality of a wearable bracelet. Imagine bringing a touch of whimsical personality to your everyday style, crafted entirely by your own loving hands. It’s an adorable, functional, and deeply satisfying project that perfectly marries form and feline fun!
Overview & Design Inspiration
The Crochet Cat Bracelet Amigurumi Pattern is a testament to the magic of tiny stitches, transforming simple yarn into a beloved companion. This design features a sweet, miniature cat face, complete with perky pointed ears, an adjustable crocheted band, and an absolutely irresistible playful curled tail. It’s an accessory that truly brings personality and a sprinkle of joy to your wrist!
What makes this project so utterly captivating is its universal appeal, especially to us devoted cat lovers and anyone who adores handmade jewelry. While the finished bracelet radiates an intricate charm, its construction relies on familiar amigurumi crochet techniques. This makes it a wonderful journey for both patient beginners and experienced crafters alike, promising a satisfying outcome with every stitch.
Materials & Recommended Supplies
To embark on this delightful cat bracelet adventure, gathering the right materials is your first step towards purr-fection:
- **Yarn:** Smooth cotton yarn in a light or fine weight, such as sport weight or fingering weight. This ensures excellent stitch definition for those adorable miniature details.
- **Colors:** A warm caramel, cinnamon, or chocolate-brown for a classic kitten look. Experiment with soft gray for realism, or cream, white, black, and pastels for playful variations!
- **Crochet Hook:** A small hook, approximately 2.0 mm to 2.5 mm, chosen to match your yarn and achieve firm, dense stitches.
- **Yarn Needle:** Essential for weaving in ends and assembling your amigurumi components neatly.
- **Stitch Markers:** Invaluable for keeping track of your rounds, especially in continuous amigurumi work.
- **Embroidery Scissors:** For precise snips on your delicate yarn.
- **Polyester Fiberfill:** A small amount to gently stuff your kitten’s head, giving it a soft, rounded shape.
- **Black Embroidery Thread:** For creating charming, soft facial details like tiny eyes, a nose, and a sweet mouth.
- **Optional:** A small toggle clasp with appropriate attachment rings if you prefer a jewelry-style closure.
Essential Techniques & Stitch Highlights
This project is a fantastic opportunity to hone your fundamental amigurumi skills, creating a sturdy yet charming accessory. You’ll primarily be working in continuous rounds, which is key to achieving that seamless, polished amigurumi look we all adore.
The magic ring (MR) kicks off the cat’s head, providing a perfectly tight and closed starting point—no gaps here! You’ll master single crochet (sc) stitches, the workhorse of amigurumi, forming the dense fabric needed for firm shaping. Increases (inc) will gently expand the head, creating its lovely rounded form, while invisible decreases (dec) ensure a beautifully smooth and undetectable reduction in stitches, maintaining that flawless finish.
Creating those darling pointed ears involves careful shaping, while joining small crochet components brings the whole bracelet together. Mastering consistent tension is paramount for this miniature project; it ensures symmetrical features, a firm fabric that keeps stuffing hidden, and a professional overall appearance. Each technique contributes to the sweet character of your finished cat bracelet!
Construction & Assembly Highlights
Crafting your cat bracelet is a joyful process of bringing small, charming components to life. You’ll begin with the most recognizable feature: the adorable cat head. This is fashioned using a series of gradual increases in continuous rounds, creating a beautifully rounded amigurumi shape that forms the face of your tiny feline.
Once the head takes shape, you’ll work specific rounds of single crochet to give it depth, ready for a whisper of fiberfill. Next, those iconic pointed ears are carefully crocheted and shaped, giving our little kitty its distinct personality. Facial features, whether embroidered with soft thread or using securely attached safety eyes (with safety considerations for different wearers), bring the kitten to life.
The bracelet’s comfortable band is then crocheted, designed to wrap snugly around the wrist. Finally, a small, playfully curled tail is added, providing an extra touch of dimension and cuteness to the accessory. All these components are crafted separately and then thoughtfully assembled, allowing for precise placement and a clean, polished finish that truly makes your handmade cat shine!
Customization & Styling Ideas
The beauty of the Crochet Cat Bracelet Amigurumi Pattern lies in its incredible versatility, inviting you to infuse your own unique style!
- **Color Play:** Go classic with warm brown tones for a traditional kitten, opt for soft grays for a realistic tabby, or let your imagination soar with cream, white, black, or cheerful pastel shades for a playful, fantastical feline!
- **Facial Expressions:** Experiment with different embroidery styles for eyes, noses, and mouths to create unique expressions. Remember, embroidered features are generally safest for children’s accessories.
- **Ear Shapes:** While pointed ears are charming, you could try slightly rounded ears for a different breed-inspired look.
- **Closure Choices:** Beyond the integrated crocheted band, consider adding a tiny button and loop, or a decorative toggle clasp for a more refined, jewelry-like finish.
- **Personal Touches:** Adorn your cat with a tiny bow, a delicate bead collar, or even embroider a small initial on its band for a truly personalized gift.
- **Beyond the Wrist:** While designed as a bracelet, this little kitty can also be transformed into a bag charm, a cute keychain, or even a mini ornament!
Pro Tips for Flawless Results
- **Consistent Tension is Key:** Maintain an even tension throughout your crocheting, especially when forming the head and ears. This ensures symmetrical features and a firm fabric that prevents stuffing from showing through.
- **Choose the Right Hook:** If your stitches appear loose, try a slightly smaller hook. If the fabric is too stiff, go up a size. The goal is a dense, yet pliable, amigurumi fabric.
- **Master Invisible Decreases:** These are your secret weapon for seamless amigurumi. Taking care with each decrease will result in a beautifully smooth surface on your cat’s head.
- **Stuffing Savvy:** Stuff your cat’s head firmly enough to hold its shape, but not so tightly that the stitches stretch or the stuffing pushes through. Less is often more with miniature amigurumi!
- **Secure Facial Features:** For embroidered eyes, use several small stitches to create definition. If using safety eyes, ensure they are clicked securely into place and consider them for adult wearers only.
Frequently Asked Questions
Is this pattern suitable for beginners?
Absolutely! While the finished piece looks intricate, the fundamental techniques like single crochet, increases, and decreases are very beginner-friendly. If you have a basic understanding of these stitches and a bit of patience, you’ll be purr-fectly fine. Experienced crocheters will also enjoy the delightful process and opportunity for customization!
What type of yarn works best for this project?
Smooth cotton yarn in a sport or fingering weight is highly recommended. Cotton provides excellent stitch definition, which is crucial for miniature amigurumi projects, and creates a durable, washable accessory. Avoid fuzzy yarns as they can obscure those adorable tiny details!
How do I ensure the bracelet fits comfortably?
Before you begin crocheting the band, measure the wrist of the intended wearer. Remember to account for the width of the crocheted cat head and any clasp you might use when determining the total length of your crocheted band. A small gauge swatch can also help you ensure your stitches will produce the correct size.
Watch the Full Step-by-Step Video Tutorial
Prefer visual guidance? Follow along with the complete video tutorial below at your own pace: