
Overview & Design Inspiration
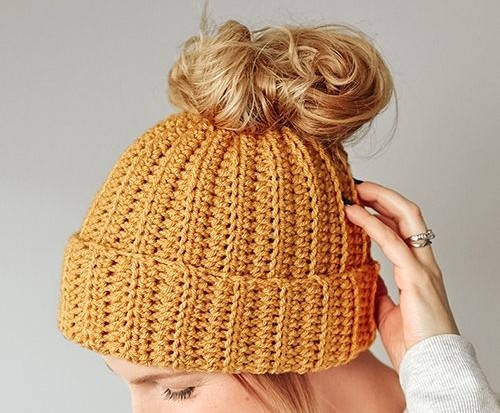
Welcome back to the studio, my fellow yarn lovers! There is nothing quite like the cozy embrace of a handmade accessory when the crisp autumn air rolls in, and this season, we are solving the ultimate cold-weather style dilemma. Meet the Crochet Easy Breezy Chunky Bun Beanie Pattern—a clever, functional, and deeply stylish piece designed specifically for those of us who live in messy buns and high ponytails.
Traditional beanies have a habit of flattening our hair or forcing us to choose between freezing ears and a ruined hairstyle. This design changes the game completely by leaving a neat, comfortable opening at the top crown. Working up in a flash thanks to thick, luxurious yarn, it is a glorious weekend project that brings instant gratification and effortless everyday style.
Materials & Recommended Supplies
Gathering your supplies is half the fun, and this project calls for cozy textures that make your hands happy from the very first stitch. Here is everything you need to pull from your stash or pick up on your next yarn run:
- Yarn: Bulky or chunky weight yarn (wool blends or soft acrylics work wonders for warmth and bounce).
- Crochet Hook: 6.5 mm, 7 mm, or 8 mm hook, depending on your personal tension and how drape-y you want your fabric.
- Notions: Yarn needle for weaving in ends, sharp scissors, stitch markers, and a flexible measuring tape.
Essential Techniques & Stitch Highlights
This pattern is a wonderful playground for mastering versatile stitches that elevate your crochet repertoire. Working primarily in USA crochet terms, you will combine foundational stitches like the half double crochet (HDC) and single crochet (SC) with more expressive techniques.
Working in the back loop only (BLO) creates a gorgeous, flexible ribbing that hugs the head securely without feeling restrictive. Meanwhile, alternating front post double crochet (FPDC) stitches introduces a stunning, raised textural element that catches the eye and gives your handmade accessory that sought-after boutique finish.
Construction & Assembly Highlights
One of the most exciting aspects of this project is its unique top-down construction method. Instead of starting at the brim, you begin right around the clever bun opening, establishing a sturdy ring that secures your hairstyle in place.
From there, gentle increase rounds widen the crown to fit the natural curve of the head before transitioning seamlessly into the body. By alternating between flexible rows and rich, textured rounds, the beanie builds its shape organically until you finish off with a firm, polished lower brim.
Customization & Styling Ideas
Handmade items are pure expressions of your personal style, and this versatile pattern is begging for your creative touch! You can easily play with color blocking, gorgeous variegated yarns, or subtle stripes to match your favorite winter coat.
If you are crafting for family and friends, the sizing is wonderfully adaptable—simply adjust the starting chain and crown increases to fit toddlers, children, or extra-cozy adult fits. It makes a phenomenal holiday gift that recipients will actually reach for every single day.
Pro Tips for Flawless Results
- Watch Your Tension: Chunky yarn can sometimes feel heavy; keep your stitches even so the textured rounds pop without becoming overly stiff.
- Check the Crown: Measure the opening against your favorite hair tie or ponytail holder early on to ensure a comfortable, custom fit.
- Weave with Care: Take your time weaving in your yarn tails on the inside of the beanie for that ultimate professional touch.
Frequently Asked Questions
Is this pattern beginner-friendly?
Absolutely! Because it relies on foundational stitches like chains, slip stitches, and half double crochets, adventurous beginners can easily tackle this project with confidence.
Can I use worsted weight yarn instead?
You can, but your beanie will turn out much thinner and smaller. If you want to use worsted weight, try holding two strands together or adjusting your hook size and adding extra increase rounds.
How can I make the bun opening larger or smaller?
It is as simple as adjusting your starting chain! Add a few more chains if you have thick, voluminous hair, or subtract a few if you prefer a snugger opening for a sleek ponytail.
Watch the Full Step-by-Step Video Tutorial
Prefer visual guidance? Follow along with the complete video tutorial below at your own pace: