
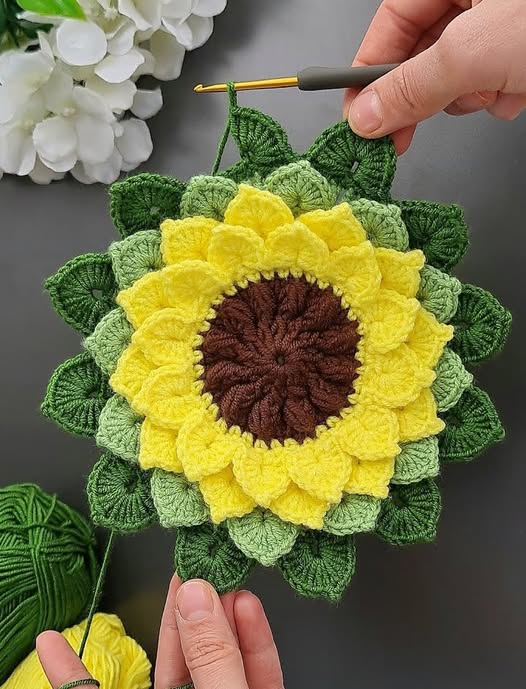
Overview & Inspiration
Hello, my wonderful crochet family! Welcome back to the blog where we celebrate all things cozy, handmade, and filled with joy. Today, I am beyond thrilled to guide you through one of my absolute favorite designs: the stunning 3D crochet sunflower pattern.
There is something magical about transforming simple strands of yarn into a vibrant, blooming masterpiece. Unlike flat motifs, this 3D design uses clever layering and strategic stitch placement to create lush, sculpted petals and a wonderfully textured center that practically begs to be touched.
Materials & Supplies Needed
- Medium-weight (Worsted Weight / Category 4) yarn in sunshine yellow, rich chocolate brown, and leafy green
- Fibers: 100% acrylic or cotton blend for great stitch definition
- Crochet hook: 4.0 mm (US size G/6) to maintain a nice, firm structure
- Tapestry needle for weaving in ends
- Stitch markers
- Sharp embroidery scissors
- Optional: Small amount of polyester fiberfill if you prefer a pillowed, stuffed center
Stitches & Abbreviations
- ch: chain
- sl st: slip stitch
- sc: single crochet
- hdc: half double crochet
- dc: double crochet
- tr: treble crochet
- blo: back loop only
- flo: front loop only
- st(s): stitch(es)
- rnd(s): round(s)
Step-by-Step Pattern Instructions
Let’s dive right into creating our gorgeous 3D sunflower! Grab your brown yarn, and let’s start with the textured center.
Round 1: Using brown yarn, make a magic ring, ch 1, work 8 sc into the ring. Join with a sl st to the first sc. [8 sts]
Round 2: Ch 1, work 2 sc in each st around. Join with a sl st. [16 sts]
Round 3: Ch 1, [1 sc in next st, 2 sc in next st] repeat around. Join with a sl st. [24 sts]
Round 4: Working in the blo for this round only, ch 1, work 1 sc in each st around. Join with a sl st, fasten off brown yarn. [24 sts]
Round 5 (Petal Base): Join yellow yarn to any unworked front loop from Round 3. Ch 3 (counts as first dc), work 1 dc in the same loop, *2 dc in next flo* repeat around. Join with a sl st to top of starting ch-3. [48 sts]
Round 6 (Shaping the Petals): *Ch 4, work 1 tr, 1 dc, and 1 hdc in the 2nd ch from hook and down the chain, skip next st, sl st in next st* repeat around to form all 3D petals. Join with a sl st, fasten off, and weave in all ends securely.
Assembly & Finishing Touches
Once your sunflower motif is completely crocheted, take a moment to admire your gorgeous work! Use your tapestry needle to weave in any remaining yarn tails securely on the wrong side of the flower.
To achieve that signature lifelike dimension, gently finger-press the petals outward so they lift away from the textured brown center. If needed, lightly steam block your finished sunflower to crisp up the petal curves and ensure a perfectly balanced, professional finish.
Pro Tips for Flawless Results
- Maintain consistent yarn tension throughout your rounds so that your petals curve uniformly without buckling.
- Use a hook size slightly smaller than recommended on your yarn label to keep the 3D center dense and well-structured.
- Block your finished motifs before joining them to other projects to guarantee a neat, professional look.
Frequently Asked Questions
What skill level is required for this 3D crochet sunflower pattern?
This pattern is wonderful for adventurous beginners who are comfortable with basic stitches like single and double crochet, while offering plenty of textural joy for advanced makers!
Can I resize this sunflower pattern for different projects?
Absolutely! You can easily make smaller sunflowers by using sport-weight yarn and a smaller hook, or create oversized statement pieces by using bulky yarn and a larger hook.
Is this pattern durable enough for home decor items like pillows and rugs?
Yes, when worked in a sturdy acrylic or cotton yarn with firm tension, these dimensional sunflowers hold their shape beautifully and withstand regular daily use.
Watch the Full Step-by-Step Video Tutorial
Prefer visual guidance? Follow along with the complete video tutorial below at your own pace: