
Overview & Design Inspiration
Welcome, my wonderful crafty friends! If you have been dreaming of adding a cozy, handmade touch to your floors, our latest project—the Crochet Oval Rug Base for Beginners Tutorial—is the absolute best place to start. There is something profoundly satisfying about turning simple strands of yarn into a functional, gorgeous piece of home decor.
When beginners dive straight into overly complex patterns, frustration often takes over and dampens the joy of making. That is why this project focuses entirely on clarity, patience, and solid structural foundations, ensuring you master the art of a flat, beautifully balanced oval right from your very first try!
Materials & Recommended Supplies
Gathering your supplies is half the fun, and for a sturdy rug, you want materials that can handle a little everyday love. Here is everything you need to bring your rug base to life:
- Yarn: Sturdy fibers like bulky cotton yarn or upcycled t-shirt yarn are ideal because they provide incredible durability and structure.
- Crochet Hook: Match your yarn weight, but many makers prefer a slightly smaller hook size (such as 8mm to 10mm US M/N or L/11) to create wonderfully tight, compact stitches.
- Stitch Markers: Essential tools for tracking your increase points at the curved ends and preventing counting errors.
- Tapestry Needle & Scissors: Perfect for weaving in your ends securely and giving your finished piece a polished, professional look.
Essential Techniques & Stitch Highlights
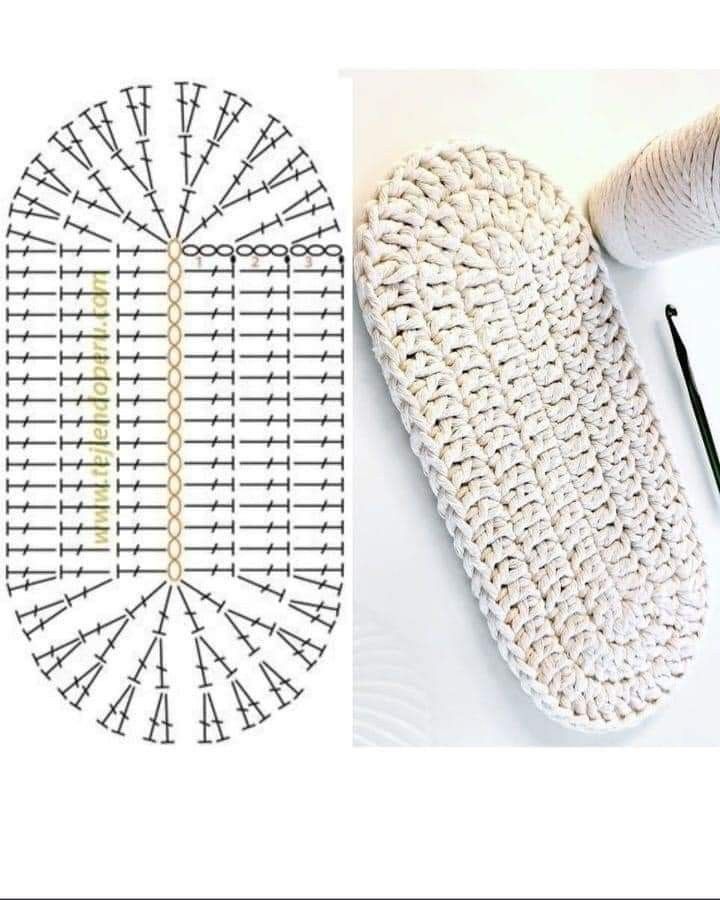
Mastering an oval rug base is all about understanding how stitches grow and where increases live. Unlike circular projects where increases are scattered evenly, an oval rug concentrates its increases at the two curved ends of a foundation chain.
By working along both sides of your initial chain and mirroring your increases at each turn, you create a naturally symmetrical shape. Keeping a steady, even tension throughout these rounds is your secret weapon for ensuring your rug lays completely flat without any frustrating curling or rippling.
Construction & Assembly Highlights
The journey begins with a manageable foundation chain that sets the overall length of your beautiful rug. From there, you will work single crochet stitches down the first side, gracefully building up your first straight edge.
When you reach the end of the chain, you will place multiple stitches into that final space to form a smooth, rounded curve. Rotating your work to travel back down the opposite side completes the foundation loop, allowing you to build up subsequent rounds by adding careful, balanced increases exclusively at the curved ends.
Customization & Styling Ideas
Once you have conquered the basic oval rug base, an entire world of creative possibilities opens up right before your eyes! You can easily adjust your initial chain length to create everything from a tiny accent mat to a grand hallway runner.
Switching up your yarn colors can completely transform the aesthetic to match a cozy nursery, a sleek modern bathroom, or a welcoming kitchen entryway. It also makes for a deeply thoughtful, personalized housewarming gift that your loved ones will cherish for years.
Pro Tips for Flawless Results
- Check for flatness: Frequently lay your work down on a flat surface during your crochet session to catch any early signs of curling or ruffling.
- Embrace stitch markers: Always mark your first and last increase stitches at the curved ends to keep your rounds perfectly symmetrical and stress-free.
- Straighten your chain: Double-check that your very first foundation chain has no twists before working your very first row of stitches into it.
- Maintain steady tension: A relaxed hand and consistent rhythm will give your rug neat, uniform stitches that look exceptionally professional.
Frequently Asked Questions
What is the best yarn for an oval rug base?
Cotton yarn and t-shirt yarn are the absolute gold standard for rugs because they offer wonderful durability, excellent weight, and are easily washable for everyday home use.
How do I keep my oval rug from curling or rippling?
Curling usually means you need a few more increases at the curved ends, while rippling means you have added too many. Adjusting your increase count at the turns will quickly coax your rug into laying completely flat!
Can a total beginner really make a crochet rug?
Yes, absolutely! By starting with a manageable chain length, using stitch markers, and focusing on even tension, even a brand-new crocheter can create a stunning and professional rug base.
Watch the Full Step-by-Step Video Tutorial
Prefer visual guidance? Follow along with the complete video tutorial below at your own pace: