
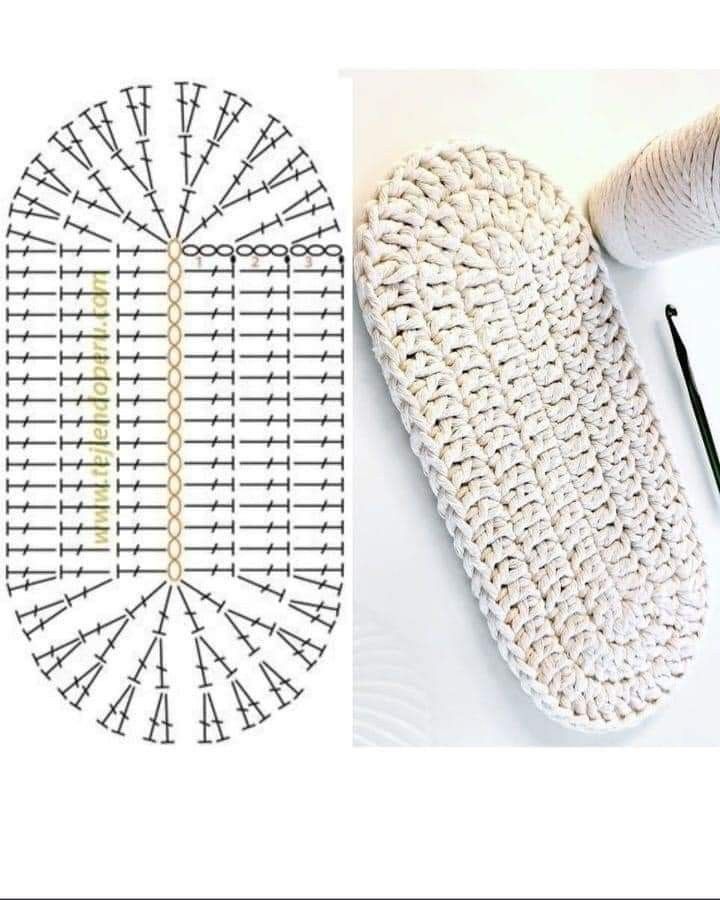
Overview & Inspiration
Welcome to the ultimate guide for creating a stunning, durable handmade rug completely from scratch! If you are a beginner looking for a project that combines absolute simplicity with impressively professional results, learning how to master an oval rug base is a wonderful choice.
This comprehensive tutorial is designed to walk you step-by-step through the process while unlocking the essential techniques behind a strong, well-shaped foundation. By focusing on clarity, patience, and structural balance, you will build an oval shape that lays completely flat without the frustration of curling or ruffling.
Materials & Supplies Needed
- Yarn: Sturdy cotton yarn or t-shirt yarn (Bulky/Super Bulky weight recommended) in your choice of colors.
- Crochet Hook: 9.0 mm (US M/N/13) or a hook size slightly smaller than recommended on the yarn label to create tight, durable stitches.
- Stitch Markers: Essential for tracking your increase points at the curved ends.
- Tapestry Needle: Used for weaving in ends neatly and securely.
- Scissors: For cleanly cutting your yarn.
- Flat Surface: A clear table or floor space to regularly check that your rug base lies flat.
Stitches & Abbreviations
- ch: Chain
- sc: Single crochet
- inc: Increase (work 2 sc in the same stitch)
- sl st: Slip stitch
- st(id): Stitch
Step-by-Step Pattern Instructions
To begin your foundation, chain 21 stitches. This manageable length helps you focus on technique and accurate stitch counting.
Round 1: Work 1 sc in the second ch from the hook. Place 1 sc in each ch across until you reach the final chain. In the last chain, work 3 sc in the same stitch to form the first rounded end. Rotate your work slightly and crochet along the opposite side of the foundation chain, placing 1 sc in each stitch back toward the start. In the very first chain where you began, place 2 additional sc in the same space to complete the second rounded end. Join with a sl st to the first st.
Round 2: For the next round, continue placing 1 stitch in each regular stitch and increase by placing 2 sc (inc) in each of the designated increase stitches from the previous round, keeping your increases strictly focused at the curved ends to maintain a smooth, symmetrical oval.
Assembly & Finishing Touches
Once your final round is complete, fasten off your yarn, leaving a generous tail for weaving. Thread your tapestry needle and carefully weave the tail back and forth through the sturdy stitches on the wrong side of the rug to secure it invisibly.
Lay your finished oval base on a flat surface to inspect its shape. If any edges feel slightly stiff or misaligned, gently stretch and pat the rug into a smooth, balanced oval shape to set the sturdy fibers in place.
Pro Tips for Flawless Results
- Maintain Even Tension: A relaxed hand grip and steady rhythm prevent your rug from curling upward like a bowl or rippling into waves.
- Use Stitch Markers Generously: Always mark the first and last increase stitches at both curved ends to completely eliminate counting errors.
- Double-Check Your Foundation Chain: Always inspect your initial chain before working into it to ensure it hasn’t twisted, which ruins the structural symmetry of the rug.
Frequently Asked Questions
What is the best yarn for an oval rug base?
Cotton yarn and t-shirt yarn are absolute favorites because they are durable, washable, and provide the thick structure needed for high-traffic floor accents.
How do I keep my oval rug flat?
Ensure that increases are placed correctly and symmetrically at both curved ends. If the rug curls upward, add an extra increase; if it ripples, reduce your increases.
Can absolute beginners really make a crochet rug?
Yes, absolutely! By starting with a manageable chain length and following clear increase points, beginners can achieve a polished, professional rug on their very first try.
Watch the Full Step-by-Step Video Tutorial
Prefer visual guidance? Follow along with the complete video tutorial below at your own pace: