
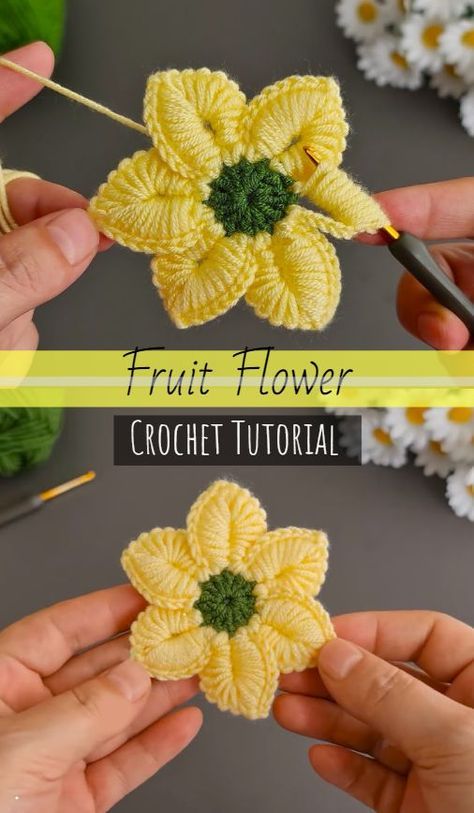
Overview & Inspiration
Welcome, fellow makers! If you love bringing a splash of vibrant joy to your handmade projects, you are going to fall head over heels for the Crochet Fruit Flower Pattern. This delightful design blends the classic beauty of floral symmetry with the playful, juicy charm of your favorite fruits.
Whether you are embellishing a cozy blanket, crafting a quick bag charm, or exploring creative surface embroidery, this versatile pattern adapts beautifully to your crafting style. Grab your hook, pick out some cheerful yarn colors, and let us dive into this creative adventure together!
Materials & Supplies Needed
- DK or worsted weight cotton yarn (recommended for crisp stitch definition) in fruit-inspired colors: red, pink, yellow, orange, green, and black
- Crochet hook: 4.0 mm (US size G/6)
- Tapestry needle for weaving in ends
- Stitch markers to keep track of your rounds and petal placement
- Sharp embroidery scissors
- Optional: Small amount of polyester fiberfill for padded dimensional designs
Stitches & Abbreviations
- ch: chain
- sl st: slip stitch
- sc: single crochet
- hdc: half double crochet
- dc: double crochet
- tr: treble crochet
- st(s): stitch(es)
- MR: magic ring
- yo: yarn over
Step-by-Step Pattern Instructions
We will start from the center core and work our way outward, building texture and petals as we go.
Round 1: The Fruit Core
Using your first main color (such as pink for watermelon or yellow for lemon), create a MR. Work 6 sc into the ring. Pull the tail tight to close the center neatly, and join with a sl st to the first sc. [6 sts]
Round 2: Seeds and Expansion
Ch 1, work 2 sc in each st around to expand the circle. If desired, incorporate small seed-like stitches or bobbles here. Join with a sl st to the first sc. [12 sts]
Round 3: The Petal Base
Ch 1, work [1 sc, 1 hdc] in the first st, [1 hdc, 1 dc] in the next st, repeating this balanced increase sequence around to prepare for petal heights. Join with a sl st. [24 sts]
Round 4: Forming the Fruit Petals
To create the petals, ch 3, work [2 dc, 1 tr, 2 dc] into the same base stitch, then ch 3 and sl st into the next base st to anchor the petal. Repeat this sequence around to form evenly spaced petals. [6 petals]
Round 5: The Outer Fruit Rind
Introduce a contrasting color (such as green for fruit skin). Working evenly around the edge of the petals, sc in each st across, placing an extra sc at petal peaks for a smooth transition. Fasten off and secure your yarn. [Approx. 48 sts]
Assembly & Finishing Touches
Use your tapestry needle to weave in all loose yarn tails securely on the back side of your motif. If you are attaching your motif to high-use items like bags or garments, secure it with whip stitches along the outer edge.
To achieve a truly polished look, lightly mist your finished fruit flower with water and pin it to a blocking mat. Allow it to dry completely so that every petal opens up with crisp, professional definition.
Pro Tips for Flawless Results
- Maintain consistent yarn tension throughout your petal rounds to prevent cupping or ruffling.
- Change colors at the final yarn-over of a stitch to ensure clean, invisible color transitions.
- Use stitch markers to map out your petal starting points before you begin crocheting the height stitches.
- Choose 100% cotton yarn to give your fruit flowers a firm, durable structure that holds its shape over time.
Frequently Asked Questions
What skill level is required for a Crochet Fruit Flower Pattern?
Most designs are wonderfully suited for confident beginners who already know basic stitches like single and double crochet, while offering enough creative flair to keep experienced makers inspired.
Can I turn this flat motif into a 3D keychain?
Yes, absolutely! Simply crochet two identical motifs, place a tiny bit of fiberfill between them, and sc them together around the outer edge while attaching a keyring.
How do I make the fruit seeds look realistic?
You can use black yarn for French knots during the center round, or add embroidered seed details with a tapestry needle after the motif is fully completed.
Watch the Full Step-by-Step Video Tutorial
Prefer visual guidance? Follow along with the complete video tutorial below at your own pace: