
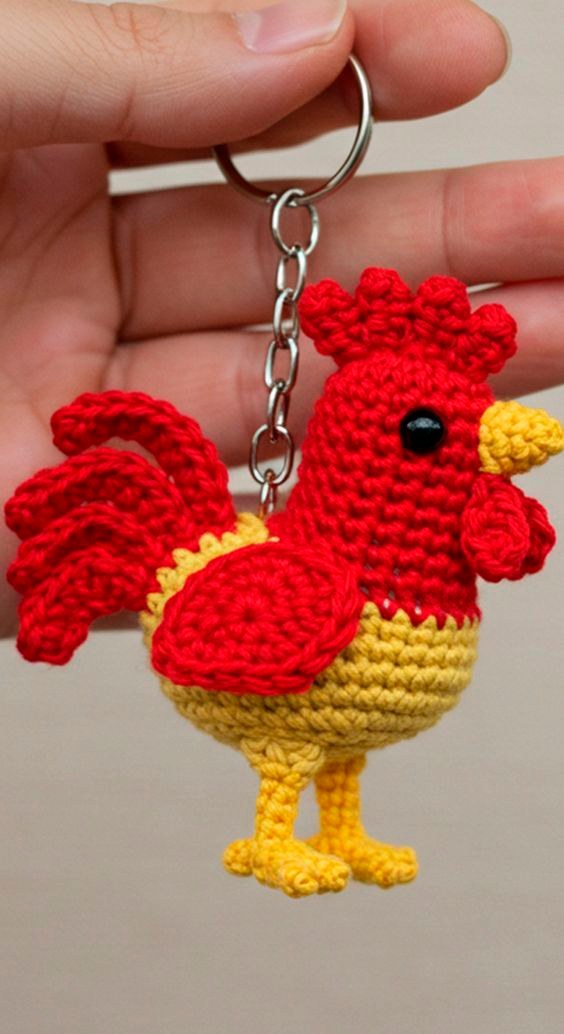
Overview & Inspiration
Welcome, fellow yarn enthusiasts! There is something endlessly joyful about turning a tiny scrap of leftover yarn into a vibrant, pocket-sized companion, and this charming rooster keychain is one of our absolute favorite quick-make projects.
Whether you are looking to brush up on your amigurumi skills, whip up a last-minute handmade gift, or add a splash of farmyard cheer to your everyday set of keys, this delightful little project offers the ultimate creative reward in a wonderfully compact package.
Materials & Supplies Needed
- Sport or DK weight cotton yarn (or acrylic yarn) in main body color, bright red for the comb, yellow/orange for the beak, and accent colors for the tail feathers
- 2.0 mm to 3.0 mm crochet hook (or size needed to keep stitches tight)
- Small amount of polyester fiberfill or stuffing
- Yarn needle / tapestry needle for assembly and weaving in ends
- Scissors
- Stitch markers
- Metal keyring or lobster clasp
Stitches & Abbreviations
- Rnd / Rnds: Round / Rounds
- St / Sts: Stitch / Stitches
- Ch: Chain
- Sl st: Slip stitch
- Sc: Single crochet
- Inc: Increase (work 2 sc in the same st)
- Dec: Decrease (work 2 sc together)
Step-by-Step Pattern Instructions
Let’s dive right into creating the main body of our rooster using continuous rounds. Grab your main body yarn and hook!
- Rnd 1: Start with a magic ring and work 6 sc into the ring [6 sts].
- Rnd 2: Work 2 sc in each st around [12 sts].
- Rnd 3: [Sc in next st, inc in next st] repeat around [18 sts].
- Rnds 4 to 7: Sc in each st around [18 sts].
- Rnd 8: [Sc in next st, dec in next st] repeat around [12 sts].
- Stuff the body firmly with fiberfill at this stage to maintain its rounded shape.
- Rnd 9: Work 6 dec around, fasten off leaving a long tail, and pull closed [6 sts].
Next, we will craft the iconic details that bring our rooster to life: the comb, beak, and tail feathers.
- Comb: Using bright red yarn, ch 4, start in the second ch from hook and work (sl st, ch 2, sl st) in each remaining chain to create the wavy crest, then fasten off.
- Beak: Using yellow or orange yarn, ch 3, work 1 sc in second ch from hook and 1 sl st in the last ch, then fasten off.
- Tail Feathers: Using contrasting or multicolored yarn, ch 6, work 2 sc in second ch from hook and down the length of the chain to create a curly feather effect.
Assembly & Finishing Touches
With all your charming little pieces crocheted and ready to go, it is time to assemble your rooster! Take your yarn needle and securely sew the bright red comb right along the top curve of the head.
Position the small yellow beak just below the comb on the front of the head and stitch it firmly in place. Next, attach your decorative tail feathers to the back of the body, ensuring all knots are tucked securely inside or trimmed neatly.
Finally, securely attach your metal keyring or lobster clasp to the very top of the rooster’s head, reinforcing the connection with a few extra passes of yarn so it holds up to daily use on your bags or keys.
Pro Tips for Flawless Results
- Maintain a firm and consistent yarn tension to ensure your stitches stay nice and tight, which prevents the polyester stuffing from peeking through.
- Choose mercerized cotton yarn if you want crisp, well-defined stitches and extra durability against everyday wear and tear.
- Play around with variegated yarn for the body or tail feathers to create a stunning, effortless color-gradient look without needing to weave in multiple yarn ends.
Frequently Asked Questions
Is the Crochet Rooster keychain Pattern suitable for beginners?
Yes, absolutely! The project relies primarily on basic amigurumi stitches like single crochet, increases, and simple shaping, making it a wonderful practice piece for newer crocheters.
How long does it take to complete a crochet rooster keychain?
Most makers can easily finish this delightful little project in just one to two hours, making it an ideal instant-gratification craft or quick gift idea.
Can I sell keychains made from this pattern?
Yes, many crafters love selling their handmade keychains at local markets or online shops. Just be sure to use your own photos and credit the design style where appropriate.
Watch the Full Step-by-Step Video Tutorial
Prefer visual guidance? Follow along with the complete video tutorial below at your own pace: