
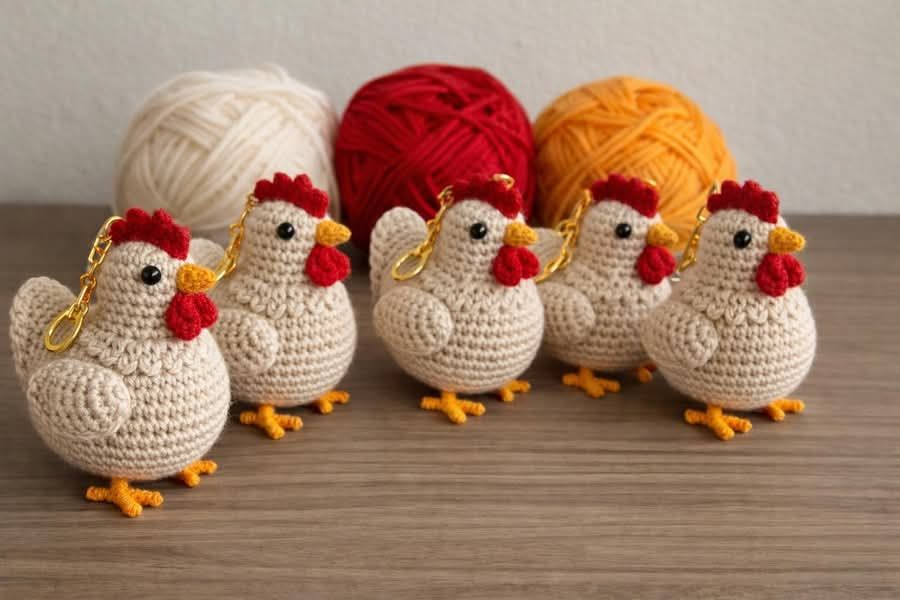
Overview & Inspiration
Welcome, my crafty friends! If you are looking for a quick, utterly adorable project that brings an instant smile to your face, you are going to fall completely in love with this Crochet Little Chicken Keychain Pattern.
Whether you are a beginner eager to master amigurumi basics or a seasoned crocheter seeking a relaxing weekend stash-buster, this charming little bird checks every single box. Not only are they wonderful for brightening up your own keys and bags, but they also make fantastic handmade gifts and top-sellers at craft fairs!
Materials & Supplies Needed
- Sport or DK weight cotton yarn in yellow (main color), plus tiny scraps of orange and red
- 2.5 mm crochet hook (US B/1 or C/2) to ensure tight, gap-free stitches
- Polyester fiberfill stuffing
- 6mm safety eyes or black embroidery floss
- Metal keychain ring with a short chain attachment
- Tapestry needle
- Stitch markers
- Scissors
Stitches & Abbreviations
- MR: Magic Ring
- ch: Chain
- sc: Single Crochet
- inc: Single Crochet Increase (work 2 sc in the same stitch)
- dec: Invisible Decrease (sc 2 stitches together in the front loops)
- sl st: Slip Stitch
- st(s): Stitch(es)
Step-by-Step Pattern Instructions
Chicken Body
Working in continuous rounds without joining, unless otherwise stated.
- Round 1: Start 6 sc in a MR. [6 sts]
- Round 2: Work [inc] around. [12 sts]
- Round 3: Work [sc 1, inc] around. [18 sts]
- Round 4: Work [sc 2, inc] around. [24 sts]
- Rounds 5 to 9: Sc in each st around. [24 sts]
- Round 10: Work [sc 2, dec] around. [18 sts]
- Insert safety eyes between Rounds 6 and 7, about 4 stitches apart, and begin stuffing the body firmly with fiberfill.
- Round 11: Work [sc 1, dec] around. [12 sts]
- Round 12: Work [dec] around to close. [6 sts]
- Fasten off, leaving a long tail to weave closed and attach the keychain hardware.
Wings (Make 2)
- Round 1: Start 5 sc in a MR, sl st to the first st to join. [5 sts]
- Fasten off, leaving a tail for sewing the wings to the sides of the body.
Beak
- Using orange yarn, ch 3, work 1 sc in the 2nd ch from hook, and 1 sl st in the last ch.
- Fasten off and secure to the center of the face right between the eyes.
Assembly & Finishing Touches
Thread your tapestry needle with the remaining body yarn tail and weave it through the front loops of the final round, pulling gently to close the top completely.
Securely sew the small wings to the left and right sides of the body, just below the eyes, ensuring your little chicken looks balanced and symmetrical.
Attach the metal keychain ring securely through the very top stitches of the head, reinforcing the stitches multiple times so it can handle daily use on your keys or backpack.
Pro Tips for Flawless Results
- Maintain a consistent, firm tension throughout your rounds to prevent the fiberfill stuffing from peeking through your stitches.
- Use cotton yarn rather than acrylic for keychains; cotton holds its crisp shape much better and resists pilling over time.
- Always use a stitch marker at the start of your continuous rounds to keep your stitch counts accurate and stress-free.
Frequently Asked Questions
What skill level is required for this pattern?
This pattern is wonderfully beginner-friendly! As long as you know how to work in the round, increase, and decrease using single crochet, you will have no trouble completing this project.
How long does it take to make one little chicken?
On average, this quick amigurumi takes between one to two hours to complete from start to finish, making it the ultimate instant-gratification craft.
Can I wash my crochet keychain if it gets dirty?
Yes, you can! We recommend gentle hand washing with mild soap. Avoid soaking the metal keychain hardware for prolonged periods to prevent any rust.
Watch the Full Step-by-Step Video Tutorial
Prefer visual guidance? Follow along with the complete video tutorial below at your own pace: